")
")

L'expédition avec Joomla 4 est la nouvelle CLI (interface de ligne de commande) améliorée qui se trouve au cœur de Joomla. Vous pouvez désormais effectuer des tâches de maintenance sans même vous connecter à votre site Web. Découvrons comment.
"Un Joomla pour tous", c'est une déclaration audacieuse. Mais, c'est vraiment vrai. D'une part, Joomla est un CMS convivial avec un panneau d'administration intuitif pour les débutants et les utilisateurs occasionnels. Tandis que, d'autre part, Joomla est une puissante application CMS qui regorge de fonctionnalités pour l'utilisateur avancé. Par conséquent, Joomla est parfaitement adapté à toutes les applications Web, d'un simple site Web d'entreprise de 5 pages à une solution de commerce électronique complexe pour une boutique en ligne très fréquentée.
En fait, si vous regardez dans le JED (Joomla Extension Directory), il y a une extension disponible pour presque tout ce que vous voudriez produire. S'il n'y a pas d'extension disponible pour votre site Web prévu, ne vous inquiétez pas. Il existe des extensions disponibles pour vous aider à créer votre propre extension Joomla personnalisée et unique.
Vous pouvez même partir de zéro et utiliser le cadre standard et bien structuré de Joomla pour créer votre propre extension. En cas de succès, vous pouvez ensuite l'ajouter au JED et laisser les autres utiliser votre extension.
A quel point ce serait cool?
L'une des façons dont Joomla, et en particulier Joomla 4, rend cela possible est la nouvelle CLI (interface de ligne de commande) améliorée qui est livrée avec le noyau Joomla 4.
Alors, jetons un coup d'œil à la CLI et découvrons à quoi vous pourriez l'utiliser.
Au fil des années et de l'amélioration de la technologie, Joomla facilite de plus en plus l'exécution de certaines tâches sans même avoir à se connecter au tableau de bord d'administration. Nous avons récemment parlé du planificateur de tâches de Joomla , qui vous permet de configurer des tâches Cron pour des tâches répétitives à partir de Joomla lui-même. Il existe également l'API Joomla, qui peut être utilisée pour contrôler Joomla à partir d'une source/d'un site Web distant. Il y a aussi la CLI de Joomla.
La CLI de Joomla est un moyen de se connecter à votre site Web Joomla et d'effectuer des tâches à partir d'un terminal distant, tel que SSH à partir du panneau de contrôle de votre hébergement de site Web.
Ceci est particulièrement utile et vous fait gagner du temps si vous exploitez plusieurs sites Web à partir du même compte d'hébergement.
Commençons par comprendre ce qu'est une interface de ligne de commande :
Qu'est-ce qu'une interface de ligne de commande ?
Une interface de ligne de commande (CLI) est une interface utilisateur (UI) utilisée pour exécuter des logiciels, gérer des fichiers informatiques et interagir avec un ordinateur/serveur. La CLI permet à l'utilisateur de répondre aux invites visuelles en tapant des commandes individuelles dans une interface, puis de recevoir des réponses de la même manière. L'invite de commande Windows est une interface de ligne de commande que vous connaissez déjà.
Users respond to the visual prompts by typing the command in a specified row and receiving the reply from the operating system. This software provides the prompt, users respond, and then an app reacts sequentially to commands. Through this command-and-response interaction, a user can issue a set of commands that are executed by a system or an application like Joomla.
The prompts and commands available depend on your operating system and the specific command-line interface, but there can be hundreds, if not thousands, of different commands executable. Many of the commands are the same between the different platforms out there, and you may well be familiar with some of them. However, there are some commands that are particular to the specific CLI and application you use.
You may already be familiar with various apps in which you can use a command-line interface. Common applications include the ‘Terminal’ on Macs, in windows it’s known as the ‘Command Prompt’, and on your website server in the Control Panel it’s referenced as SSH.
Entering text commands to control your app may seem daunting at first, but it’s a skill well used in Linux and other unix based operating systems. It’s also a skill that’s worth learning if you want to become a website developer. Once you become familiar with the terminology of using a CLI, there are other uses that you will come across as you hone your skills.
For Example:
Using Node.js to make a web app in an editing suite like Jet Brains Webstorm.
Or,
Running commands for your clients, on Amazon’s Elastic Compute Cloud (Amazon EC2) instances using a remote terminal program such as PuTTY or SSH.
However, there are GUI-based ‘shells’ available that are considered easier to use by beginners. Although, strictly speaking, the term shell is usually used to describe a command-line interpreter. A shell may be any program comprising the UI, including completely graphical-oriented ones.
Where is Joomla’s CLI?
Unlike many other Joomla extenstions which you can find in the admin area of your Joomla website, Joomla's Command-Line Interface is part of the core. So, there are no settings to fiddle with, it's just there and working quietly in the background of your Joomla website.
How Do I Use Joomla’s CLI?

First things first. Before you can access the Joomla CLI, you’ll need to create a way to connect directly to your website’s host without actually logging into your Joomla, or your Host’s Cpanel.
Cpanel recommends using a desktop application called ‘PuTTY’ if you run Windows on your computer, although if you run Windows 10, or later, it has its own Windows SSH Client which you can access from the Command Prompt.
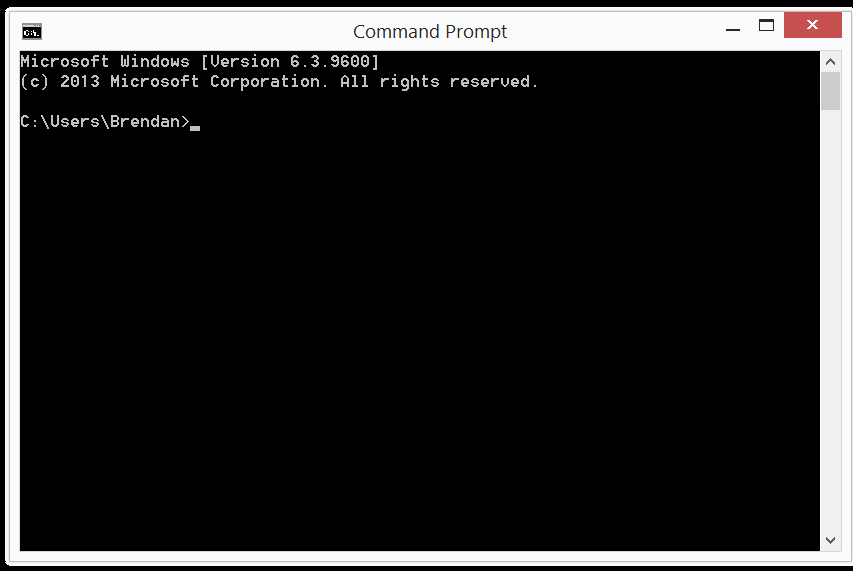
To access the Command Prompt, open the Run dialog box, by hitting the Windows key + r. Then, in the Run dialog box, type cmd and then click OK to open a command prompt window.
If you use Linux, or run a Mac, you may well already have software installed to connect directly to your website server. For the basis of this article I’ll assume you’re running Windows, as I am.
Each way of accessing your website server’s similar, but you’ll have to set up SSH access on your website hosting's Control Panel first before you can connect to Joomla’s CLI.
For this article I’ll be using ‘PuTTY’ as I’m on a Windows 8 machine, and there are several quirks I’ve had to solve along the way, so I’ll share some those with you as well to save you some time setting up SSH access to your website’s server.
So head on over to the ‘PuTTY’ download page and install ‘PuTTY’ on your machine if needed.
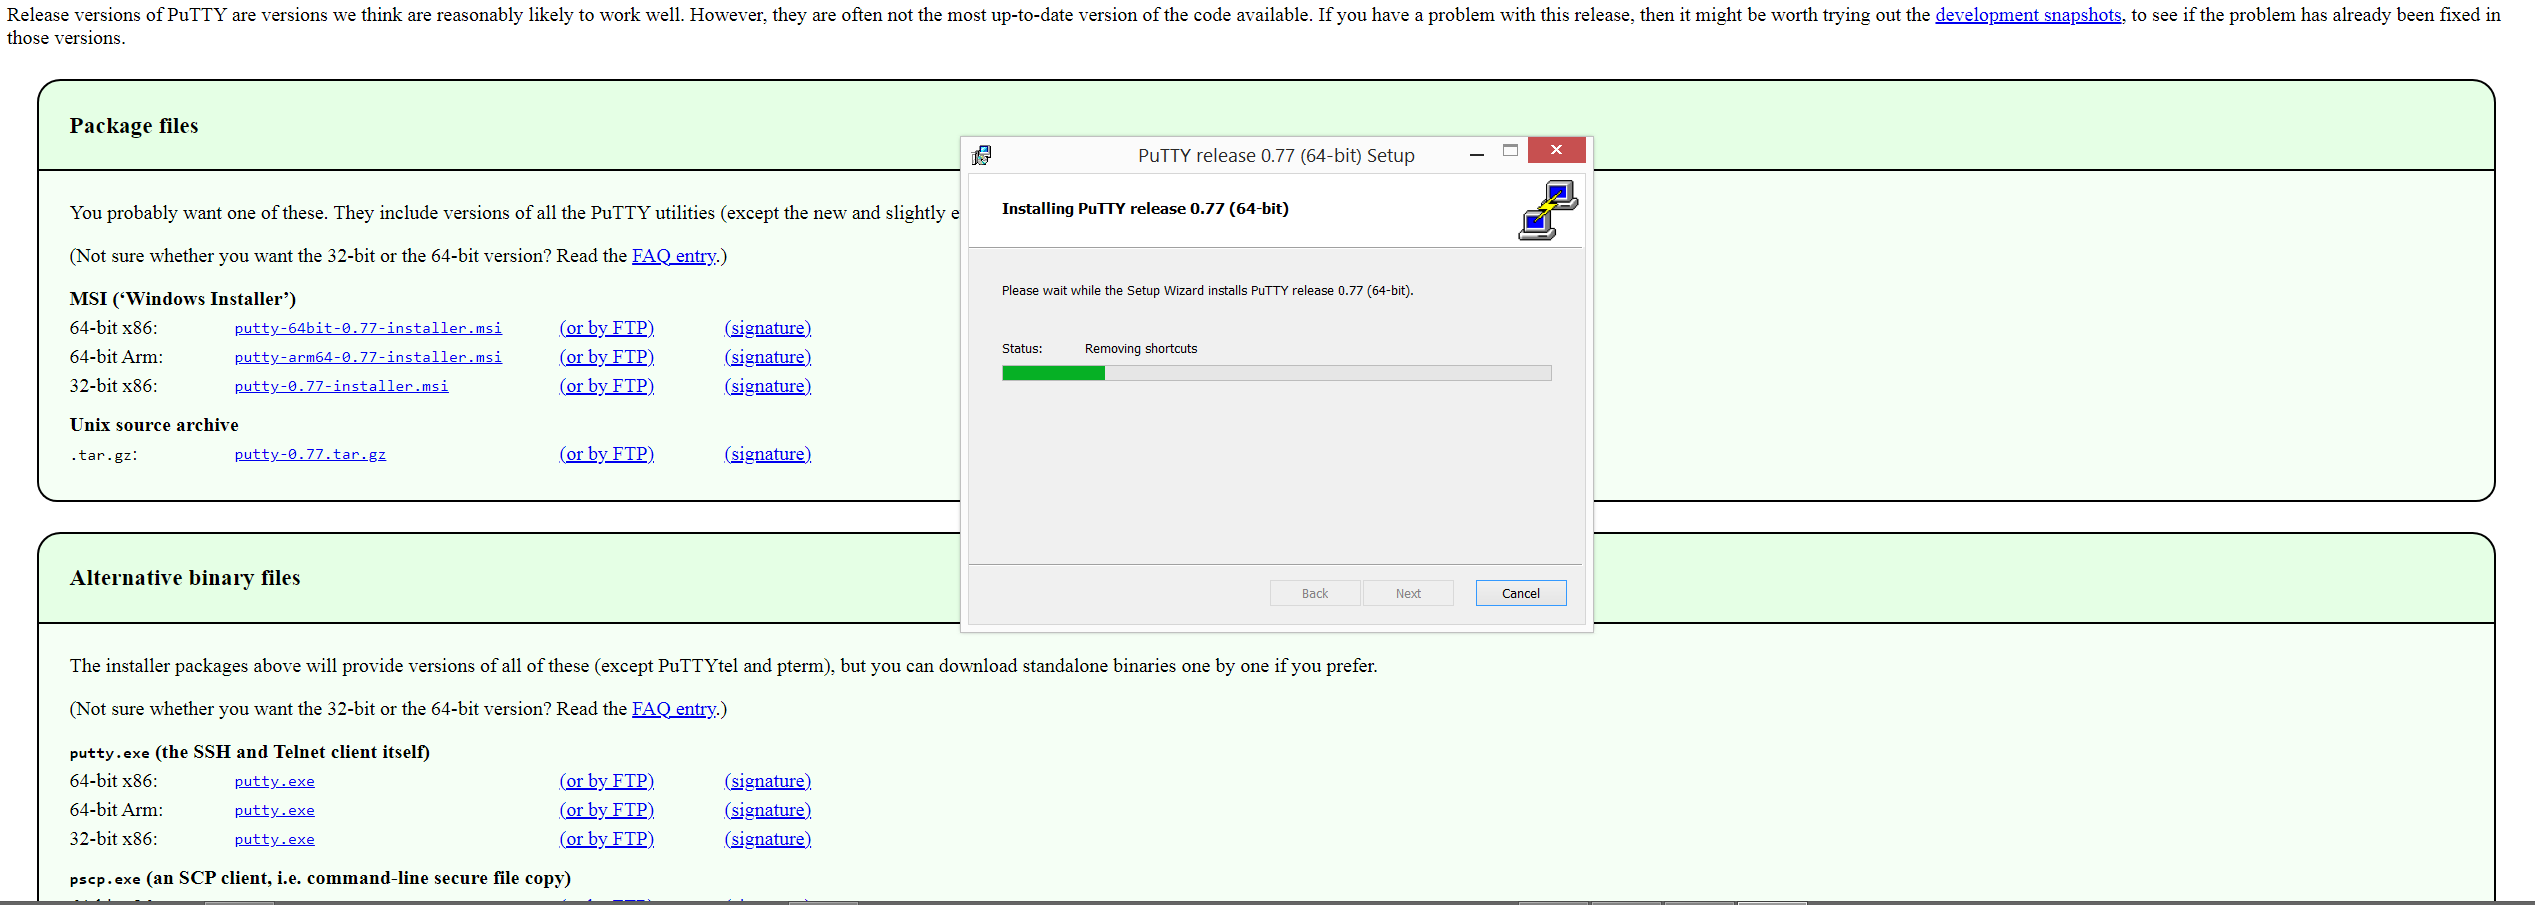
The next step is to activate SSH on your web hosting’s Cpanel, or other web hosting control panel, Plesk, for example. We’ll stick with Cpanel as it’s the most popular.
Set Up Your Access Keys
To use SSH, you’ll need to set up and manage a pair of public/private keys in Cpanel. The instructions seem complicated at first, but they’re really quite straightforward. There's a good article on the A2 Hosting website with lots of information for different operating systems. The instructions may differ slightly from host to host, so I’d encourage you to research this for your specific use case.

It’s also worth remembering that you’ll have to download your private key to your computer, so remember where you put it. If you use a native SSH client in Mac/Linux, or Windows 10, you should save the key file to:
Mac/Linux: /home/username/.ssh directory. (Replace username with your own username.)
Windows 10: \Users\username\.ssh directory (Replace username with your own username.)
This is so your terminal program knows where to find your key.
If you use ‘PuTTY’ then just remember where it’s downloaded as you’ll need to reference it in ‘PuTTY’s’ settings.
Set Up PuTTY TO Access Your Server
If you installed ‘PuTTY’ already, find the desktop icon and open the program. If not, install it now. The desktop icon to open PuTTY looks like this:
![]()
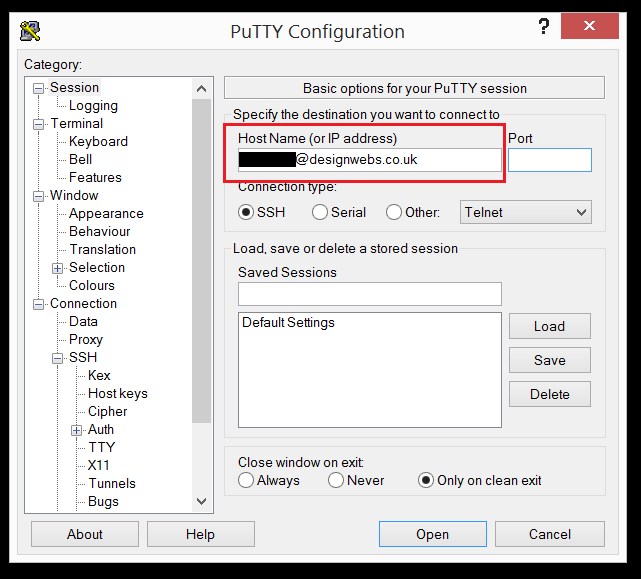
Setting up PuTTY to access your server isn't difficult, there are only 3 things you need to enter. These may vary slightly depending on your website host, so you’ll have to check this for your own circumstance. In my case, I need to do the following:
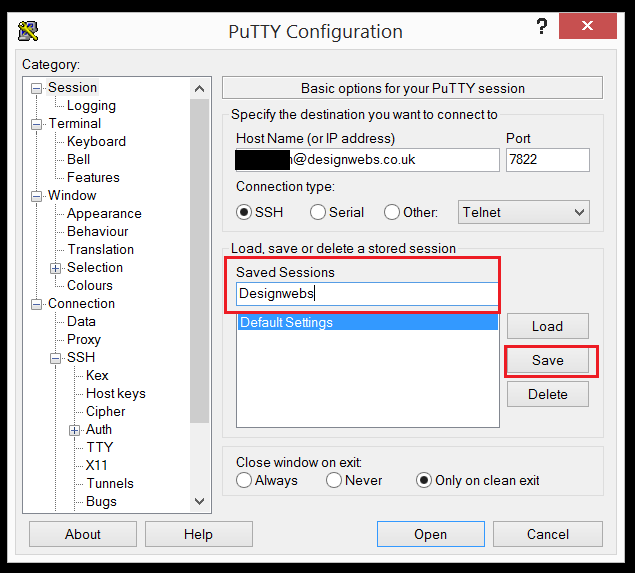
- Enter the username for my hosting account along with the domain I want access to. This needs to be written in the ‘Host Name (or IP Address)’ field in the ‘Session’ category tab.
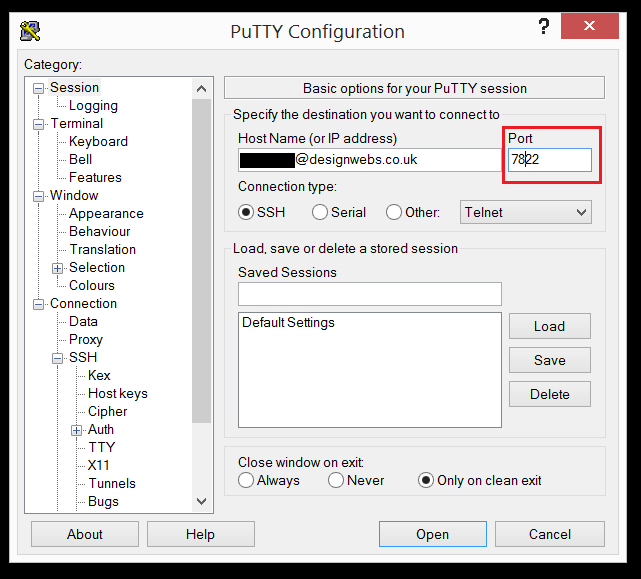
- Next, in the ‘Port’ field, type in your SSH connection port number. The default is 22, but many hosts change this to boost connection security. Mine is 7822.
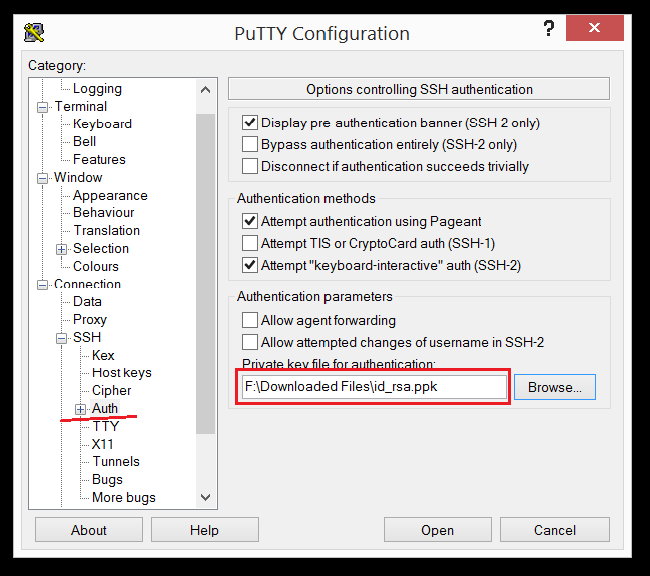
- Now, you need to open a new tab in the category tree, scroll down to ‘SSH’, then open ‘Auth’. At the bottom of the tab, browse to the location you saved your downloaded SSH Private Key to, highlight it, and click ‘Open’.
- Go back to your Session tab and in the ‘Saved Sessions’ field add a memorable name to it. Then click the ‘Save’ button.
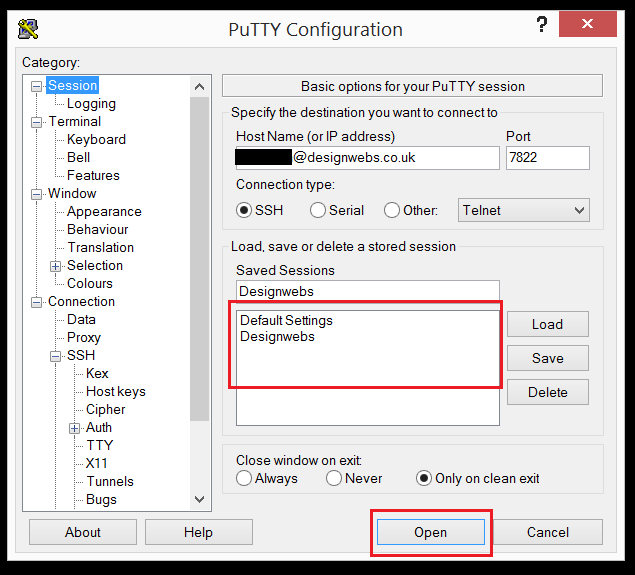
- You’re now ready to connect to your website hosting’s SSH Client with ‘PuTTY’. You can either double click on your saved memorable name, or click the open button.
If all’s gone according to plan, you should now see PuTTY’s terminal window. It should look something like this:
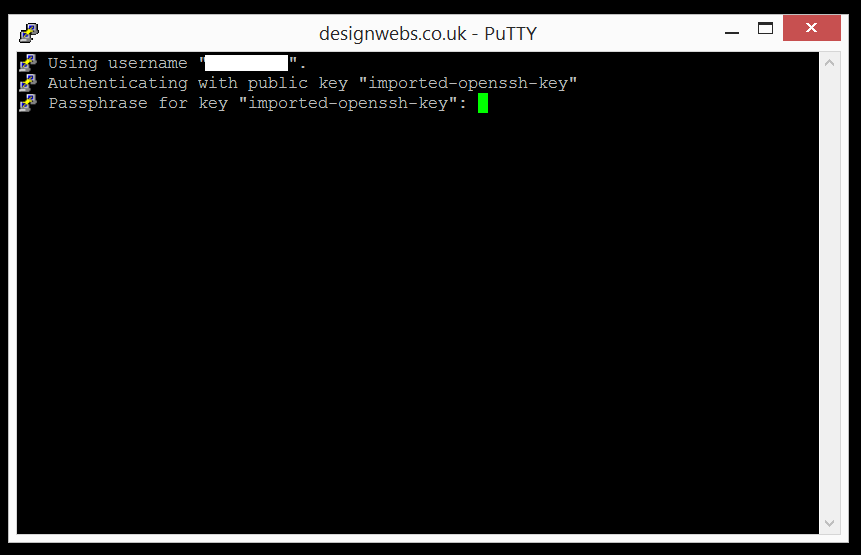
The terminal window should look similar from this point onwards, regardless of the operating system or SSH client you use. The commands you issue will also be the same. So, I’ll move forward just referring to the ‘Terminal’.
The next step is to enter the password you created when you set up the public/private keys in Cpanel. If you don’t do this within a set period of time, your website server will close the connection to your terminal and you’ll receive an error message like this:

Voici l'une des bizarreries de l'utilisation d'un terminal pour se connecter au serveur de votre site Web. Lors de la saisie de votre mot de passe, rien ne s'affiche ! Pas d'étoiles, pas de tirets, rien. J'ai également remarqué que je ne pouvais pas non plus copier coller mon mot de passe dans la fenêtre du terminal (bien que cela puisse être particulier à 'PuTTY').
Je suis un partisan des mots de passe forts super longs, mais cela pourrait être une exception aux règles ! Bien que je vous conseille toujours de suivre les conseils de votre Cpanel quant à la force du mot de passe créé. Comme mentionné dans les articles précédents, john123 n'est pas assez bon. En fonction de vos clés SSH, de votre système d'exploitation et de votre instance Cpanel, il se peut que vous n'ayez à saisir votre mot de passe que pour la connexion initiale. Mais les sessions suivantes ne vous demanderont pas votre mot de passe. Ce qui peut vous concerner ou non.
Utiliser votre terminal pour accéder à la CLI de Joomla
Alors, allez-y et tapez votre mot de passe et, lorsque vous avez terminé, cliquez sur "Entrée" sur votre clavier.
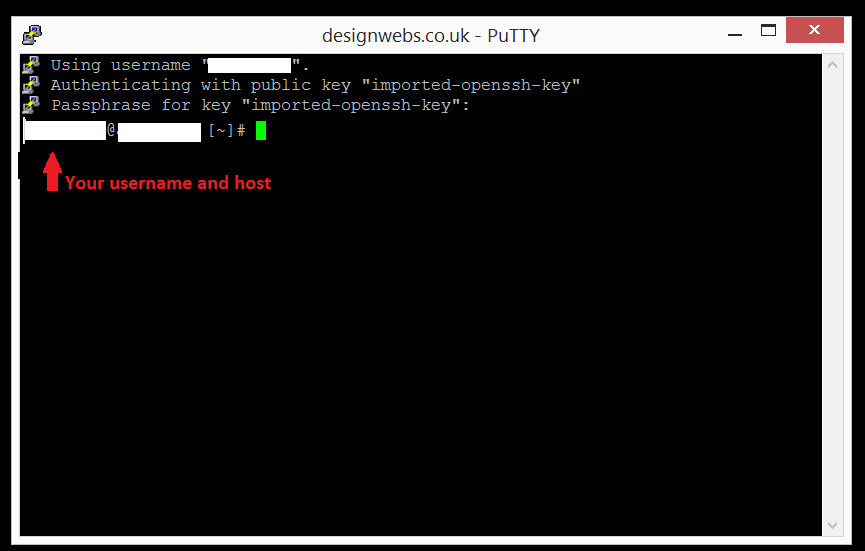
If all’s gone well, you should see a new line of information that looks like:
username@123host [~] #
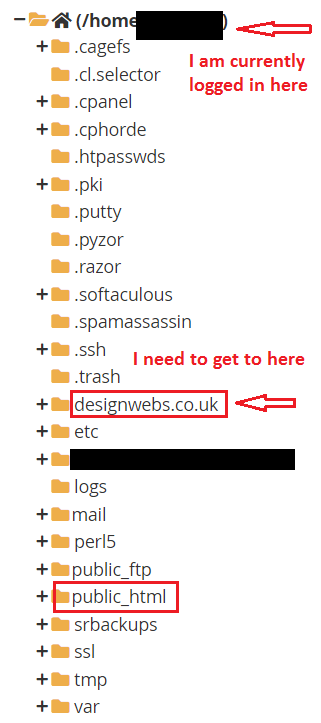
This is the root directory for your website files. Depending on your website hosting package, this will probably be in your ‘public_html’ folder.
If you’ve installed Joomla to a different directory, you’ll need to navigate to that directory next. This is also true if you run more than one instance of Joomla on the same hosting package.
It’s time to dust off your old DOS handbook!
In my example, my domain designwebs.co.uk is in a folder that’s outside on my public_html folder like so:
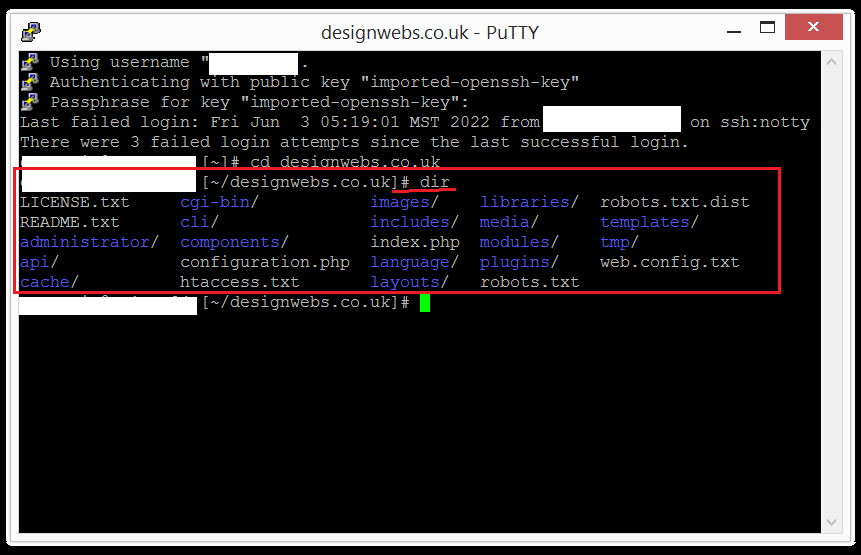
If you remember your DOS commands, you can simply type cd [your folder name here], so in my example cd desighwebs.co.uk where the cursor is flashing in your terminal window. CD is short-code and simply means “Change Directory”.
I’m now in the correct directory in which to operate the Joomla CLI. If you want to check you're in the same directory as Joomla, you can simply type ‘dir’ (which is short for 'directory') at the prompt and all the familier Joomla files and folders in that directory will be listed. Like so:
Let’s use Joomla’s CLI
It seems to have taken a long time to get to this point, but it shouldn’t take too long once you’ve mastered the use of your terminal window or an SSH client like ‘PuTTY’. The whole point of the Joomla CLI is to speed up tasks, especially those that involve waiting for those tasks to complete. Backing up your website is a good example of using Joomla’s CLI. We’ll get into that later.
So, let’s make our first call to Joomla’s CLI and make sure we’re connected and everything’s working as expected.
The standard format to connect to Joomla’s CLI begins with:
php cli/joomla.php
Although if you enter the cli directory (cd my-website-folder-name/cli), rather than working from Joomla’s root directory, you can use:
php joomla.php
Instead.
The Updated Joomla CLI documentation gives more information about the tasks you can complete using the Joomla CLI.
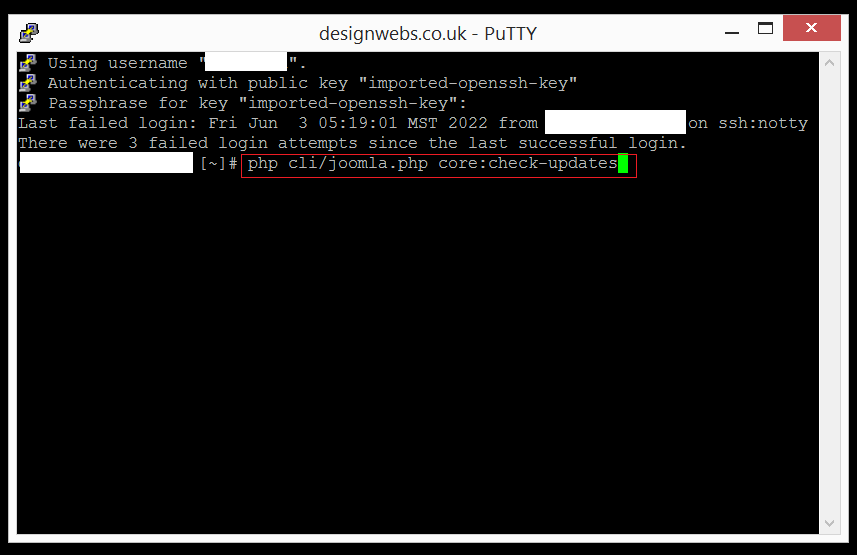
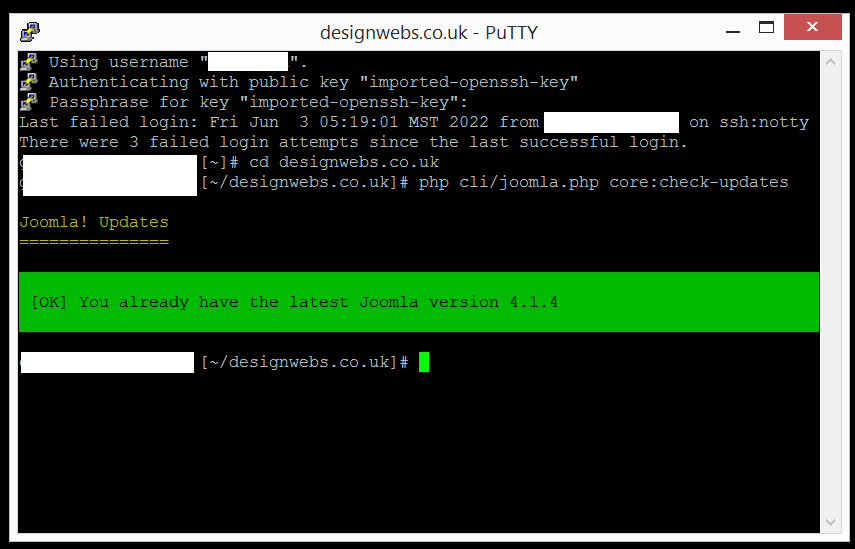
A good task to test our connection would be to find out what version of Joomla the website is running on.
So, at the command prompt, type in:
php cli/joomla.php core:check-updates
And hit enter.
PuTTY Note:
If you copy a Joomla CLI command with your copy/paste function, all you need to do to paste it into PuTTY’s terminal is a single right mouse click as the cursor.
If you’re connected, and everything’s working, you’ll be rewarded with a message detailing the version of Joomla that your website is running on.
Joomla Command-Line Interface (CLI) Format
When you enter commands in your terminal to access Joomla’s CLI, there is a set format.
Which may comprise 2 or more parts, depending on what you want to do, and how much information you require back.
Each Joomla component developer will be able to offer varying amounts of control and data retrieval for their software based on Joomla’s CLI. An early adopter of this Joomla functionality is Akeeba, so using Akeeba Backup as an example, you can control almost all functionality from your terminal.
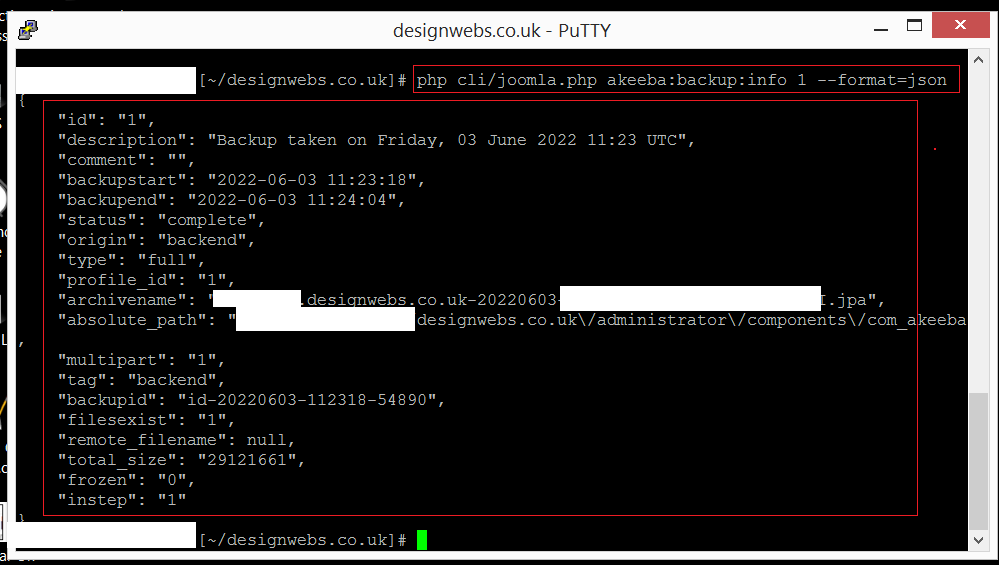
The following CLI command asks for the backup data held for a specific backup:
php cli/joomla.php akeeba:backup:info 1 --format=json
So, let’s break it down, so it means something.
|
php cli/joomla.php |
The URL needed to activate Joomla’s CLI |
|
akeeba |
A unique name for the command |
|
backup |
The particular software |
|
info |
The action you’d like to complete |
|
1 |
An argument for the command (if required) |
|
--format=json |
An option, or two. In this case the output of our CLI command will be in a Json format. |
Make sure to take note of the spaces and colons in the command so that it functions properly.
Joomla’s CLI commands follow a similar principle of arguments and options, but as they are ‘core’ commands, they are a little simpler.
Currently, Joomla’s CLI commands fall into 11 categories
Cache, Config, Core, Database, Extension, Finder, Scheduler, Session, Site, Update and User.
Each having their own functions.
For Example:
php cli/joomla.php core:check-updates Checks for Joomla updates
php cli/joomla.php site:down Put the site into offline mode
Adding options to the parameters of the CLI command can help to narrow down your results. For example, if you want to find what extensions they used to build your website, you would use the command:
php cli/joomla.php extension:list
But, if you only wanted to find specific extensions of a certain type, related to languages, for example, you would use the same command but add the option --type=language:
php cli/joomla.php extension:list --type=language
Which would return the following information:
Installed extensions.
=====================
----------------- -------------- --------- ---------- --------
Name Extension ID Version Type Active
----------------- -------------- --------- ---------- --------
English (en-GB) 222 4.1.4 language Yes
English (en-GB) 223 4.1.4 language Yes
English (en-GB) 224 4.1.4 language Yes
----------------- -------------- --------- ---------- --------
Tip:
If you type in php cli/joomla.php at the command prompt in your terminal, you will get a list of all Joomla CLI commands and descriptions.
Let’s Start Using Joomla’s CLI
We’re going to run 4 basic maintenance tasks that you should complete regularly on our Joomla website. All from a terminal, without logging into Joomla’s back-end admin. We’re going to use 4 simple CLI commands to accomplish these tasks.
First, we need to gather the commands we will use. You can find current Joomla CLI commands in the Cheat Sheet below. As Akeeba Backup is the most widely used Joomla Backup extension, we will use that to take a backup.
The CLI commands we need are:
php cli/joomla.php update:extensions:check
php cli/joomla.php akeeba:backup:take
php cli/joomla.php extension:discover:install
php cli/joomla.php cache:clean
If you’re not already, login to your terminal of choice and make sure that you’re in Joomla’s root directory.
Task One: Check for extension updates
Enter php cli/joomla.php update:extensions:check at your terminal command prompt.
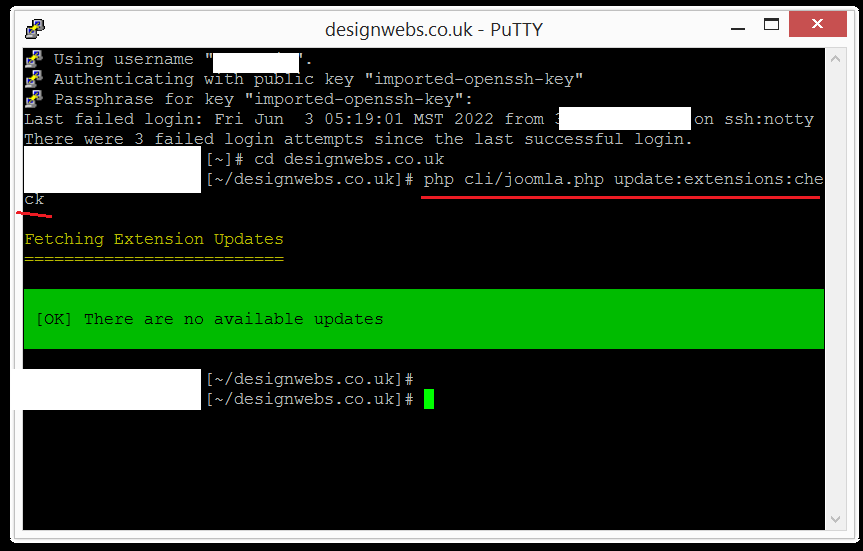
In my case, no updates were available to install. The success message is shown in green. I’d say the time taken for this command to execute was less than 3 seconds.
Task Two: Take a backup
It’s now time to take a backup with Akeeba Backup. Enter php cli/joomla.php akeeba:backup:take at your terminal command prompt.
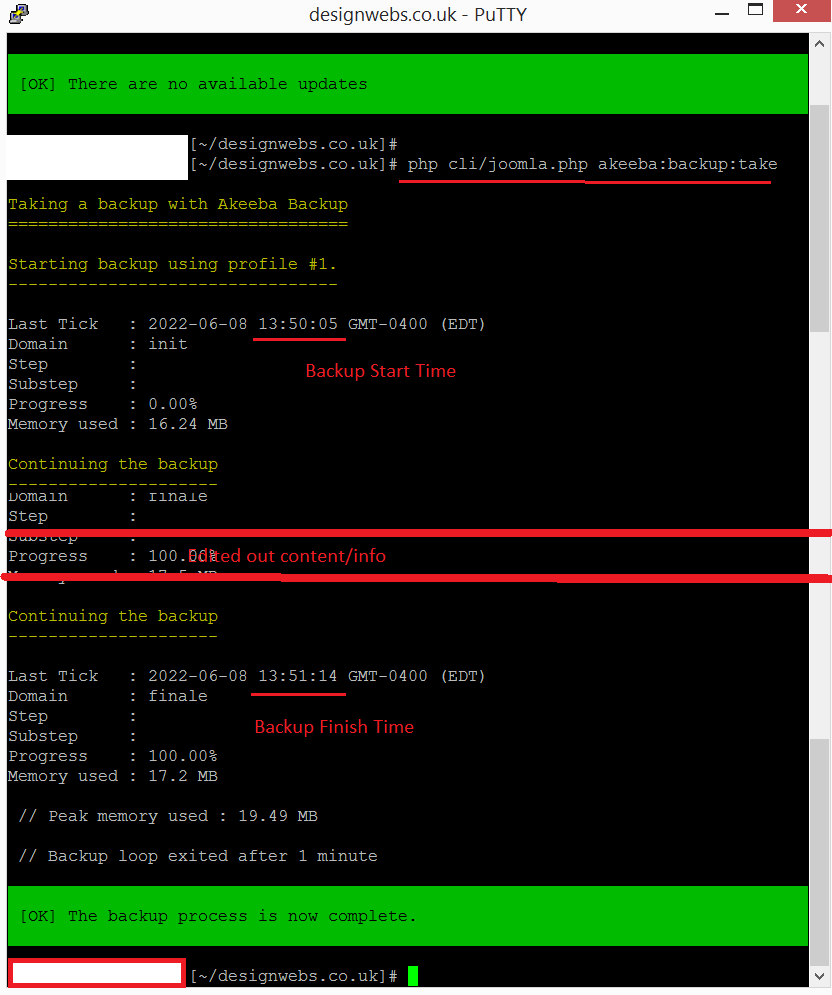
Taking a backup obviously takes a little longer. During the backup process, the progress is detailed in the terminal window in much the same way as you see in Joomla’s admin backend.
The success of the backup is shown in green. From the timestamps, you can see that it only took 1 minute 10 seconds to complete. Which is pretty good.
Task Three: Install extension update
It’s time now to install any extension updates. Enter php cli/joomla.php extension:discover:install at the terminal command prompt.
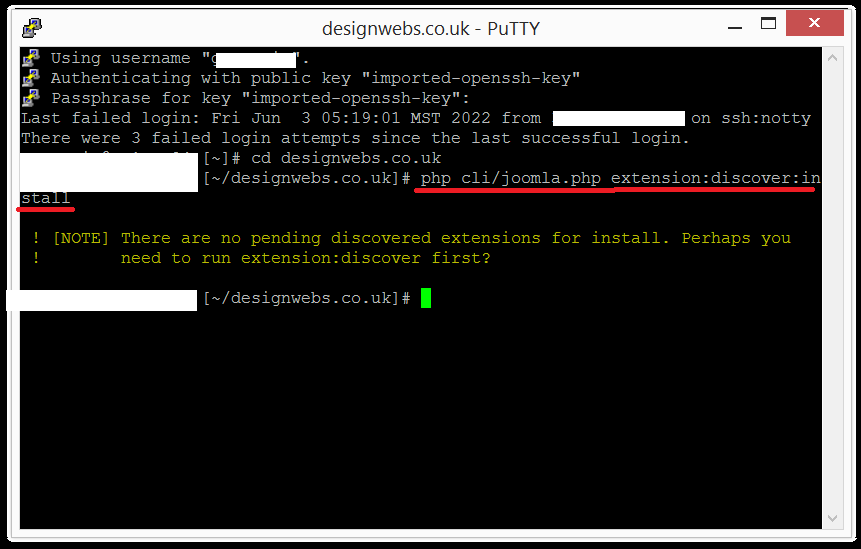
In my case, everything is up to date, so nothing to install. If this is the case, the CLI gives advice on what you could do instead. In this instance, the Joomla CLI suggested it try to run the command extension:discover. This works in the same way as running the ‘install > discover’ option from your System Dashboard.
Task Four: Clear Joomla’s Cache
Lastly, we will clean up Joomla’s cache. Enter php cli/joomla.php cache:clean at your terminal’s command prompt.
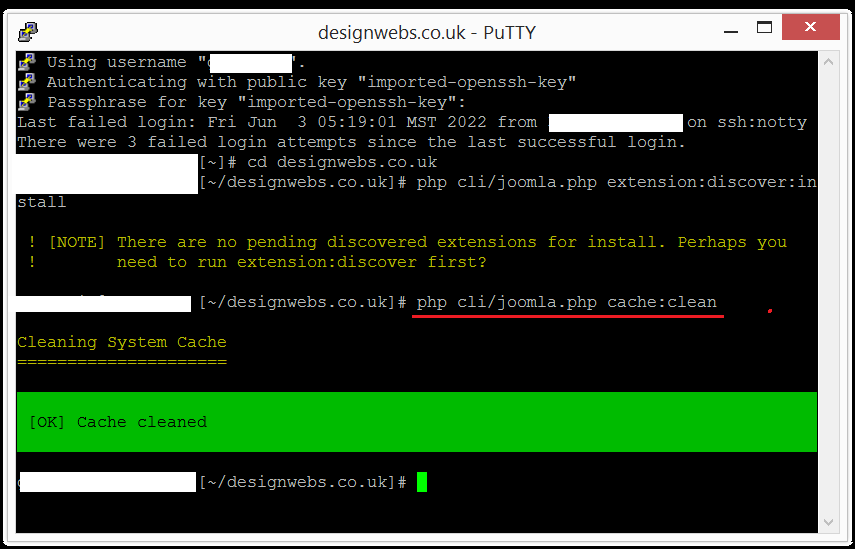
Once the cache’s been emptied of its junk, you’ll again see a green success message.
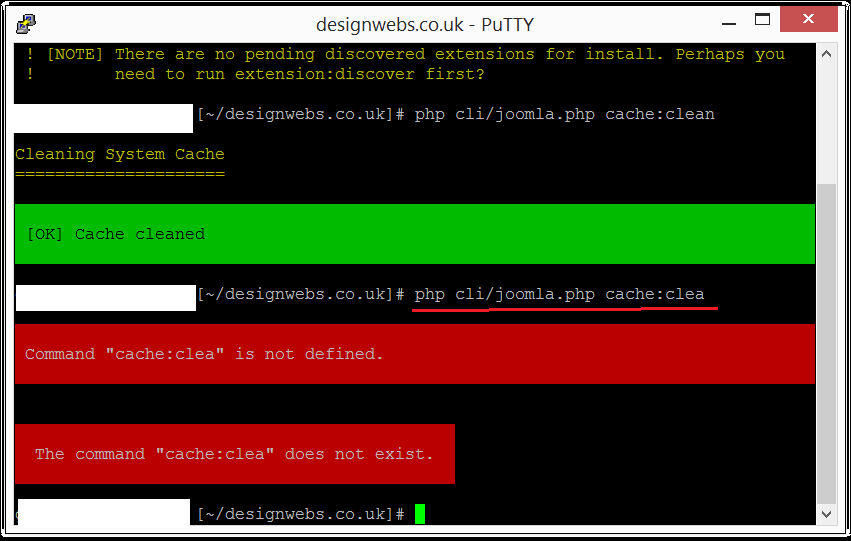
Error Messages
If you make a typo while entering your CLI command, or enter an unrecognised command, you will receive an error message in red. The message will contain a little useful information to help you work out what went wrong. You can see in the image below it says:
Command “cache:clea” is not defined
The command “cache:clea” does not exist
Of course, my typo referencing ‘cache:clea’ doesn’t exist in the Joomla CLI, therefore it’s not defined in an action to carry out. Thus it throws an error.
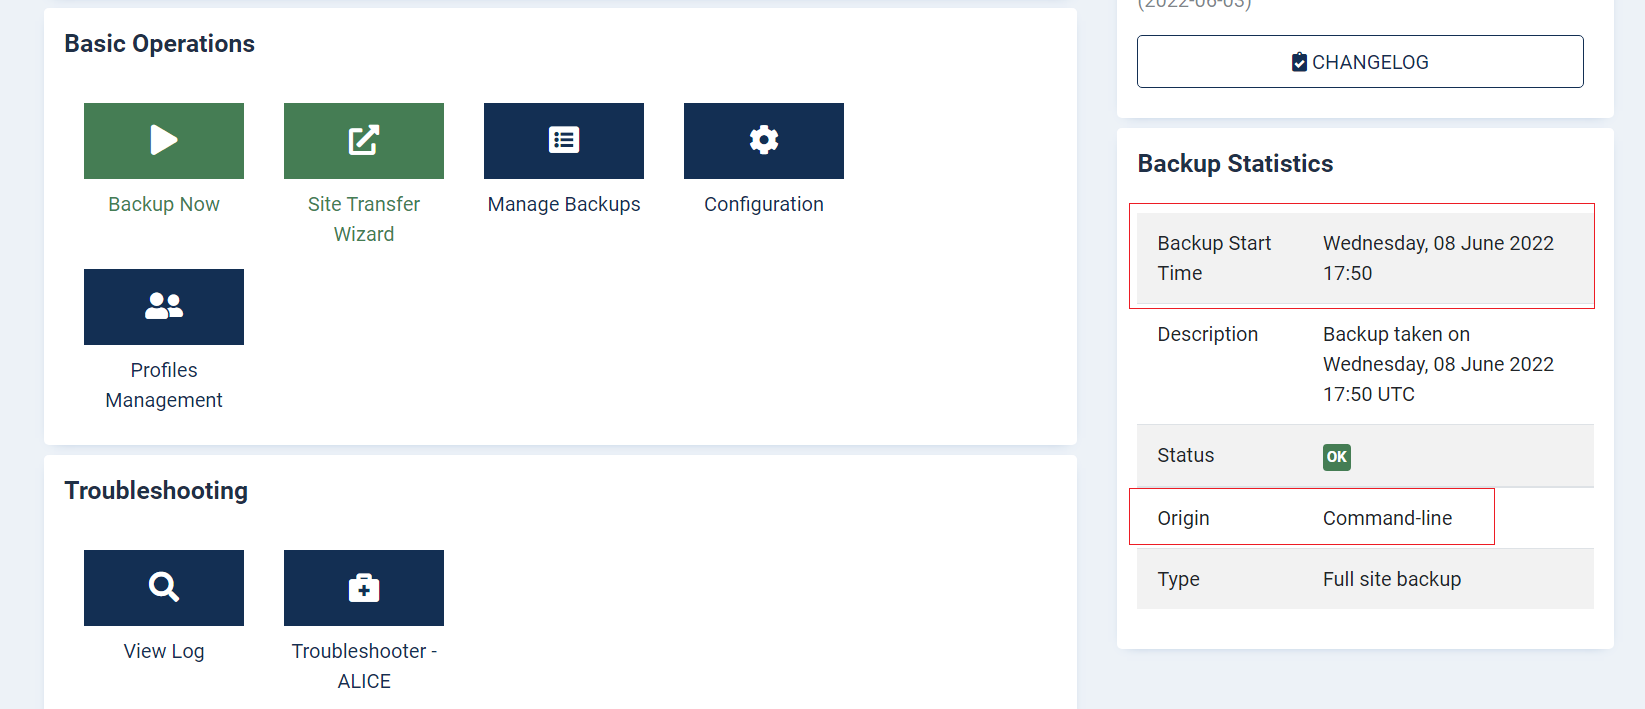
Check Akeeba Backup in Admin
It’s not always going to be possible to check whether a CLI command was actually initiated, without some digging in Joomla’s files and settings. But, some extensions make it easy. Let’s look at Akeeba Backup again. If you login to your Joomla admin panel and navigate to Akeeba Backup’s Control Panel, you will see the ‘Backup Statistics’ panel on the right-hand side. Here you can see that the last backup was initiated from the Command Line. It also gives details about the backup taken and the time it was taken.
What Are The Benefits Of Using Joomla’s CLI?
Like many topics discussed here in the Joomla magazine, there’s a lot more going on under the hood than there’s time or space to detail here. As with many topics, the ‘surface has just been scratched’ on this updated Joomla 4 feature.
I think the single biggest benefit of getting to grips with the Joomla Command-Line Interface is how quick it is to carry out those necessary tasks. From start to finish the four tasks detailed above took around 2 minutes, and that included starting up the ‘Putty’ terminal, connecting to my server via SSH, manually typing in the login password and copy/pasting each of the four commands, in turn.
If you multiply doing those same tasks over several websites, that would be a lot of time saved.
For advanced users, the command line and terminal give you the opportunity to automate repetitive tasks over multiple websites you have full access to. You can cycle through their directories and execute the same Joomla CLI command against them, quickly and easily.
Imagine the time it would take to manually login to Joomla’s admin and run Akeeba Backup individually over 100 different websites in your portfolio?
“ That’s the whole point of a command line application. It is very conducive to infinite customisation. Combined with something like Ansible it can even be used to execute commands across a fleet of hundreds of servers running thousands of sites.
Command-line tools work together to give you superpowers. “
Quote: Nicholas @ Akeeba
Personally, now I’ve set up ‘PuTTY’ I’m going to add SSH access to all of my websites and run those updates, backups and cache cleans every time I receive one of those ‘This is sent from your website’ update emails that clog up my inbox. I think it’s worth investing the time initially to create the SSH access keys and setting up a terminal. I may even take the time to write a batch command to cycle through each website in turn!
Let me know in the comments how you’ll use Joomla’s CLI
Joomla CLI Cheat Sheet
php cli/joomla.php (+ a command)
| Cache | |
| cache:clean | Clean expired cache entries |
| Config | |
| config:get | Display the current value of a configuration option |
| config:set | Set a value for a configuration option |
| Core | |
| core:check-updates | Check for Joomla updates |
| core:update | Update Joomla |
| Database | |
| database:export | database:export |
| database:import | Import the database |
| Extension | |
| extension:discover | Discover extensions |
| extension:discover:install | Install discovered extensions |
| extension:discover:list | List discovered extensions |
| extension:install | Install an extension from a URL or from a path |
| extension:list | List installed extensions |
| extension:remove | Remove an extension |
| Finder | |
| finder:index | Purges and rebuild the index |
| Scheduler | |
| scheduler:list | List all scheduled tasks |
| scheduler:run | Run one or more scheduled tasks |
| scheduler:state | Enable, disable or trash a scheduled task |
| Session | |
| session:gc | Perform session garbage collection |
| session:metadata:gc | Perform session metadata garbage collection |
| Site | |
| site:down | Put the site into offline mode |
| site:up | Put the site into online mode |
| Update | |
| update:extensions:check | Check for pending extension updates |
| update:joomla:remove-old-files | Remove old system files |
| User | |
| user:add | Add a user |
| user:addtogroup | Add a user to a group |
| user:delete | Delete a user |
| user:list | List all users |
| user:removefromgroup | Remove a user from a group |
| user:reset-password | Change a user's password |
Akeeba Backup CLI Cheat Sheet
php cli/joomla.php (+ a command)
| akeeba:backup:alternate | Take a backup with Akeeba Backup's frontend backup feature |
| akeeba:backup:alternate_check | Check for failed Akeeba Backup backups with its front-end feature |
| akeeba:backup:check | Check for failed Akeeba Backup backup attempts |
| akeeba:backup:delete | Deletes a backup record known to Akeeba Backup, or just its files |
| akeeba:sauvegarde:télécharger | Renvoie une partie d'archive de sauvegarde pour un enregistrement de sauvegarde connu d'Akeeba Backup |
| akeeba:sauvegarde:récupérer | Télécharger une sauvegarde du stockage distant vers le serveur |
| akeeba:sauvegarde:info | Répertorie un enregistrement de sauvegarde connu d'Akeeba Backup |
| akeeba:sauvegarde:liste | Répertorie les enregistrements de sauvegarde connus d'Akeeba Backup |
| akeeba:sauvegarde:modifier | Modifie un enregistrement de sauvegarde connu d'Akeeba Backup |
| akeeba:sauvegarde:prendre | Faites une sauvegarde avec Akeeba Backup |
| akeeba:sauvegarde:upload | Réessayez de télécharger une sauvegarde sur le stockage distant |
| akeeba:filter:supprimer | Supprimer une valeur de filtre connue d'Akeeba Backup |
| akeeba:filtre:exclure | Définir un filtre d'exclusion sur Akeeba Backup |
| akeeba:filter:include-database | Ajoute une base de données supplémentaire à sauvegarder par Akeeba Backup |
| akeeba:filter:include-directory | Ajouter un répertoire hors site supplémentaire à sauvegarder par Akeeba Backup |
| akeeba:filtre:liste | Obtenir les valeurs de filtre connues d'Akeeba Backup |
| akeeba:log:obtenir | Récupérer un fichier journal connu d'Akeeba Backup |
| akeeba:journal:liste | Liste les fichiers journaux connus d'Akeeba Backup |
| akeeba : migrer | Migre les paramètres d'Akeeba Backup 8 |
| akeeba:option:obtenir | Obtient la valeur d'une option de configuration pour un profil Akeeba Backup |
| akeeba:option:liste | Répertorie les options de configuration d'un profil Akeeba Backup, y compris leur titre |
| akeeba:option:définir | Définit la valeur d'une option de configuration pour un profil Akeeba Backup |
| akeeba:profil:copie | Crée une copie d'un profil Akeeba Backup |
| akeeba:profil:créer | Crée un nouveau profil Akeeba Backup |
| akeeba:profil:supprimer | Supprimer un profil Akeeba Backup |
| akeeba:profil:exporter | Exporte un profil Akeeba Backup sous forme de chaîne JSON |
| akeeba:profil:importer | Importe un profil Akeeba Backup à partir d'une chaîne JSON |
| akeeba:profil:liste | Liste les profils de sauvegarde d'Akeeba Backup |
| akeeba:profil:modifier | Modifie un profil Akeeba Backup |
| akeeba:profil:réinitialiser | Réinitialise un profil Akeeba Backup |
| akeeba:sysconfig:obtenir | Obtient la valeur d'une option à l'échelle du composant Akeeba Backup |
| akeeba:sysconfig:list | Répertorie les options à l'échelle du composant Akeeba Backup |
| akeeba:sysconfig:set | Définit la valeur d'une option à l'échelle du composant Akeeba Backup |
Lectures complémentaires
https://docs.cpanel.net/cpanel/security/ssh-access/
https://www.chiark.greenend.org.uk/~sgtatham/putty/latest.html
https://www.a2hosting.com/kb/cpanel/cpanel-security-features/configuring-ssh-keys-with-cpanel
https://www.digitalcitizen.life/command-prompt-how-use-basic-commands/
https://docs.joomla.org/J4.x:CLI_Update
https://docs.joomla.org/J4.x:CLI_Database_Exporter_Importer
https://docs.joomla.org/J4.x:Writing_A_CLI_Application
https://symfony.com/doc/current/console/style.html
https://www.chiark.greenend.org.uk/~sgtatham/putty/latest.html
https://www.akeeba.com/documentation/akeeba-backup-joomla/akeeba-backup-cli.html
