")
")
Part1.: Joomla 4 for Clients, Part 1: Managing Users, Access, & Permissions
Joomla 4 is here, and with it comes a completely revamped administration panel. We now have the ability to totally control our clients' editing experience, above and beyond what we could do with Joomla 3. In this post, we're going to cover setting up client editor profiles, creating a custom admin menu, and creating custom dashboard pages from scratch.
This post assumes you have already set up the appropriate user group and view access levels for your use case. If you're not sure or haven't done so yet, head on over to Part 1 of this series. You'll learn how to add a custom user group and view access level for your clients so you can precisely control what they see.
Jump to:
- Creating a simplified editor profile
- Custom administrator menus and menu items
- Creating (and using!) new dashboard pages
Creating a simplified editor profile
TInyMCE, the default Joomla editor, has gotten even better in Joomla 4. The default tool set for it, which is assigned to Super Users by default, has a ton of icons, and can be overwhelming for our clients. (To be honest, sometimes it overwhelms me, too!)
A lot of people don't realize that TinyMCE supports different tool sets for different user groups, which will make the editing experience a much calmer one for our clients!
From the home dashboard, click on the "Plugins" quick icon.
You can also go to System > Manage > Plugins, but the quick icon is faster.
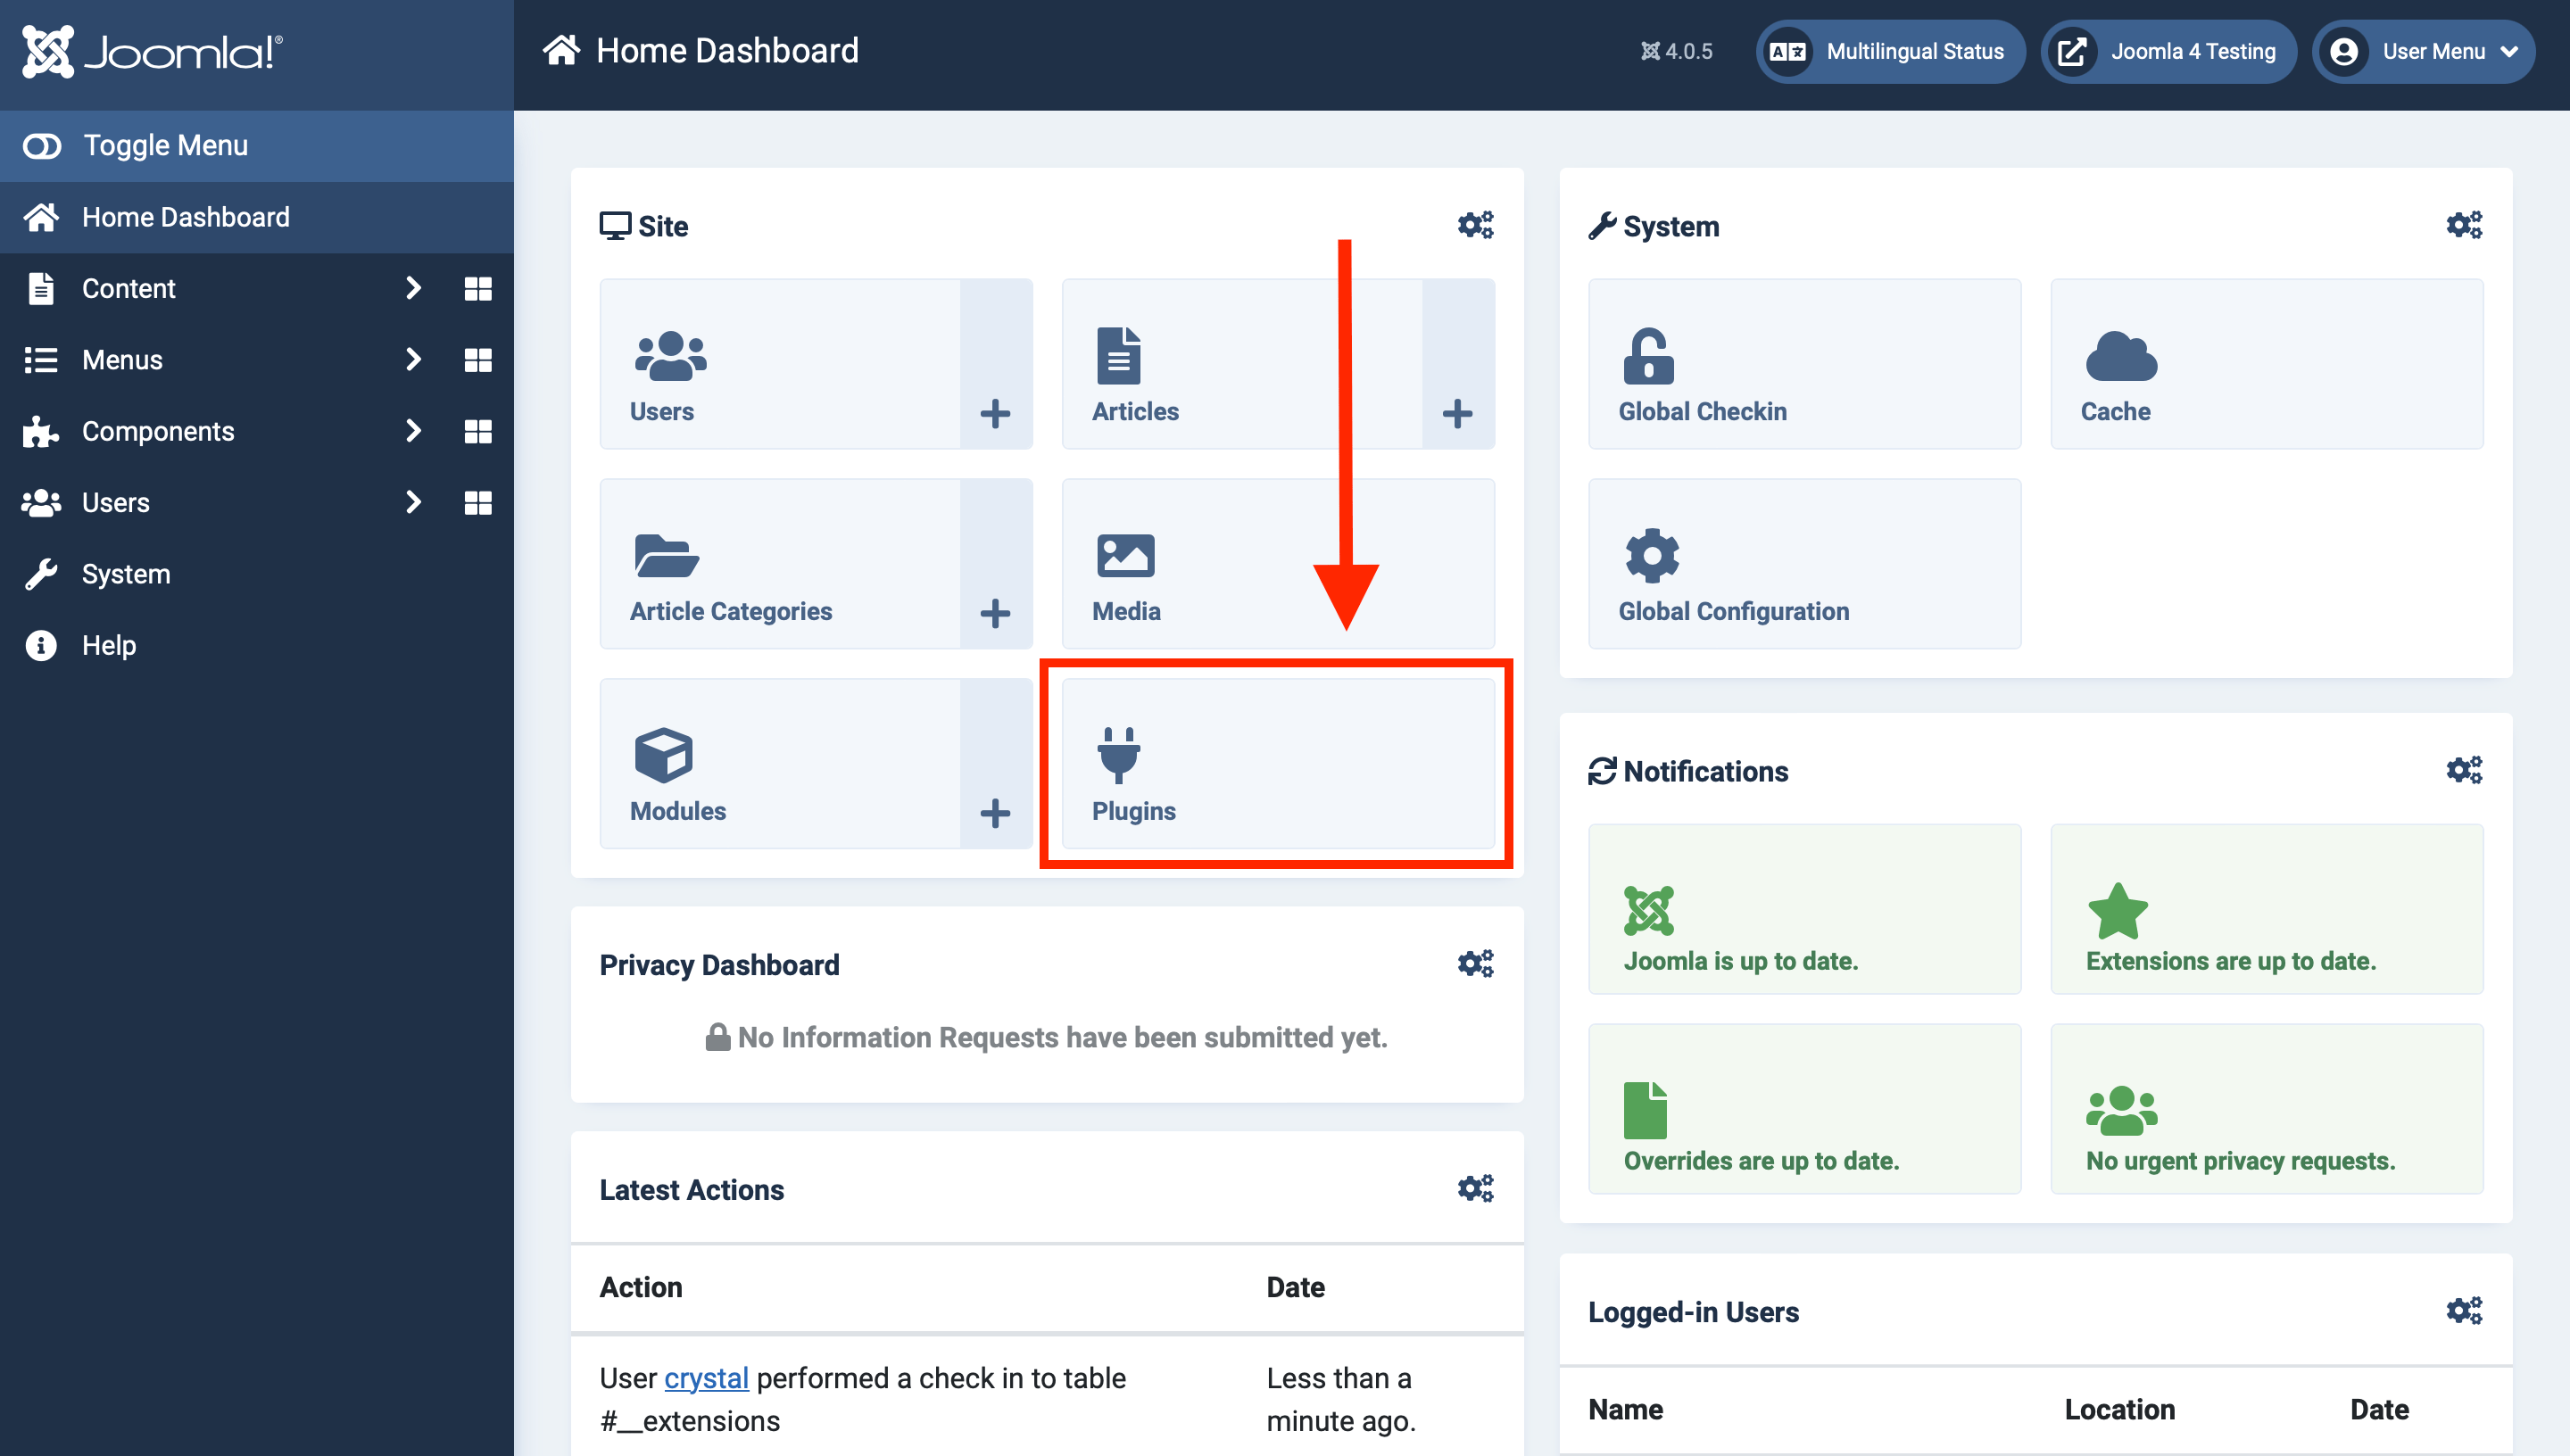
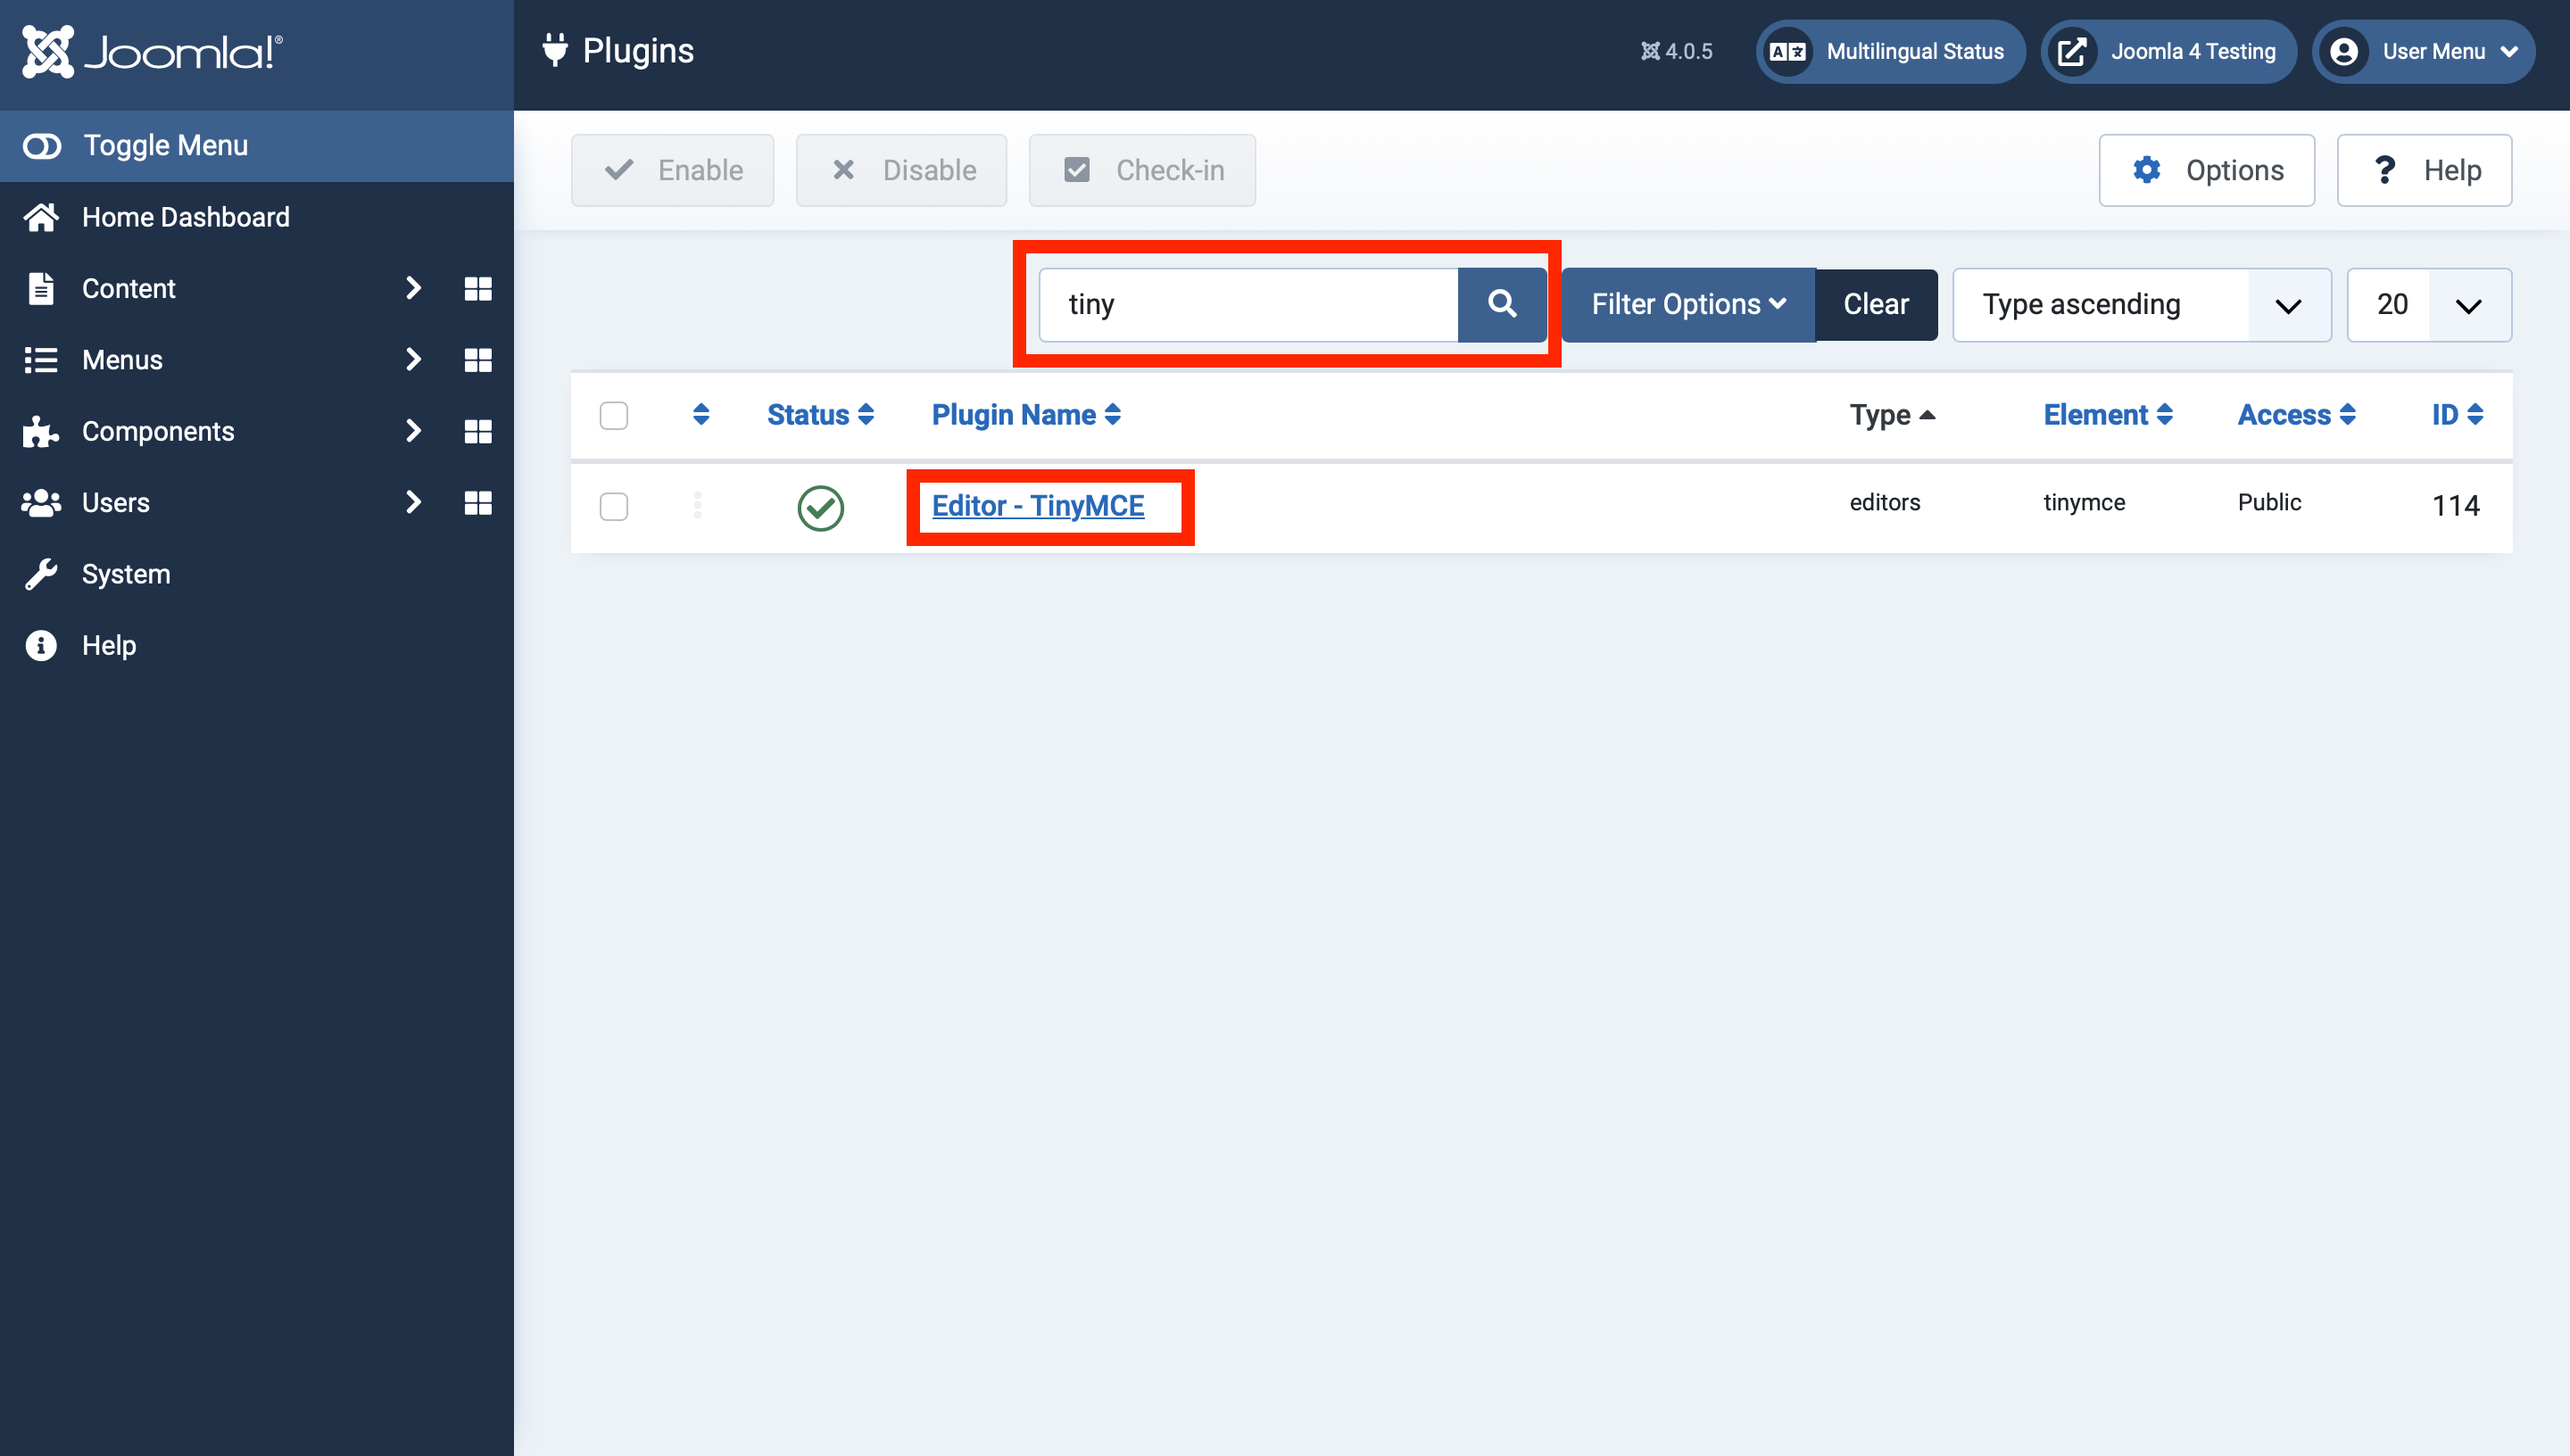
In the search bar, type "TinyMCE" (or just "tiny") and select "Editor - TinyMCE".
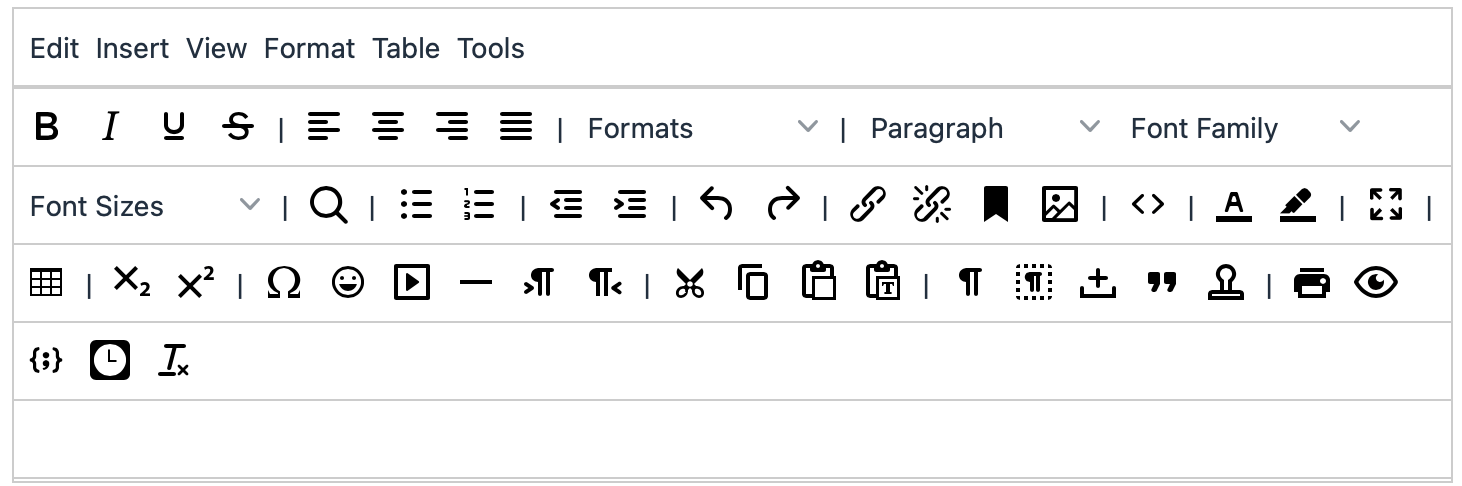
Find the heading "TinyMCE Sets".
You'll see something like this:

You can add or remove icons to any set here. I like to remove the ones I don't use from Set 0, but for now, let's take a look at Set 1.
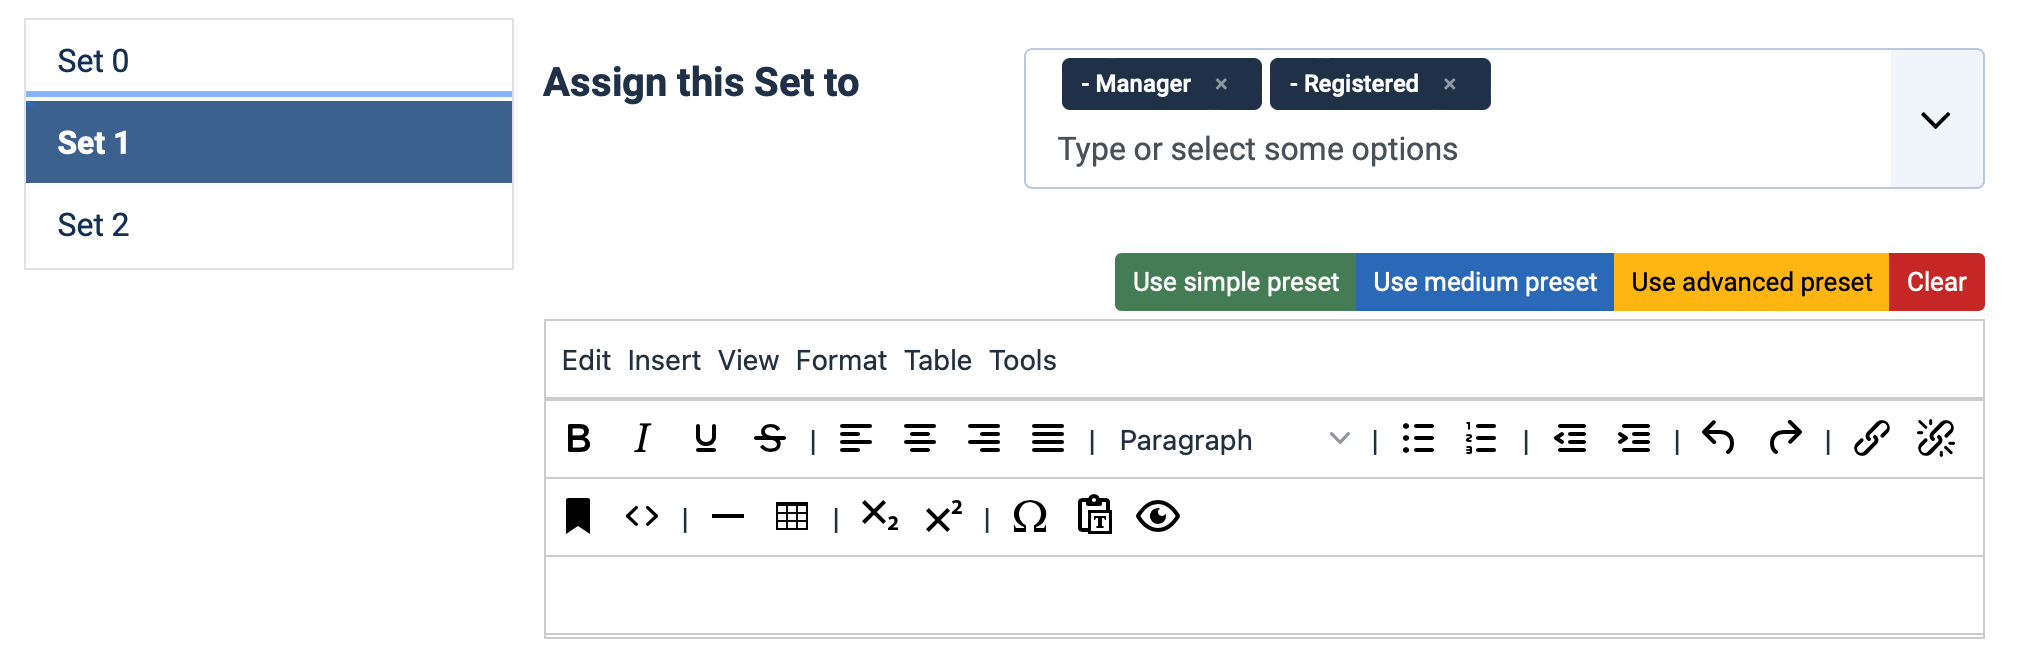
That's more like it! I might still remove some options, but for the most part, this looks more useful for my clients, so let's add them to Set 1.
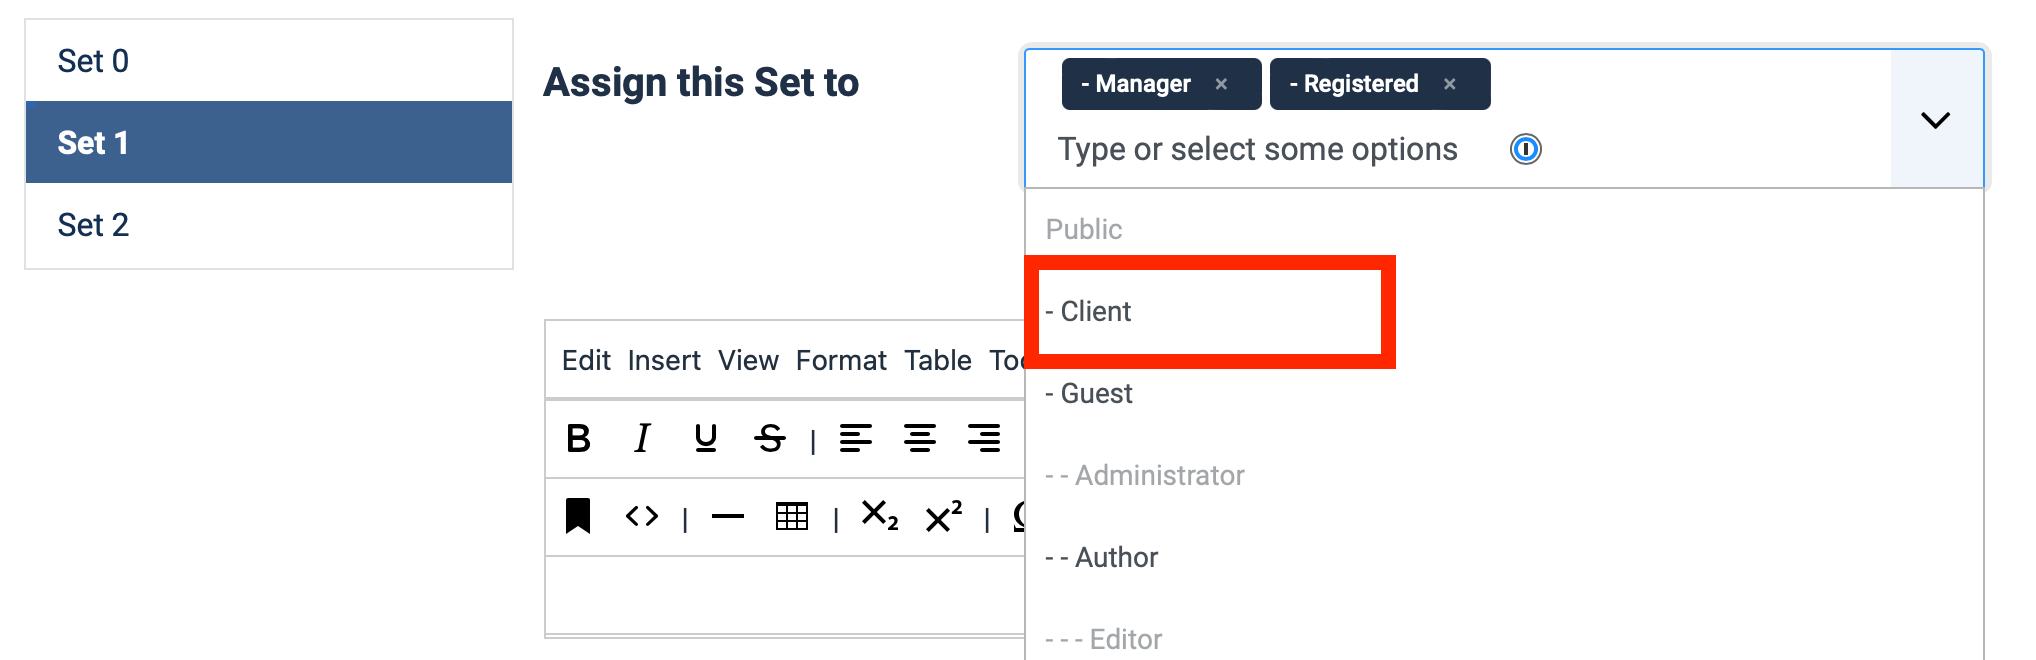
Type or select "Client" (or your user group name) in the box next to "Assign this Set to".
Make any changes to the tools or ordering of icons that you want, and then save and close the plugin.
Custom administrator menus and menu items
The default admin menu is fine if your site is pretty much just a blog, but once you start having different categories for different kinds of content, walking a client through how to edit the correct articles can be a pain.
This is where creating a custom admin menu can come in handy! You can create links to the particular components and views that your clients need most, and hide the rest.
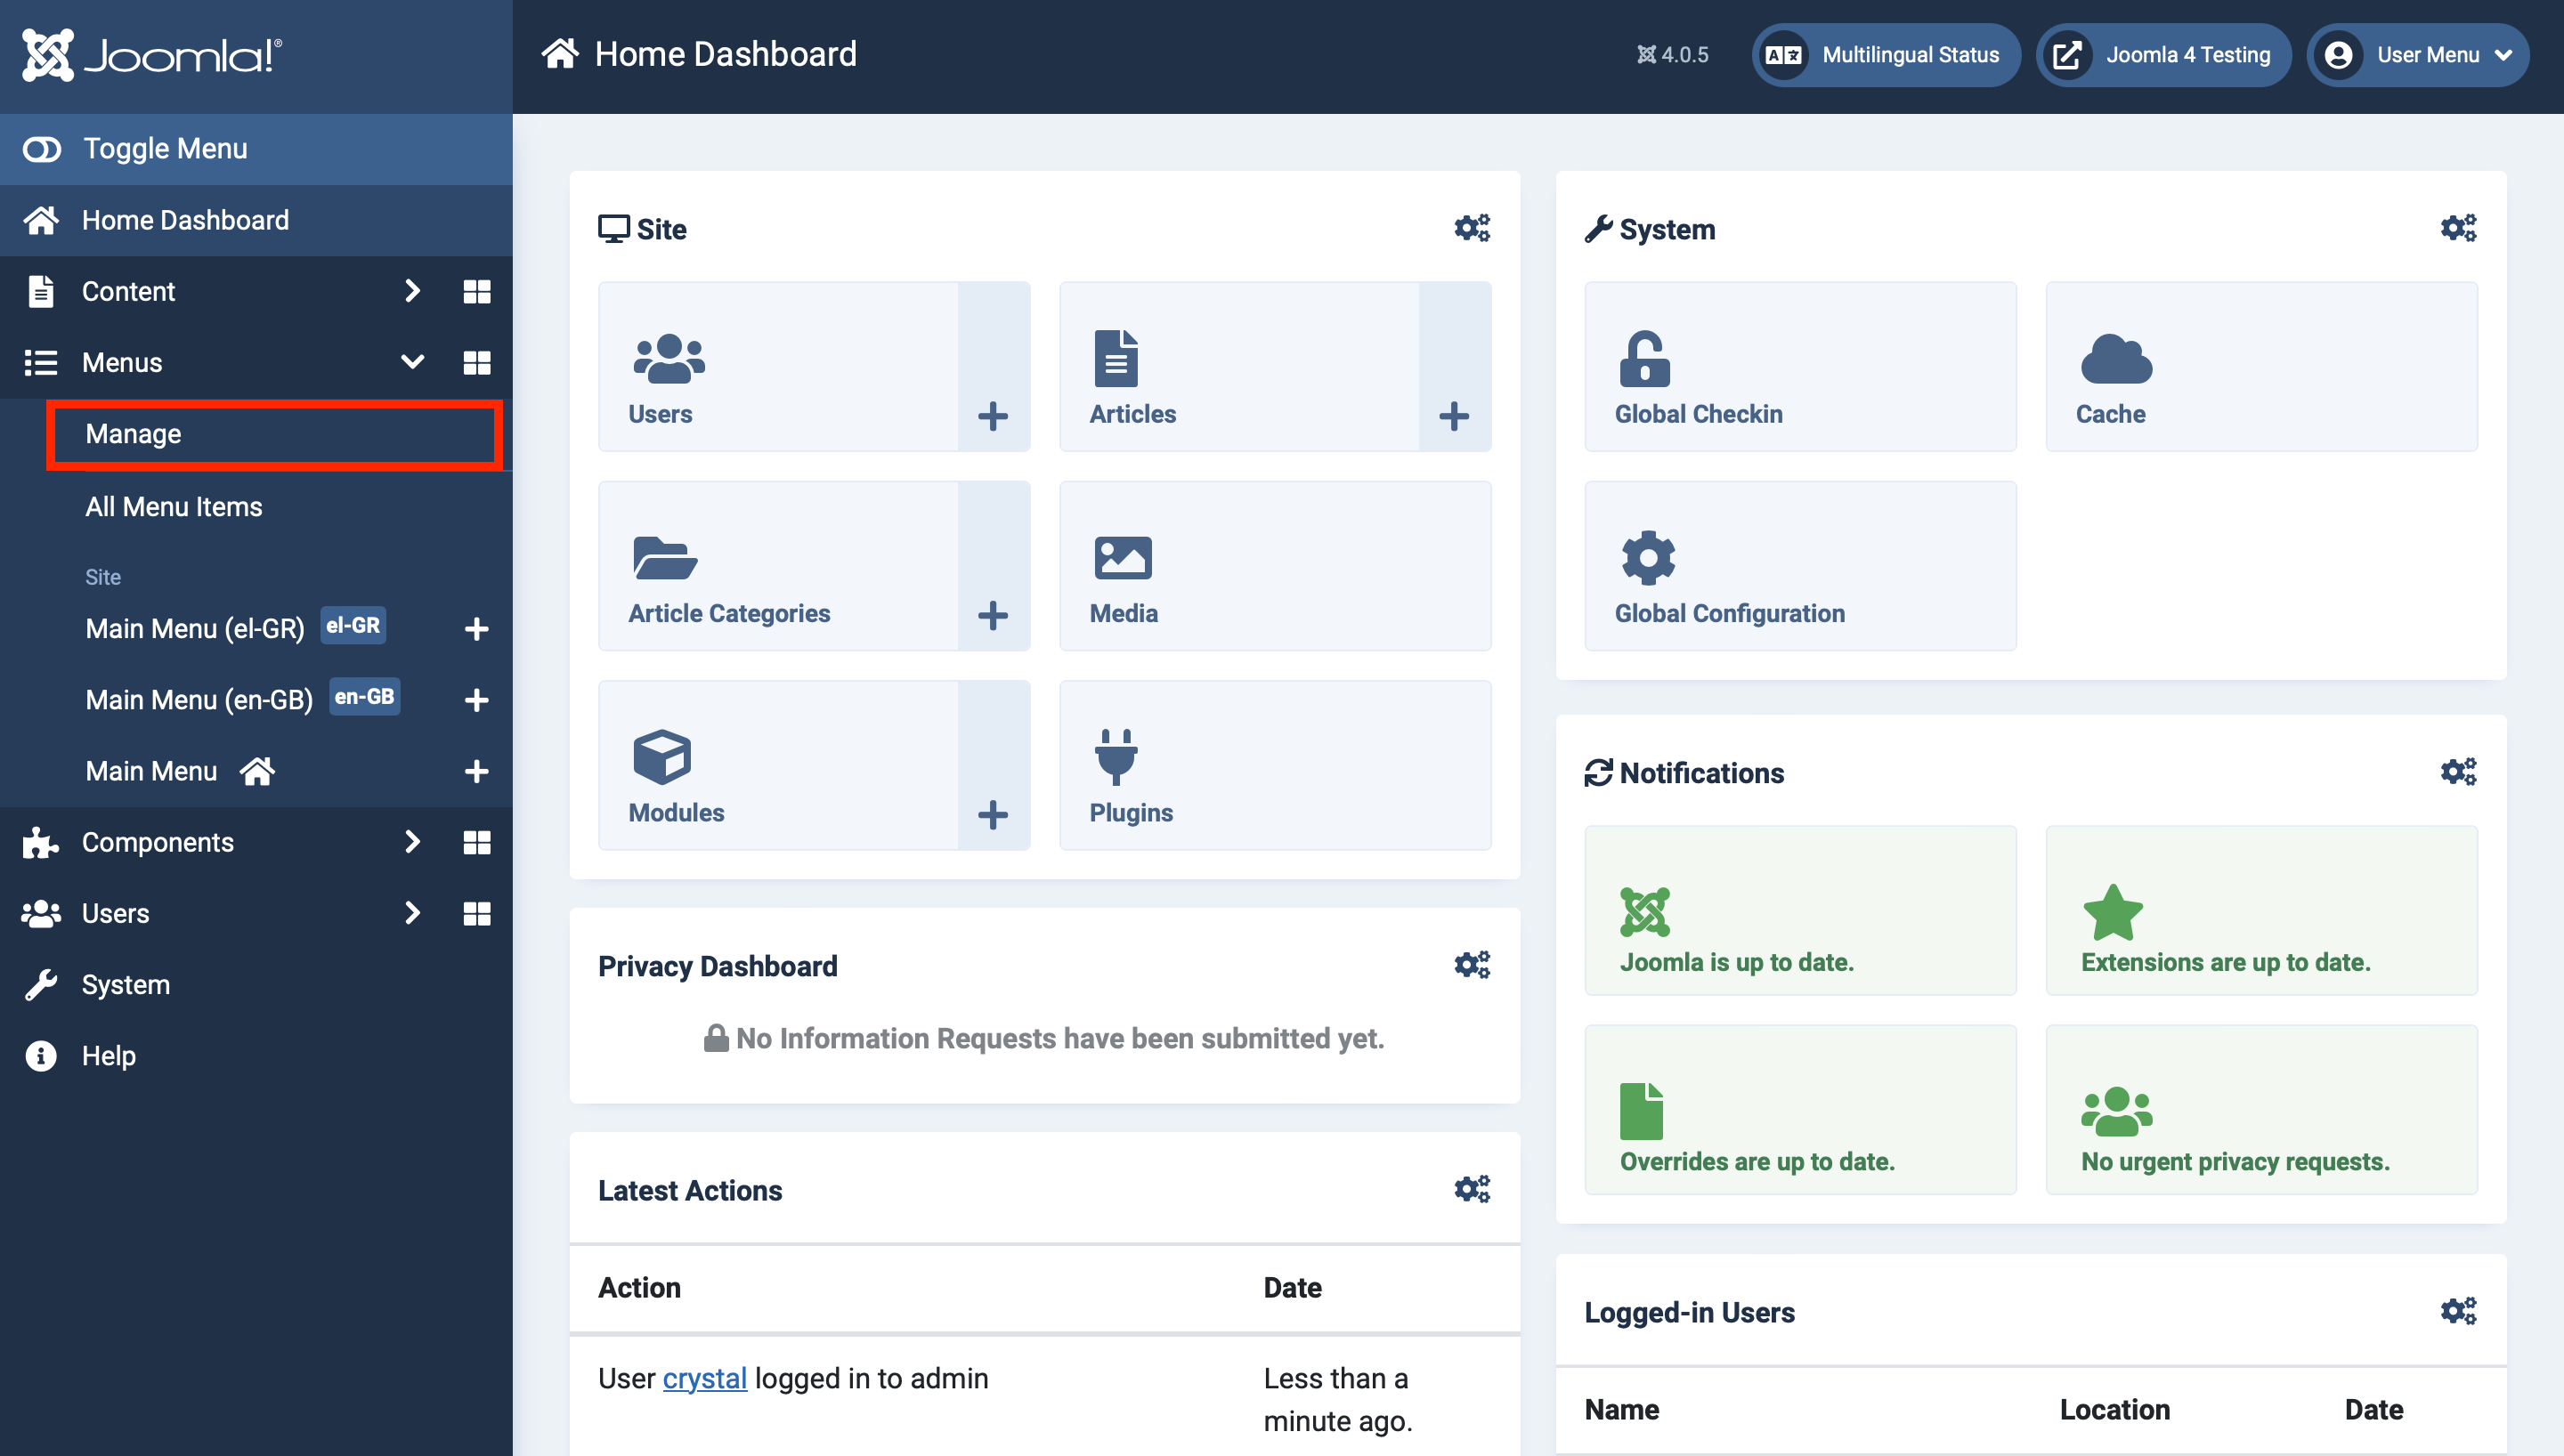
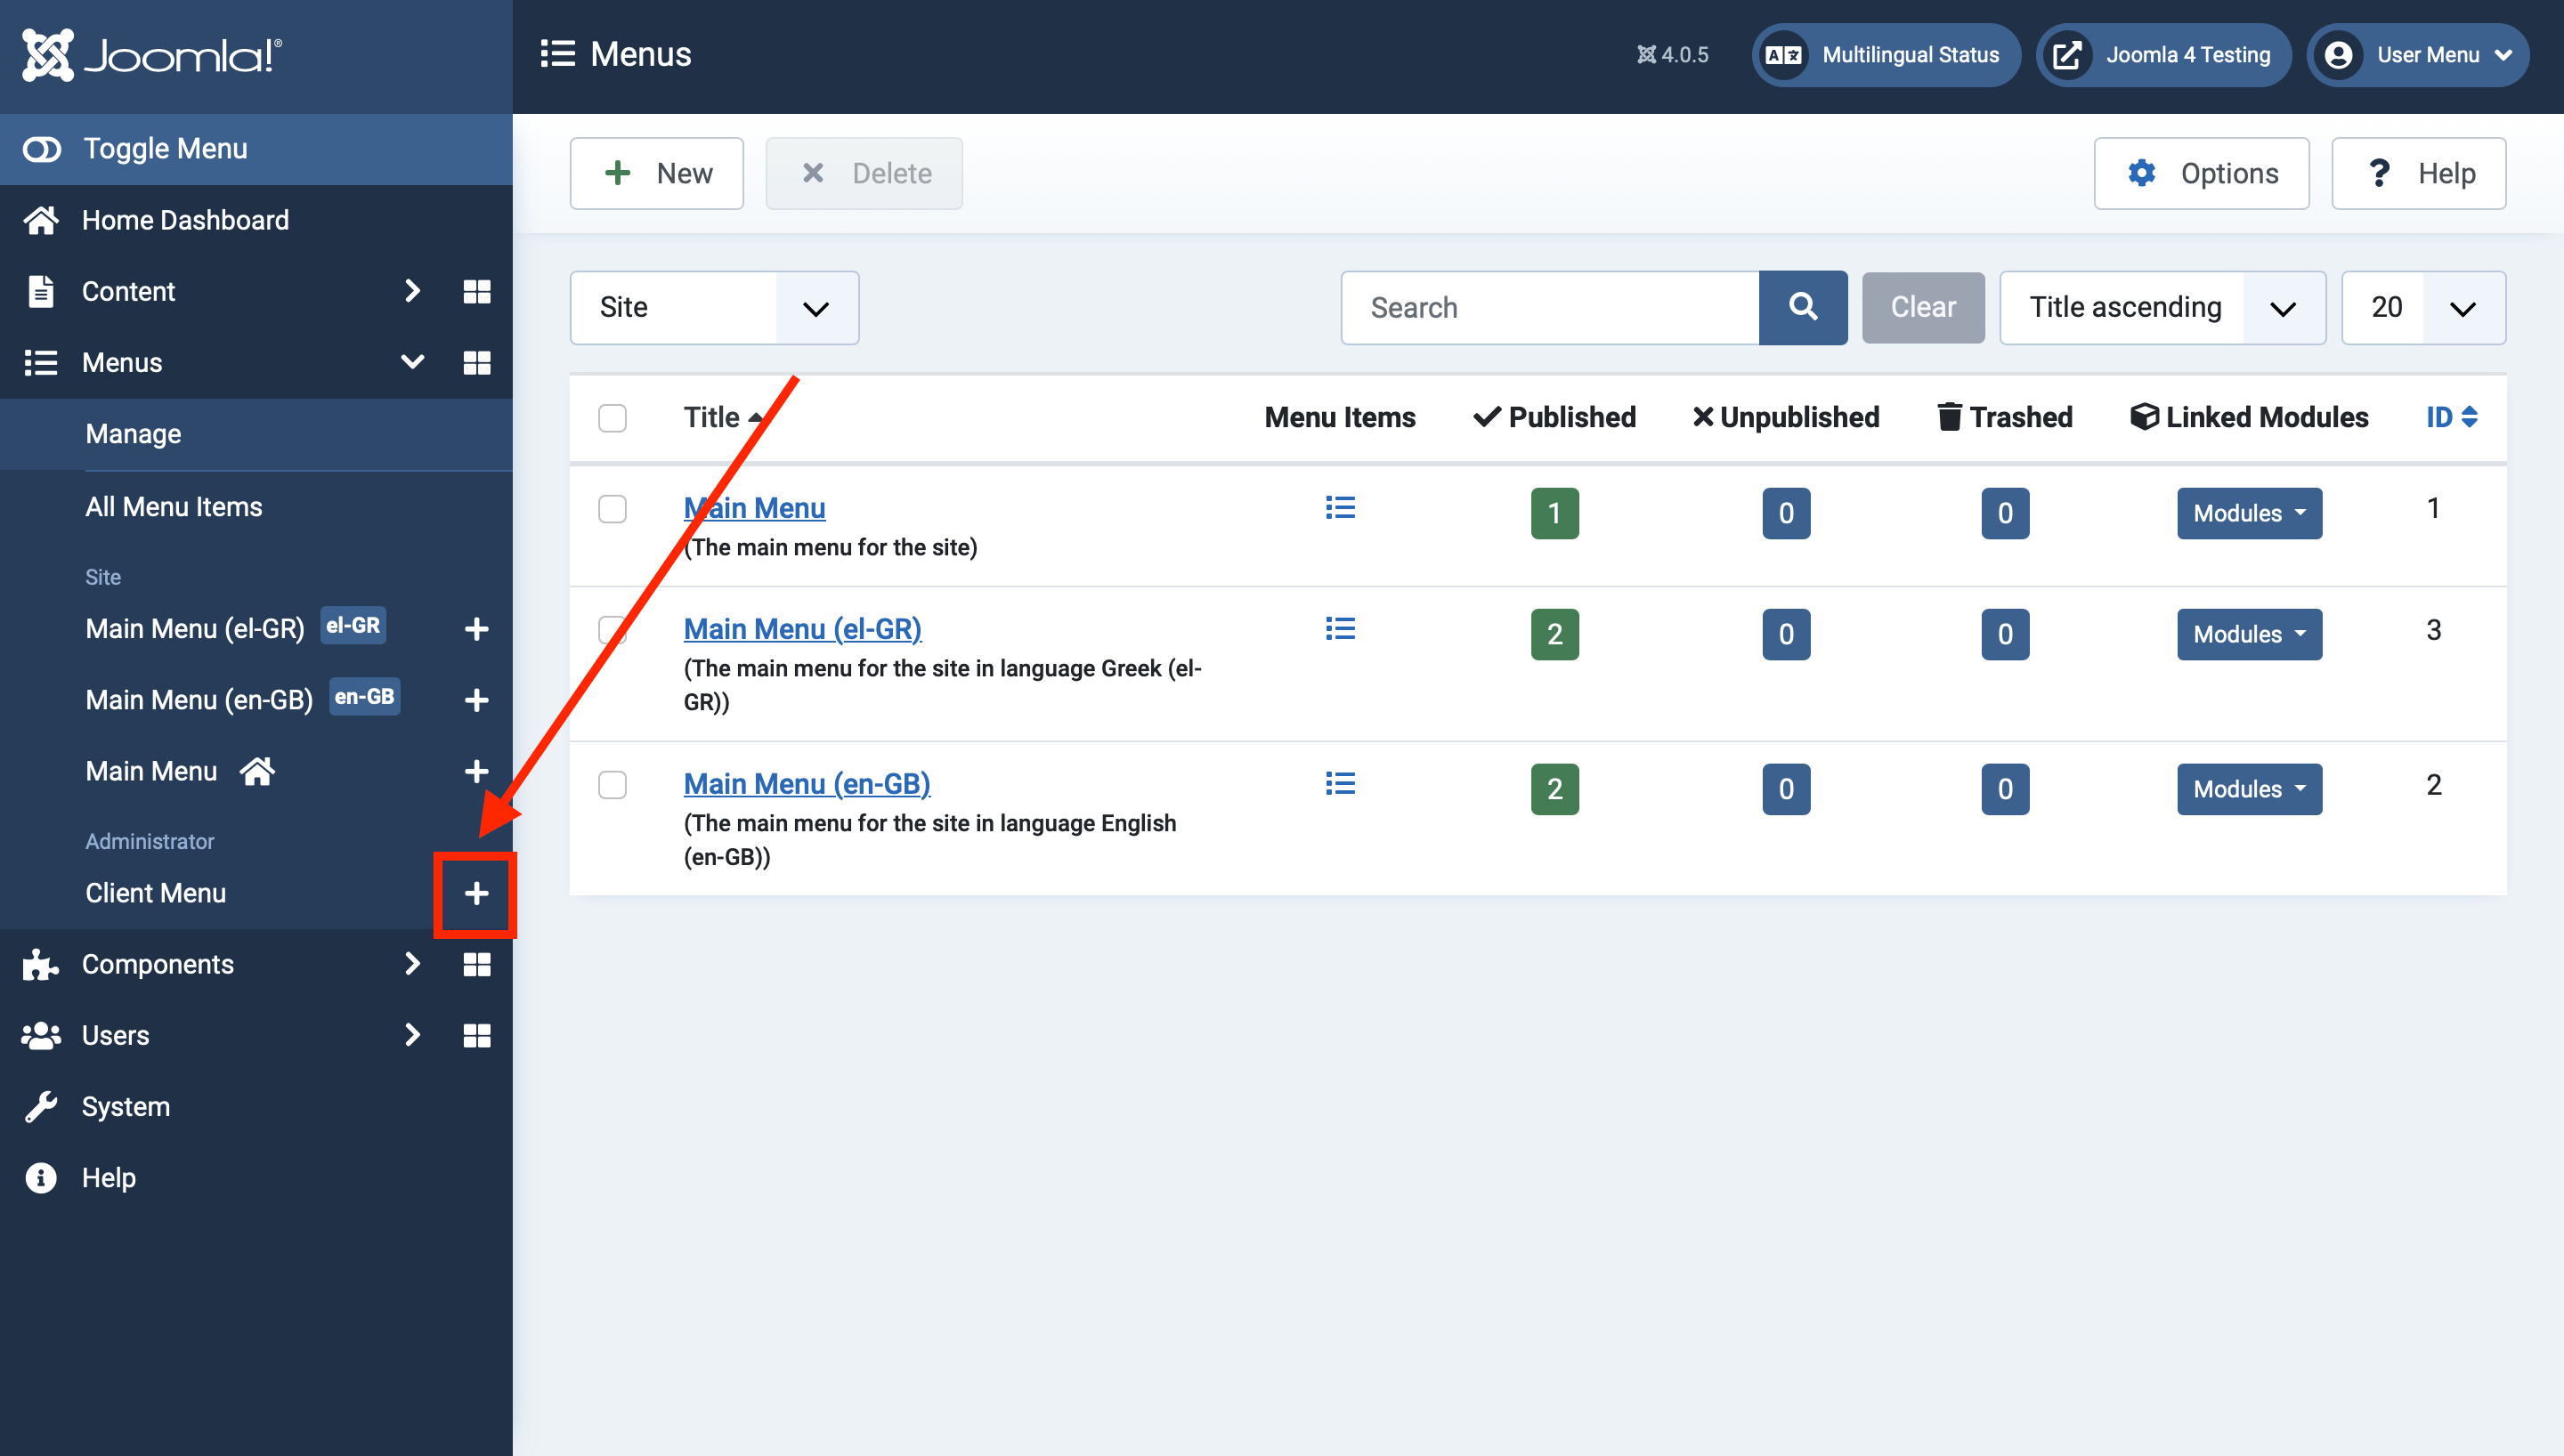
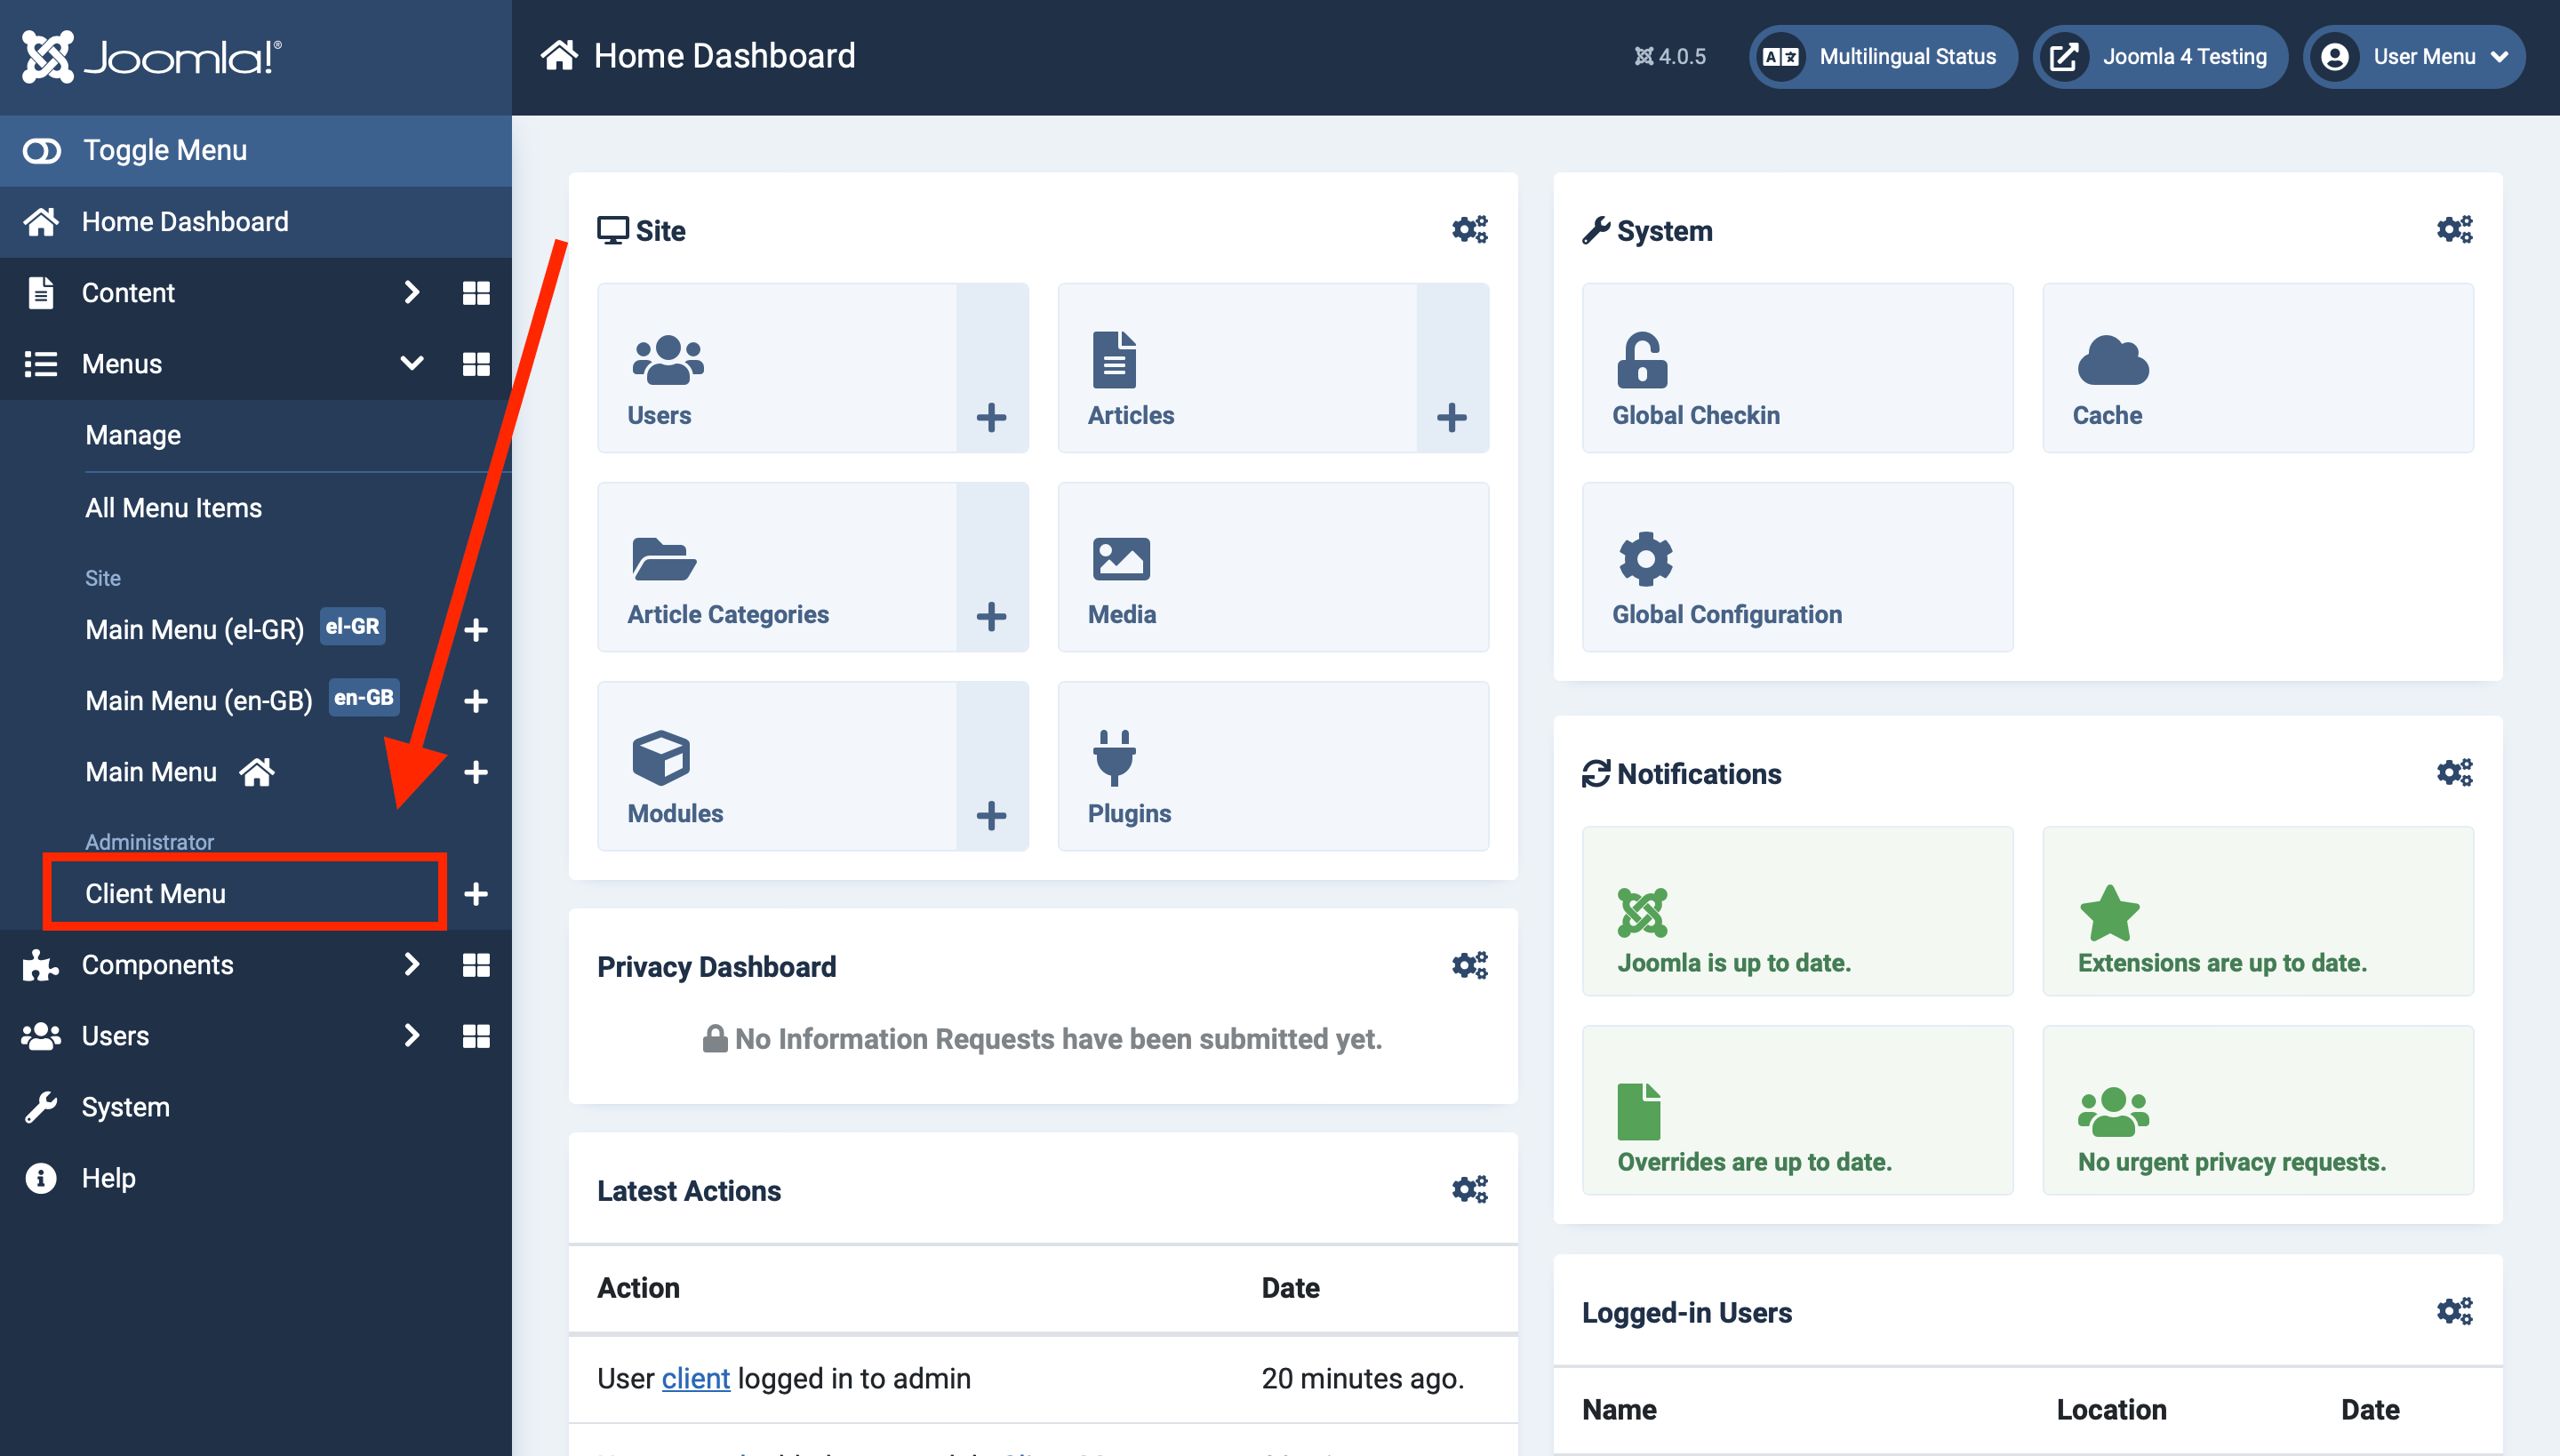
Step 1: Click on "Menus" in the left-hand menu, and select "Manage".
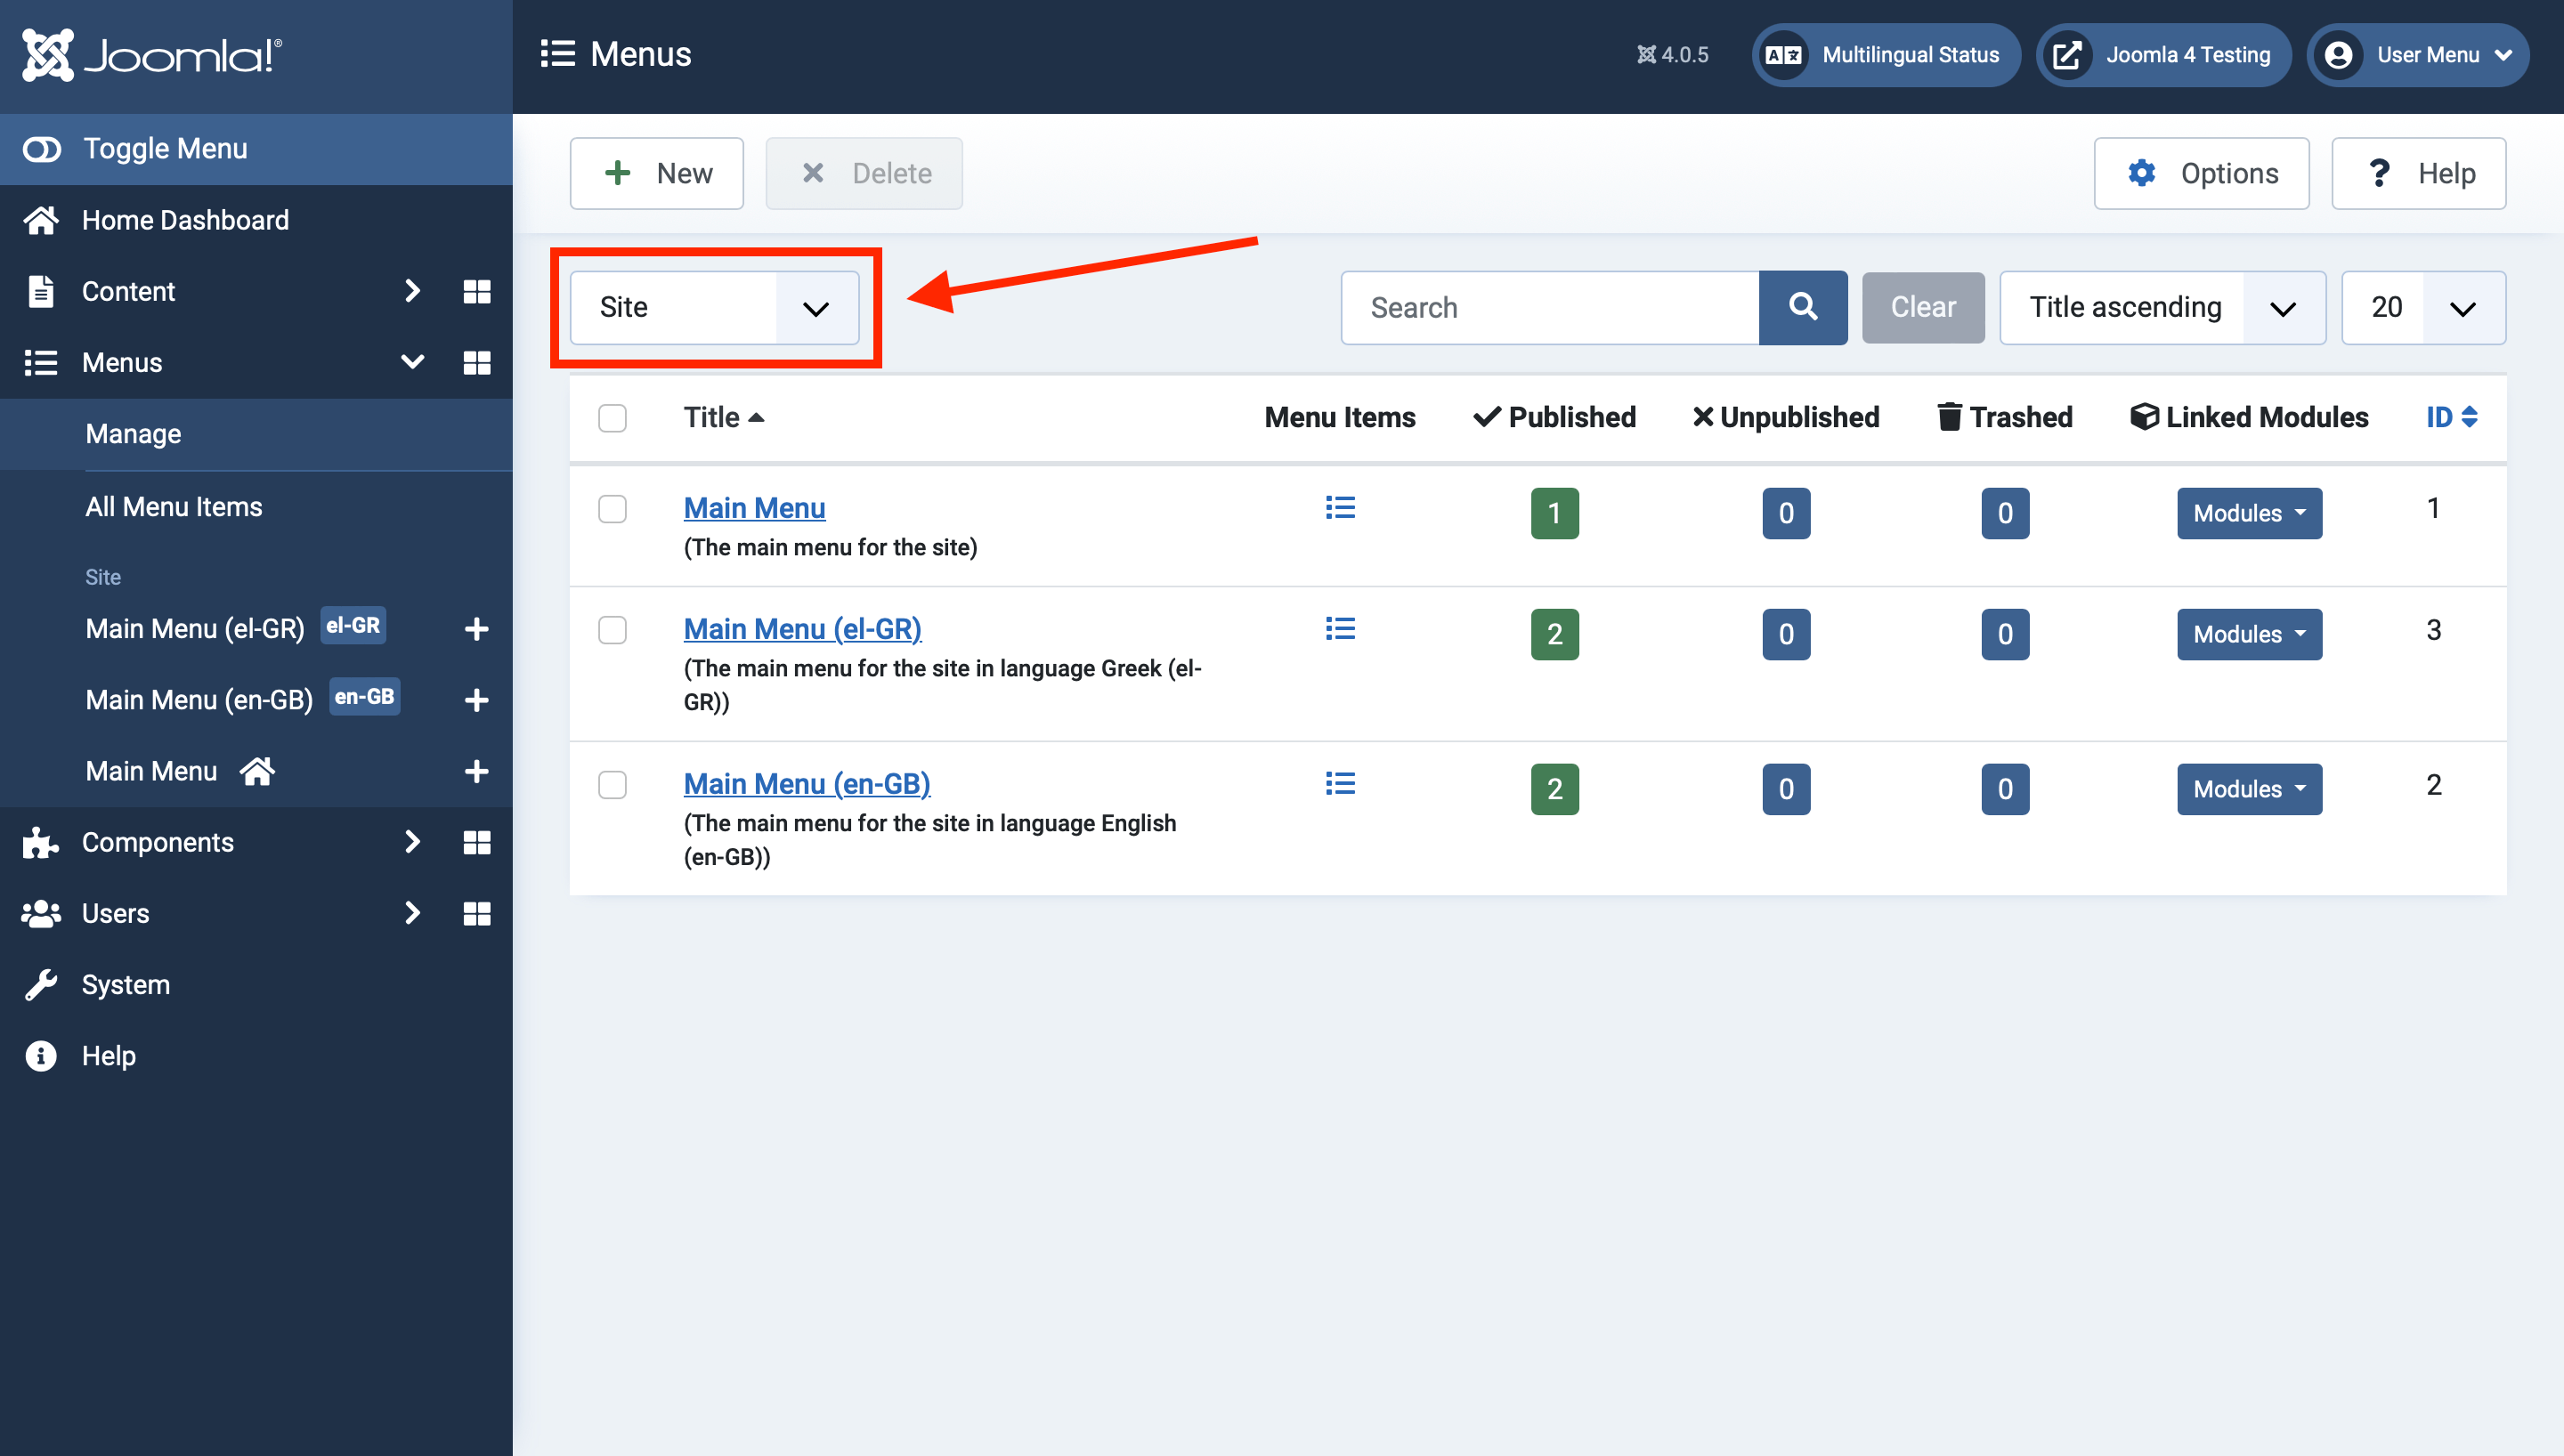
Step 2: Select the dropdown that says "Site", and select "Administrator".
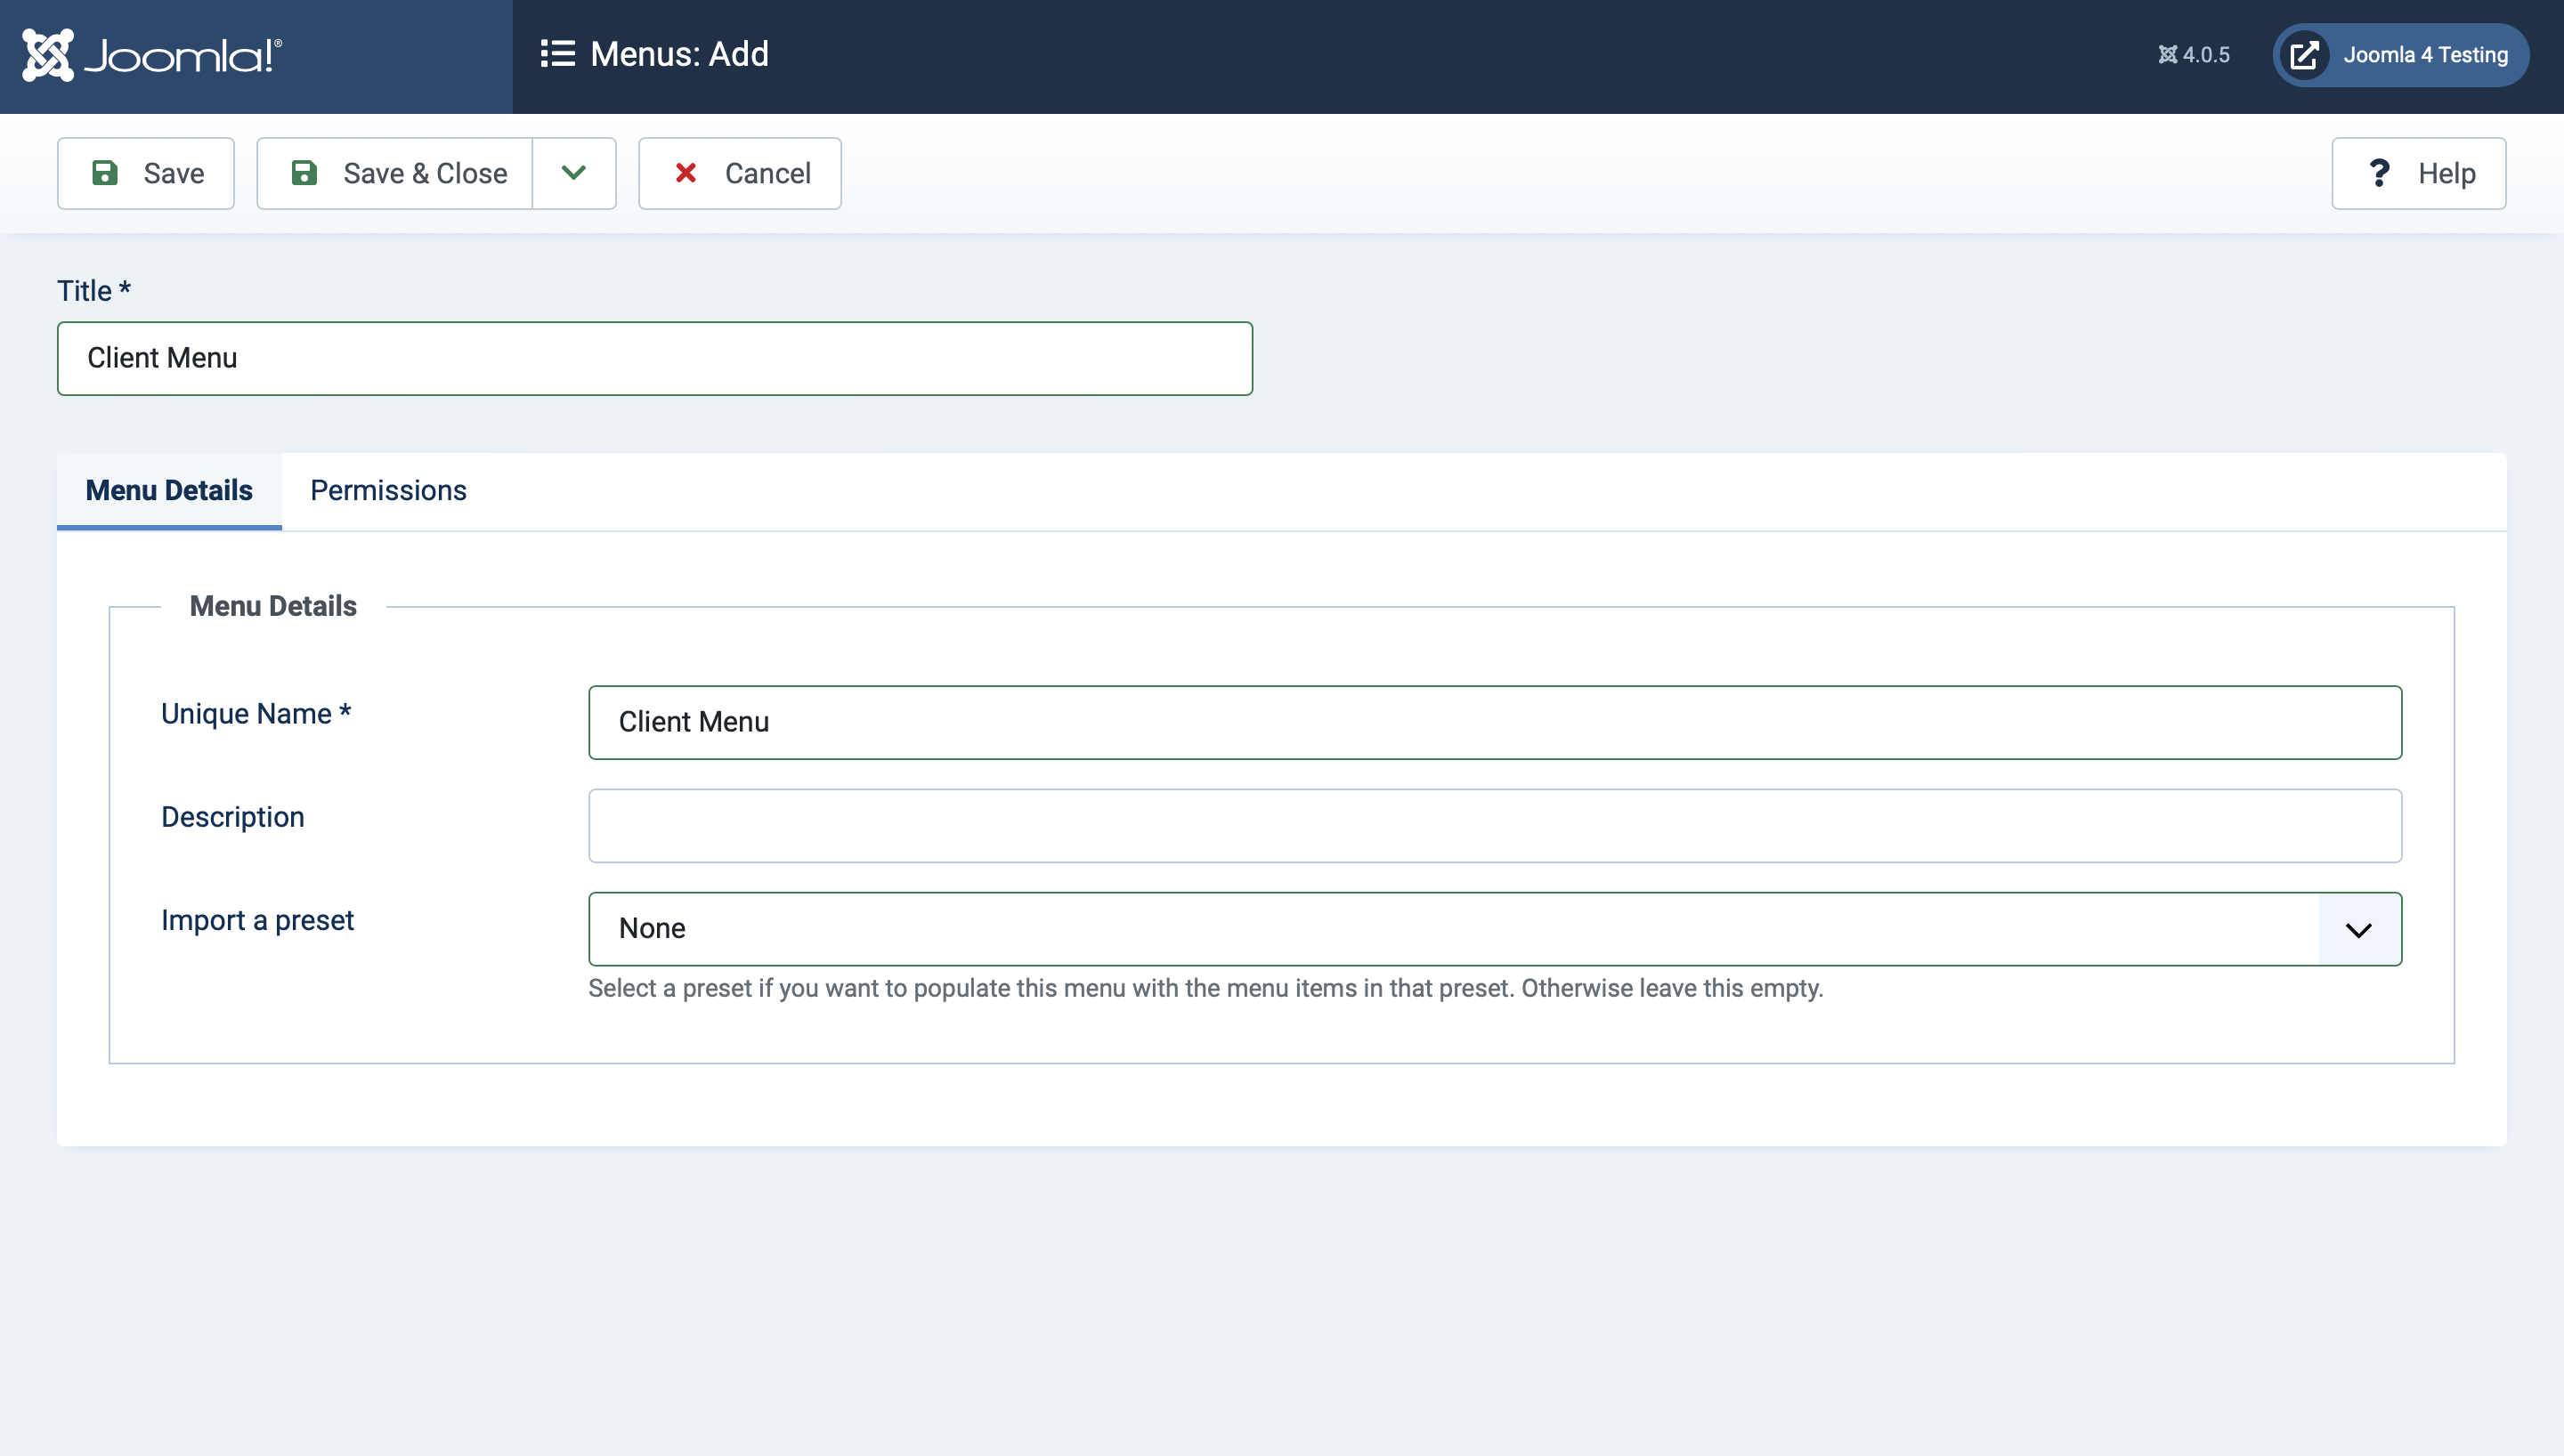
Step 3: Select "New", and fill out the details.
If you select a preset, it will auto-create the menu items for you based on that preset. I like to start from scratch, so I leave it as "none". Once you're ready, Save & Close.
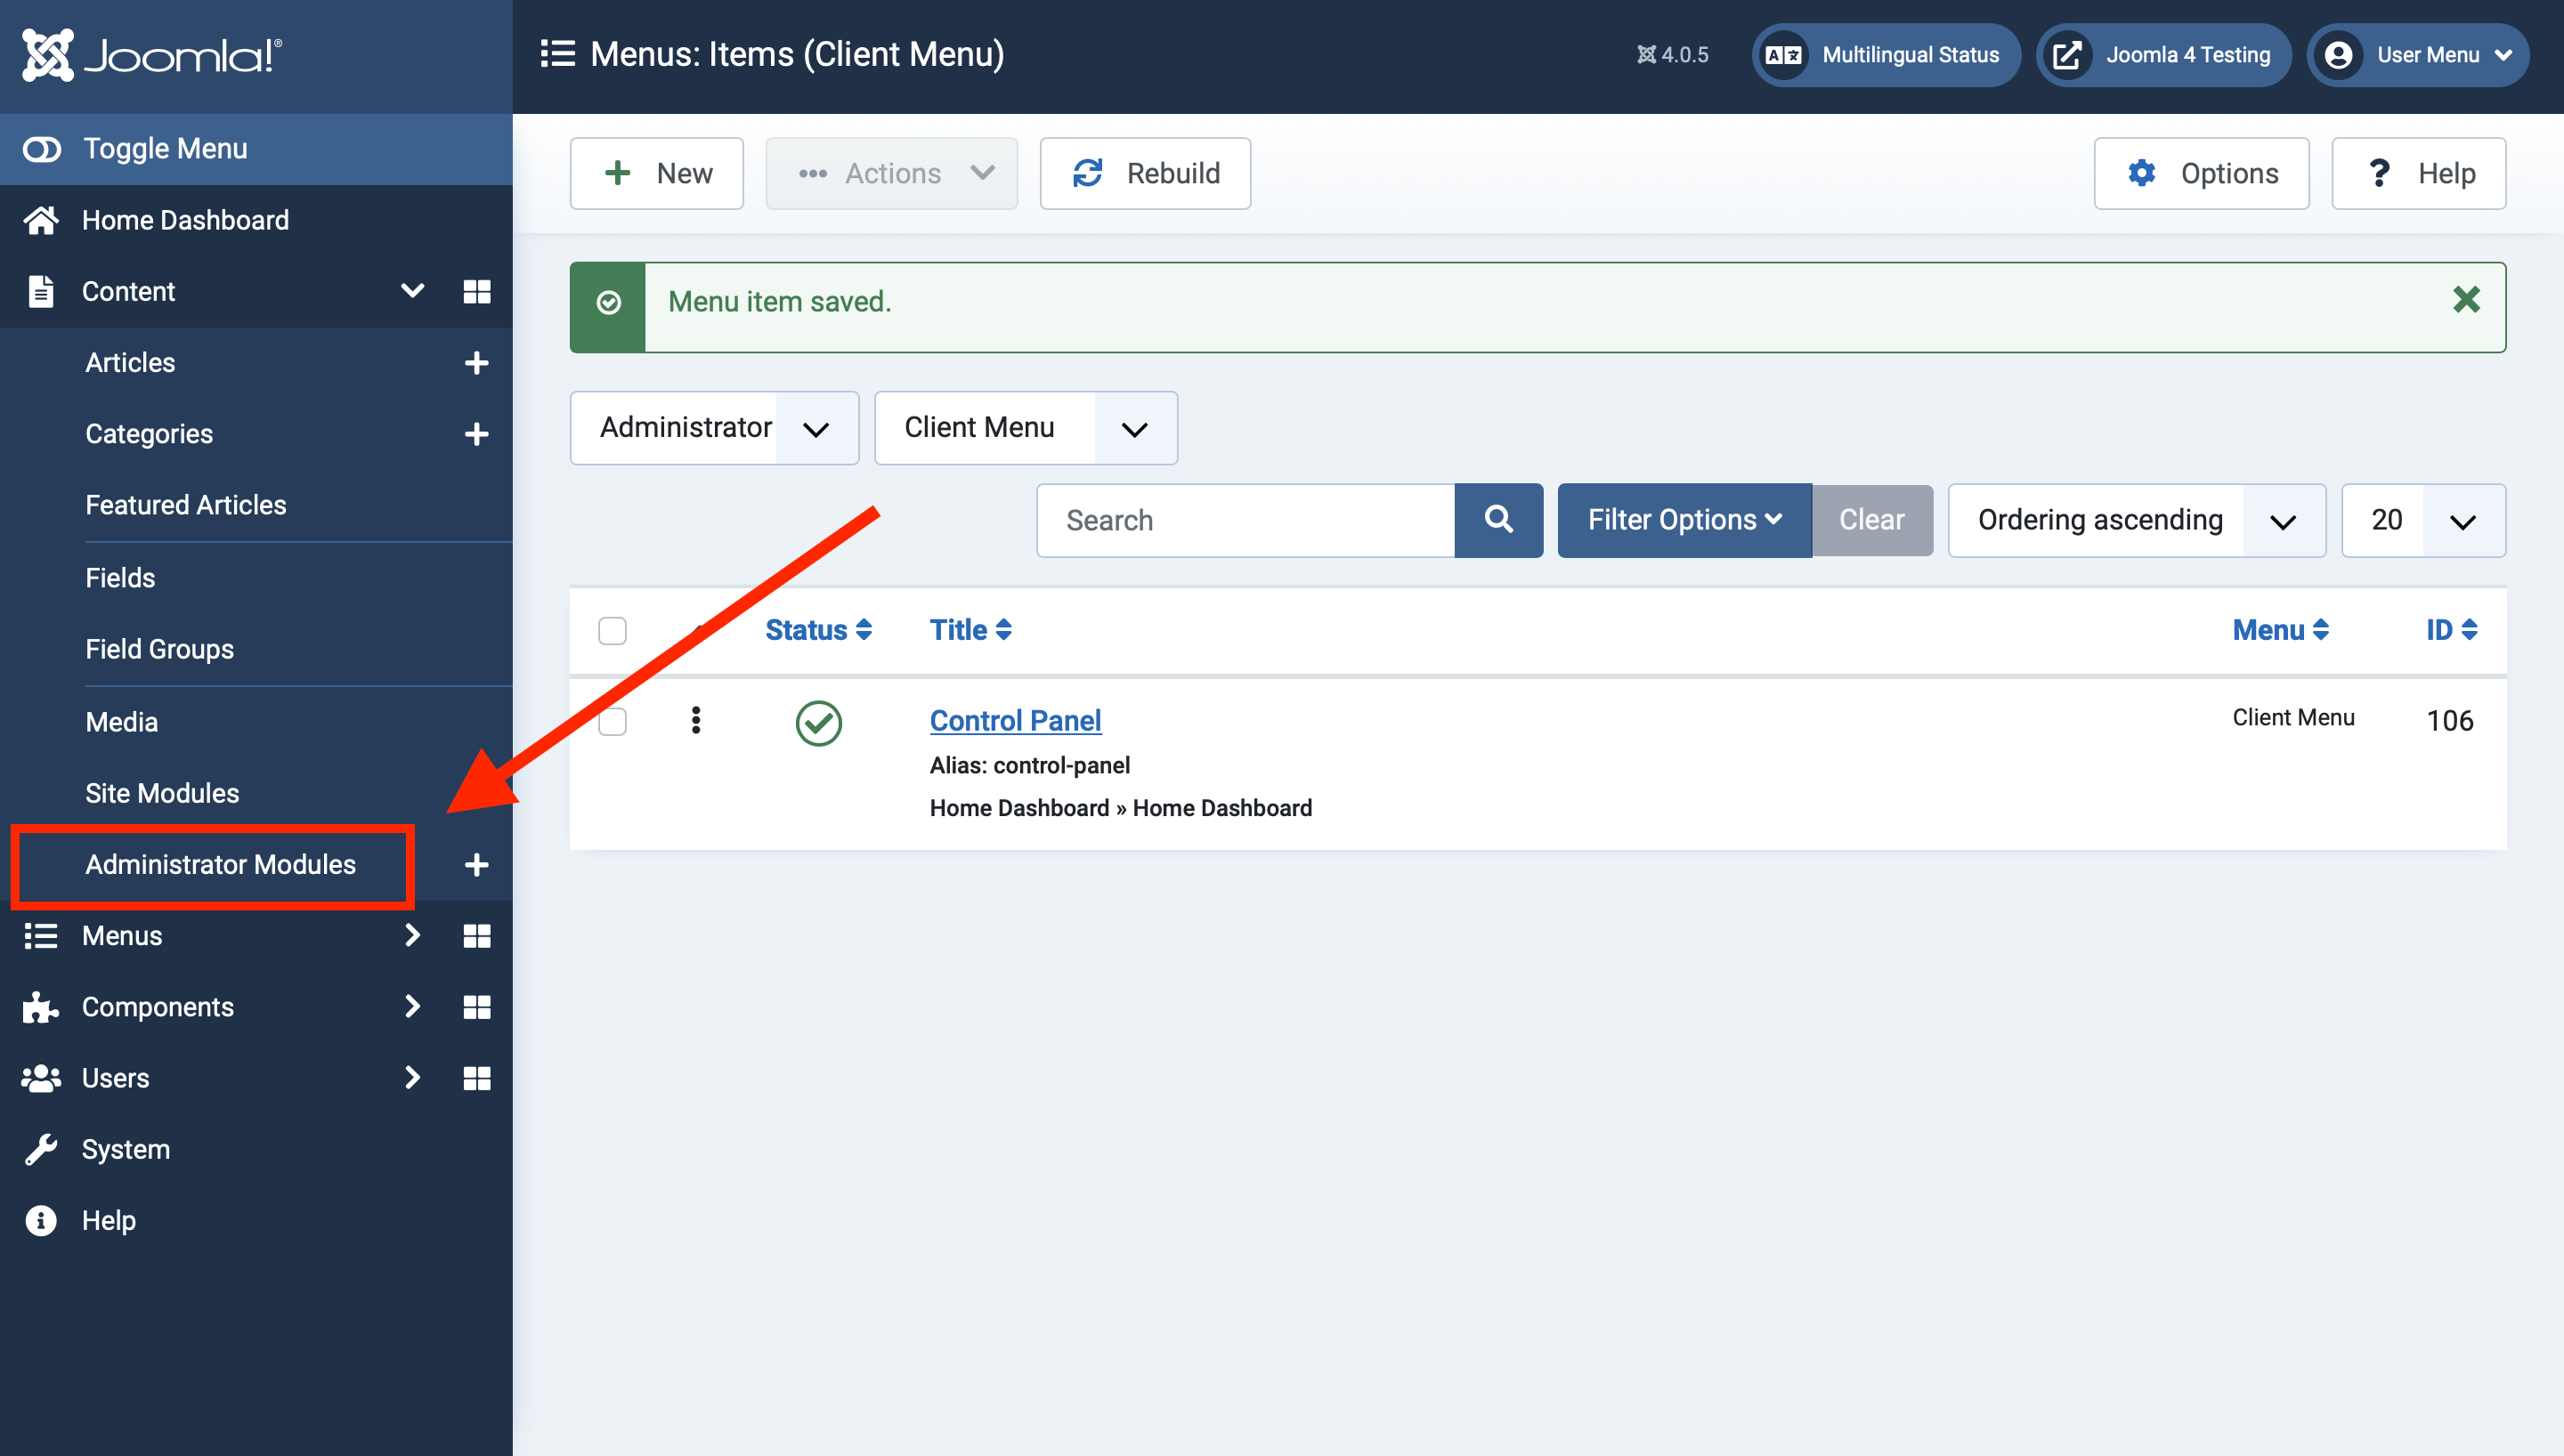
Step 4: Add the menu items you want to include in your client menu.
You'll notice that when you click on "Menus" in the menu, there is a new section titled "Administrator", with the menu you just created underneath. Click the plus sign next to it to add a new menu item.
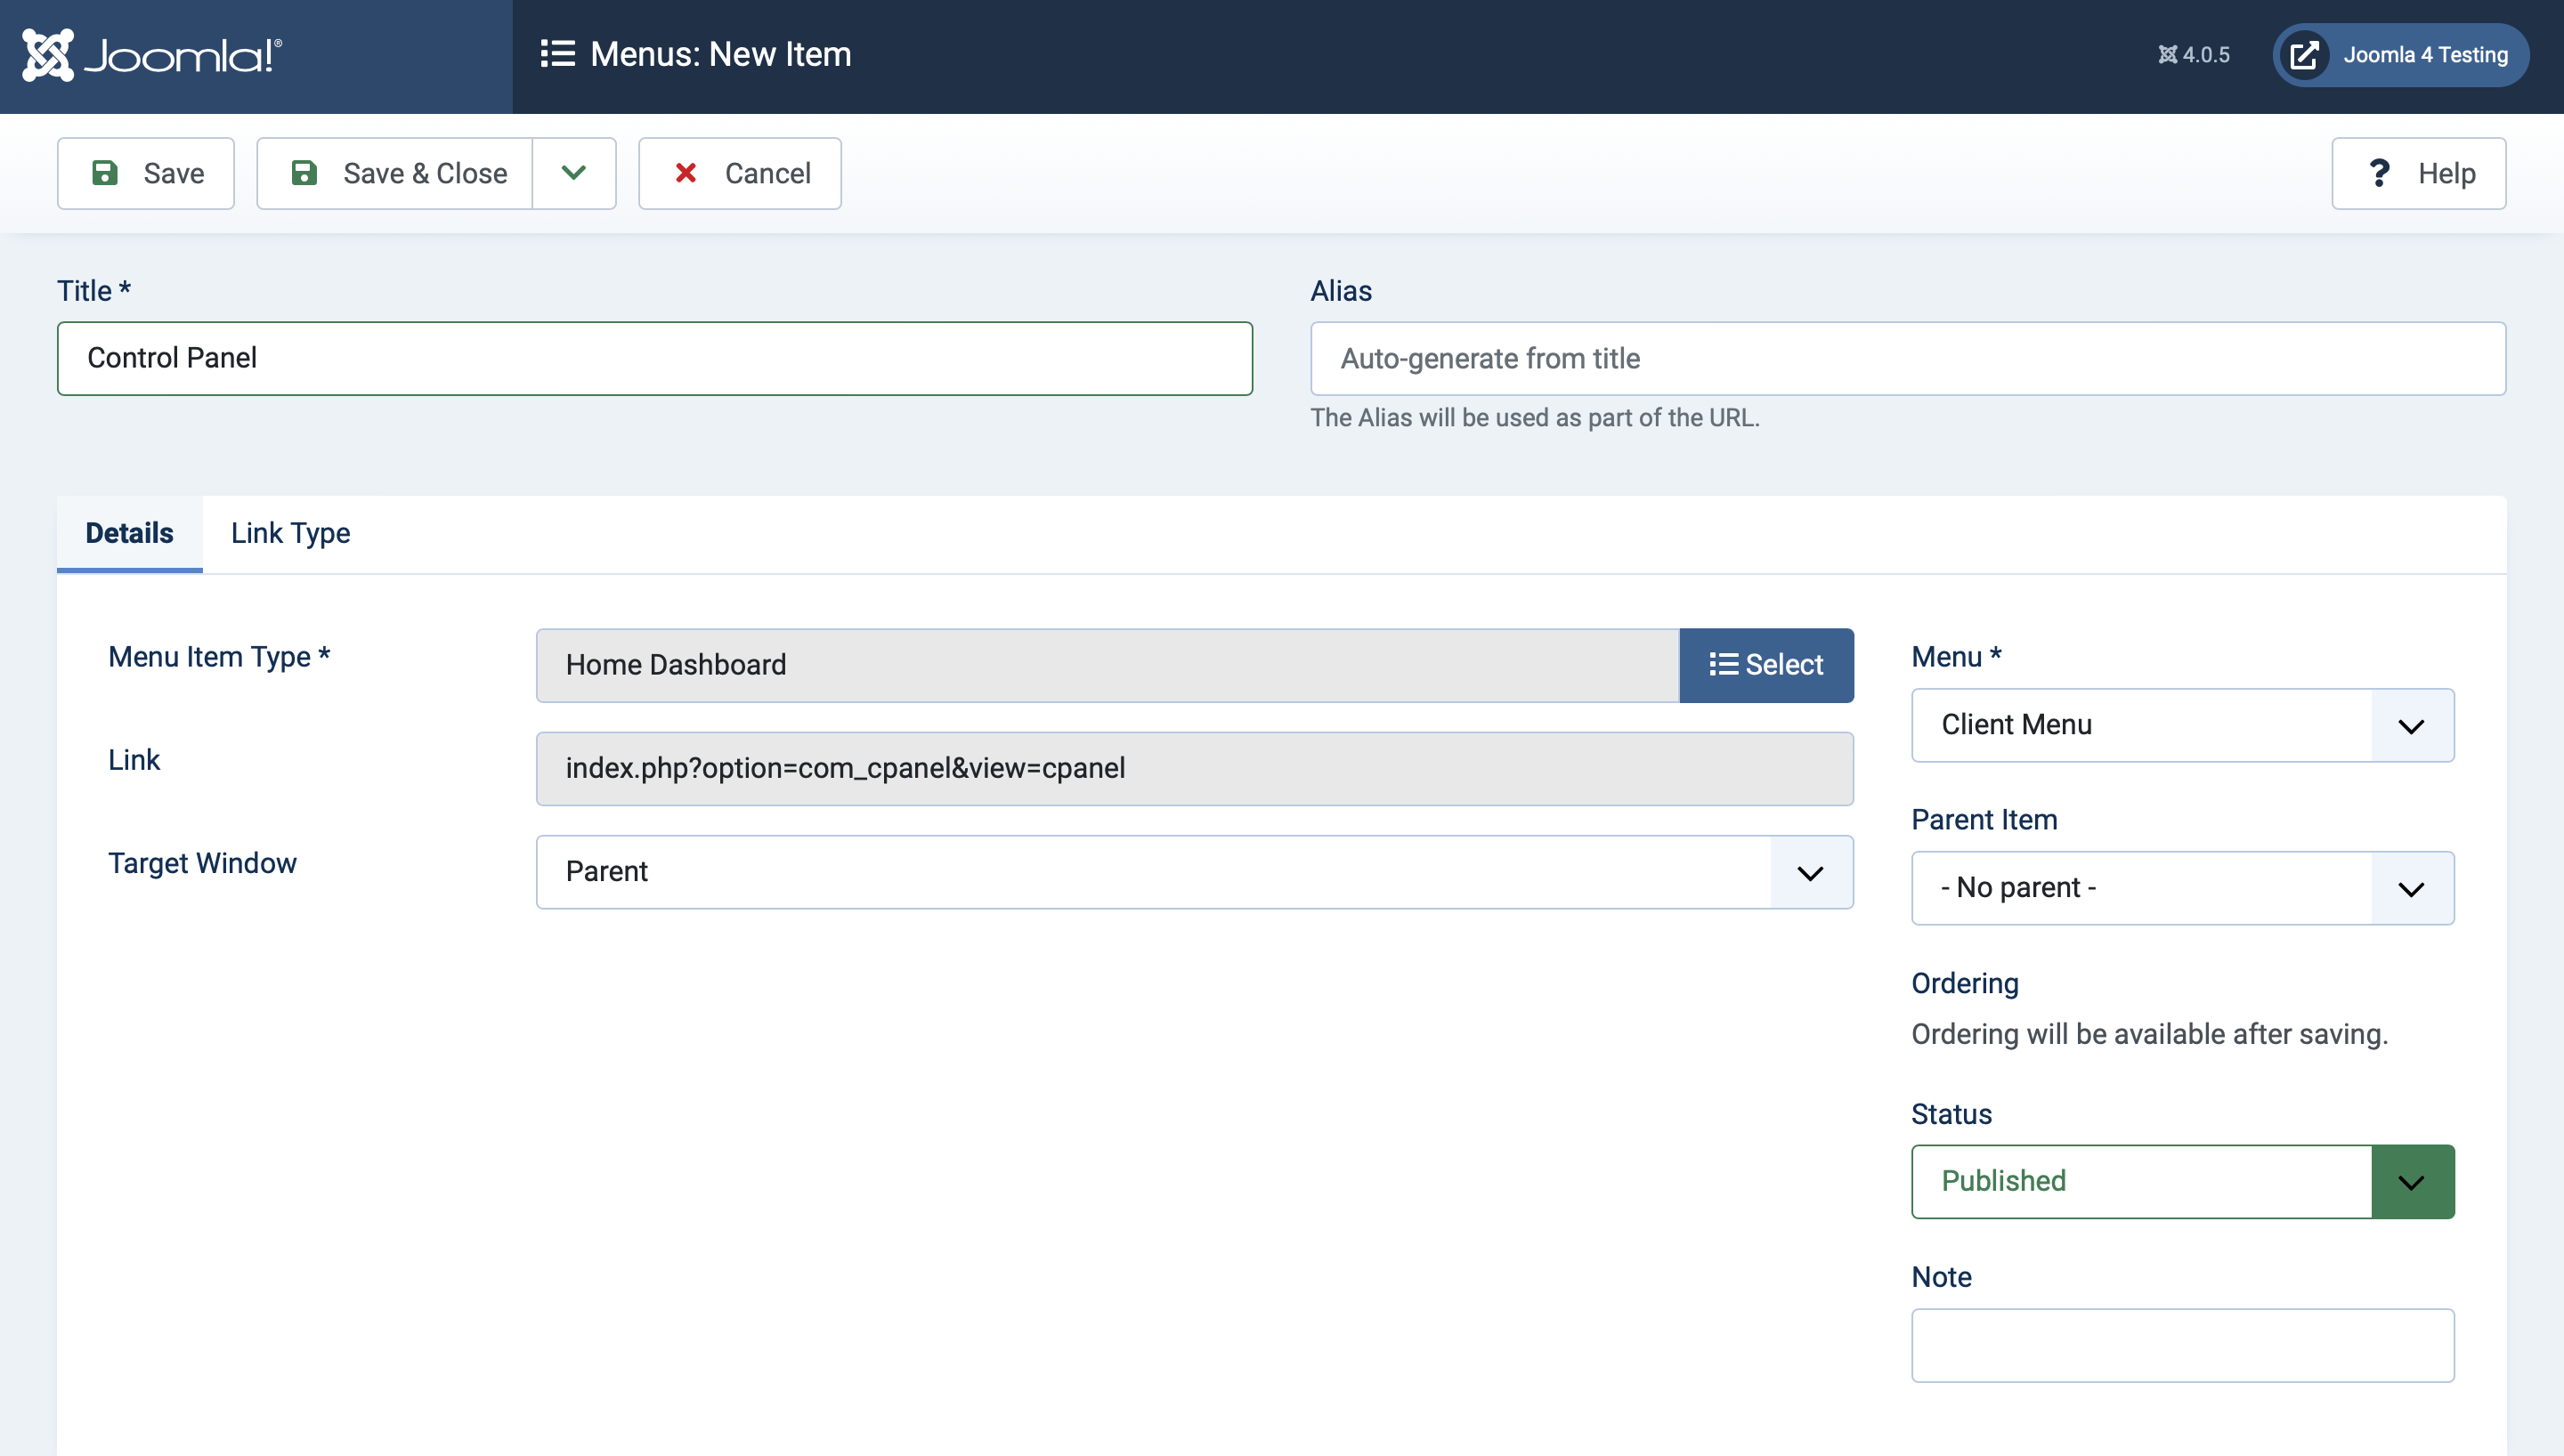
Create a new menu item just like you would for a front-end menu. For example purposes, we're going to create a menu item that goes to the Home Dashboard.
Under Menu Item Type, select Home Dashboard. Fill out a title for your item - in this case, I'm using Control Panel.
If you want, go to the second tab ("Link Type") and you'll see a field called "Link Icon Class". You can add a Font Awesome icon here—Joomla 4 has loaded the free Font Awesome 5 icons in the backend. Check out all the icons here.
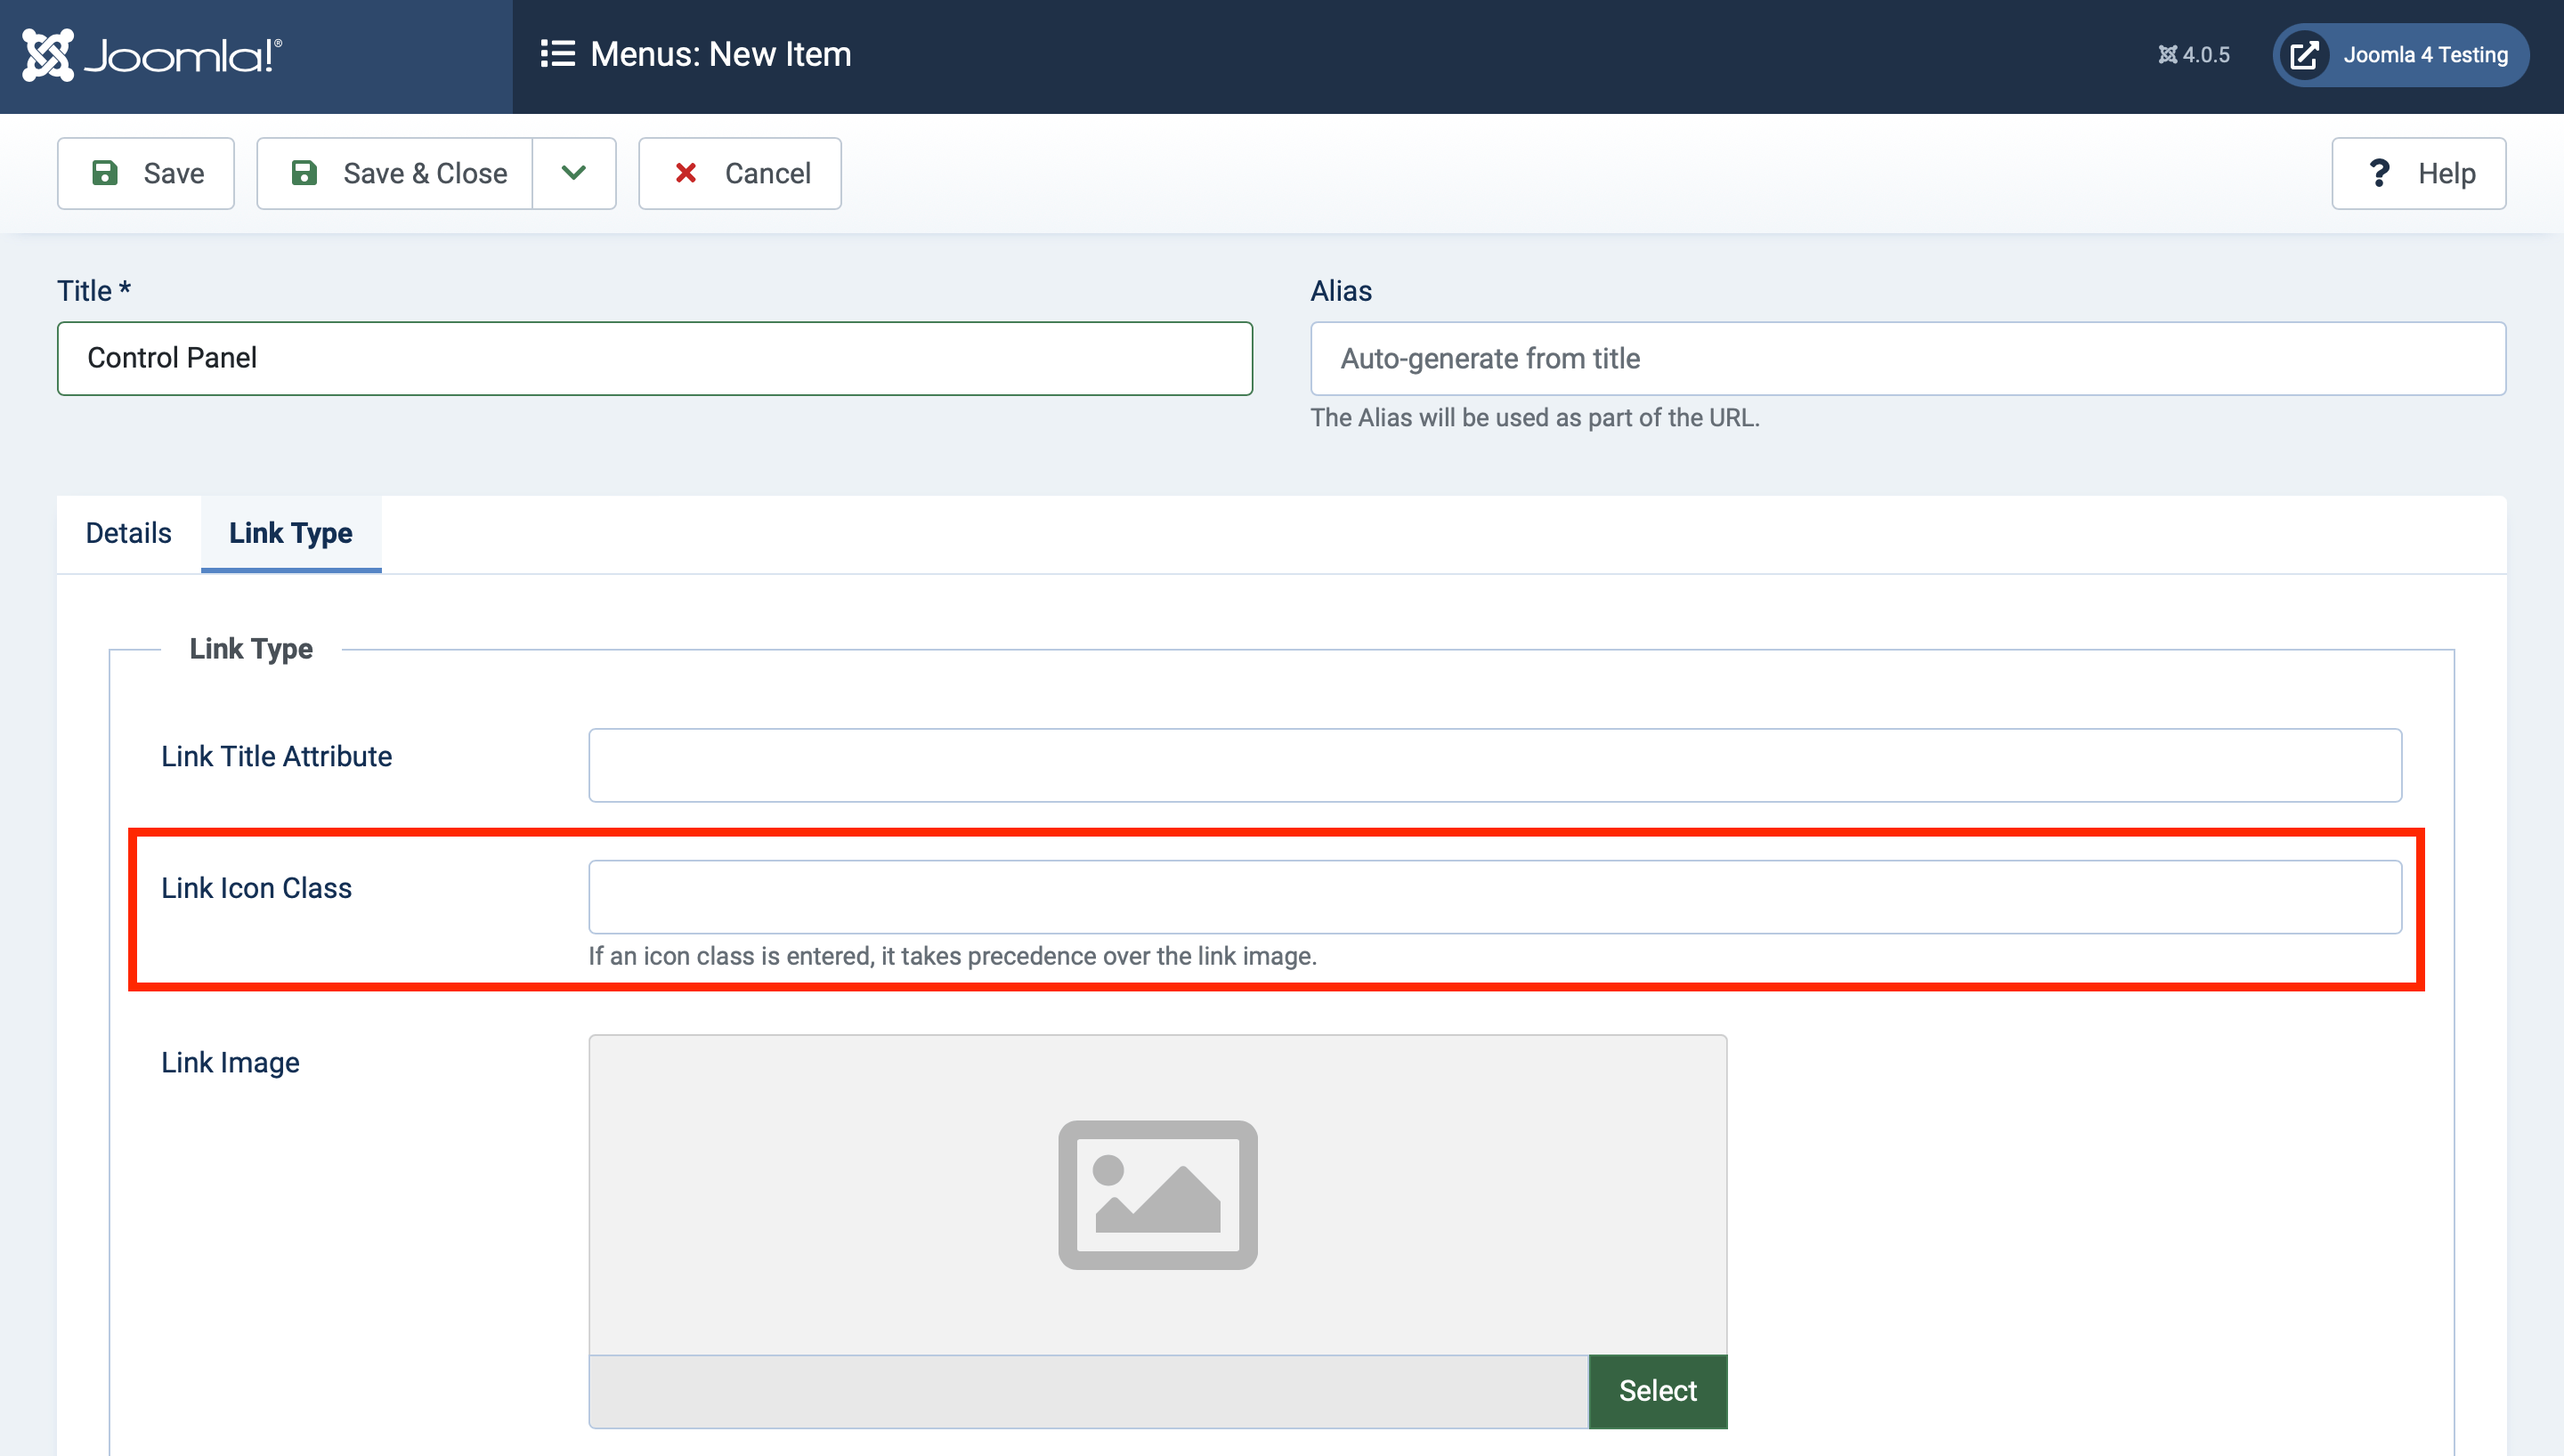
In this case, I want to have a home icon, since it's the home dashboard. So I will use fas fa-home as the icon class. (Note you need to include the fill icon class so that Joomla knows to look for a Font Awesome icon.
Once you're done, hit Save & Close.
Add as many menu items as you need, and then move onto the next step.
Step 5: Create a new menu module.
Once you're ready, click on "Content" in the menu, and then click on "Adminstrator Modules".
Before we add a new menu module, we have to hide the default one from our clients.
Click on "Filter Options" and then click on the "Select Position" dropdown and select "menu".
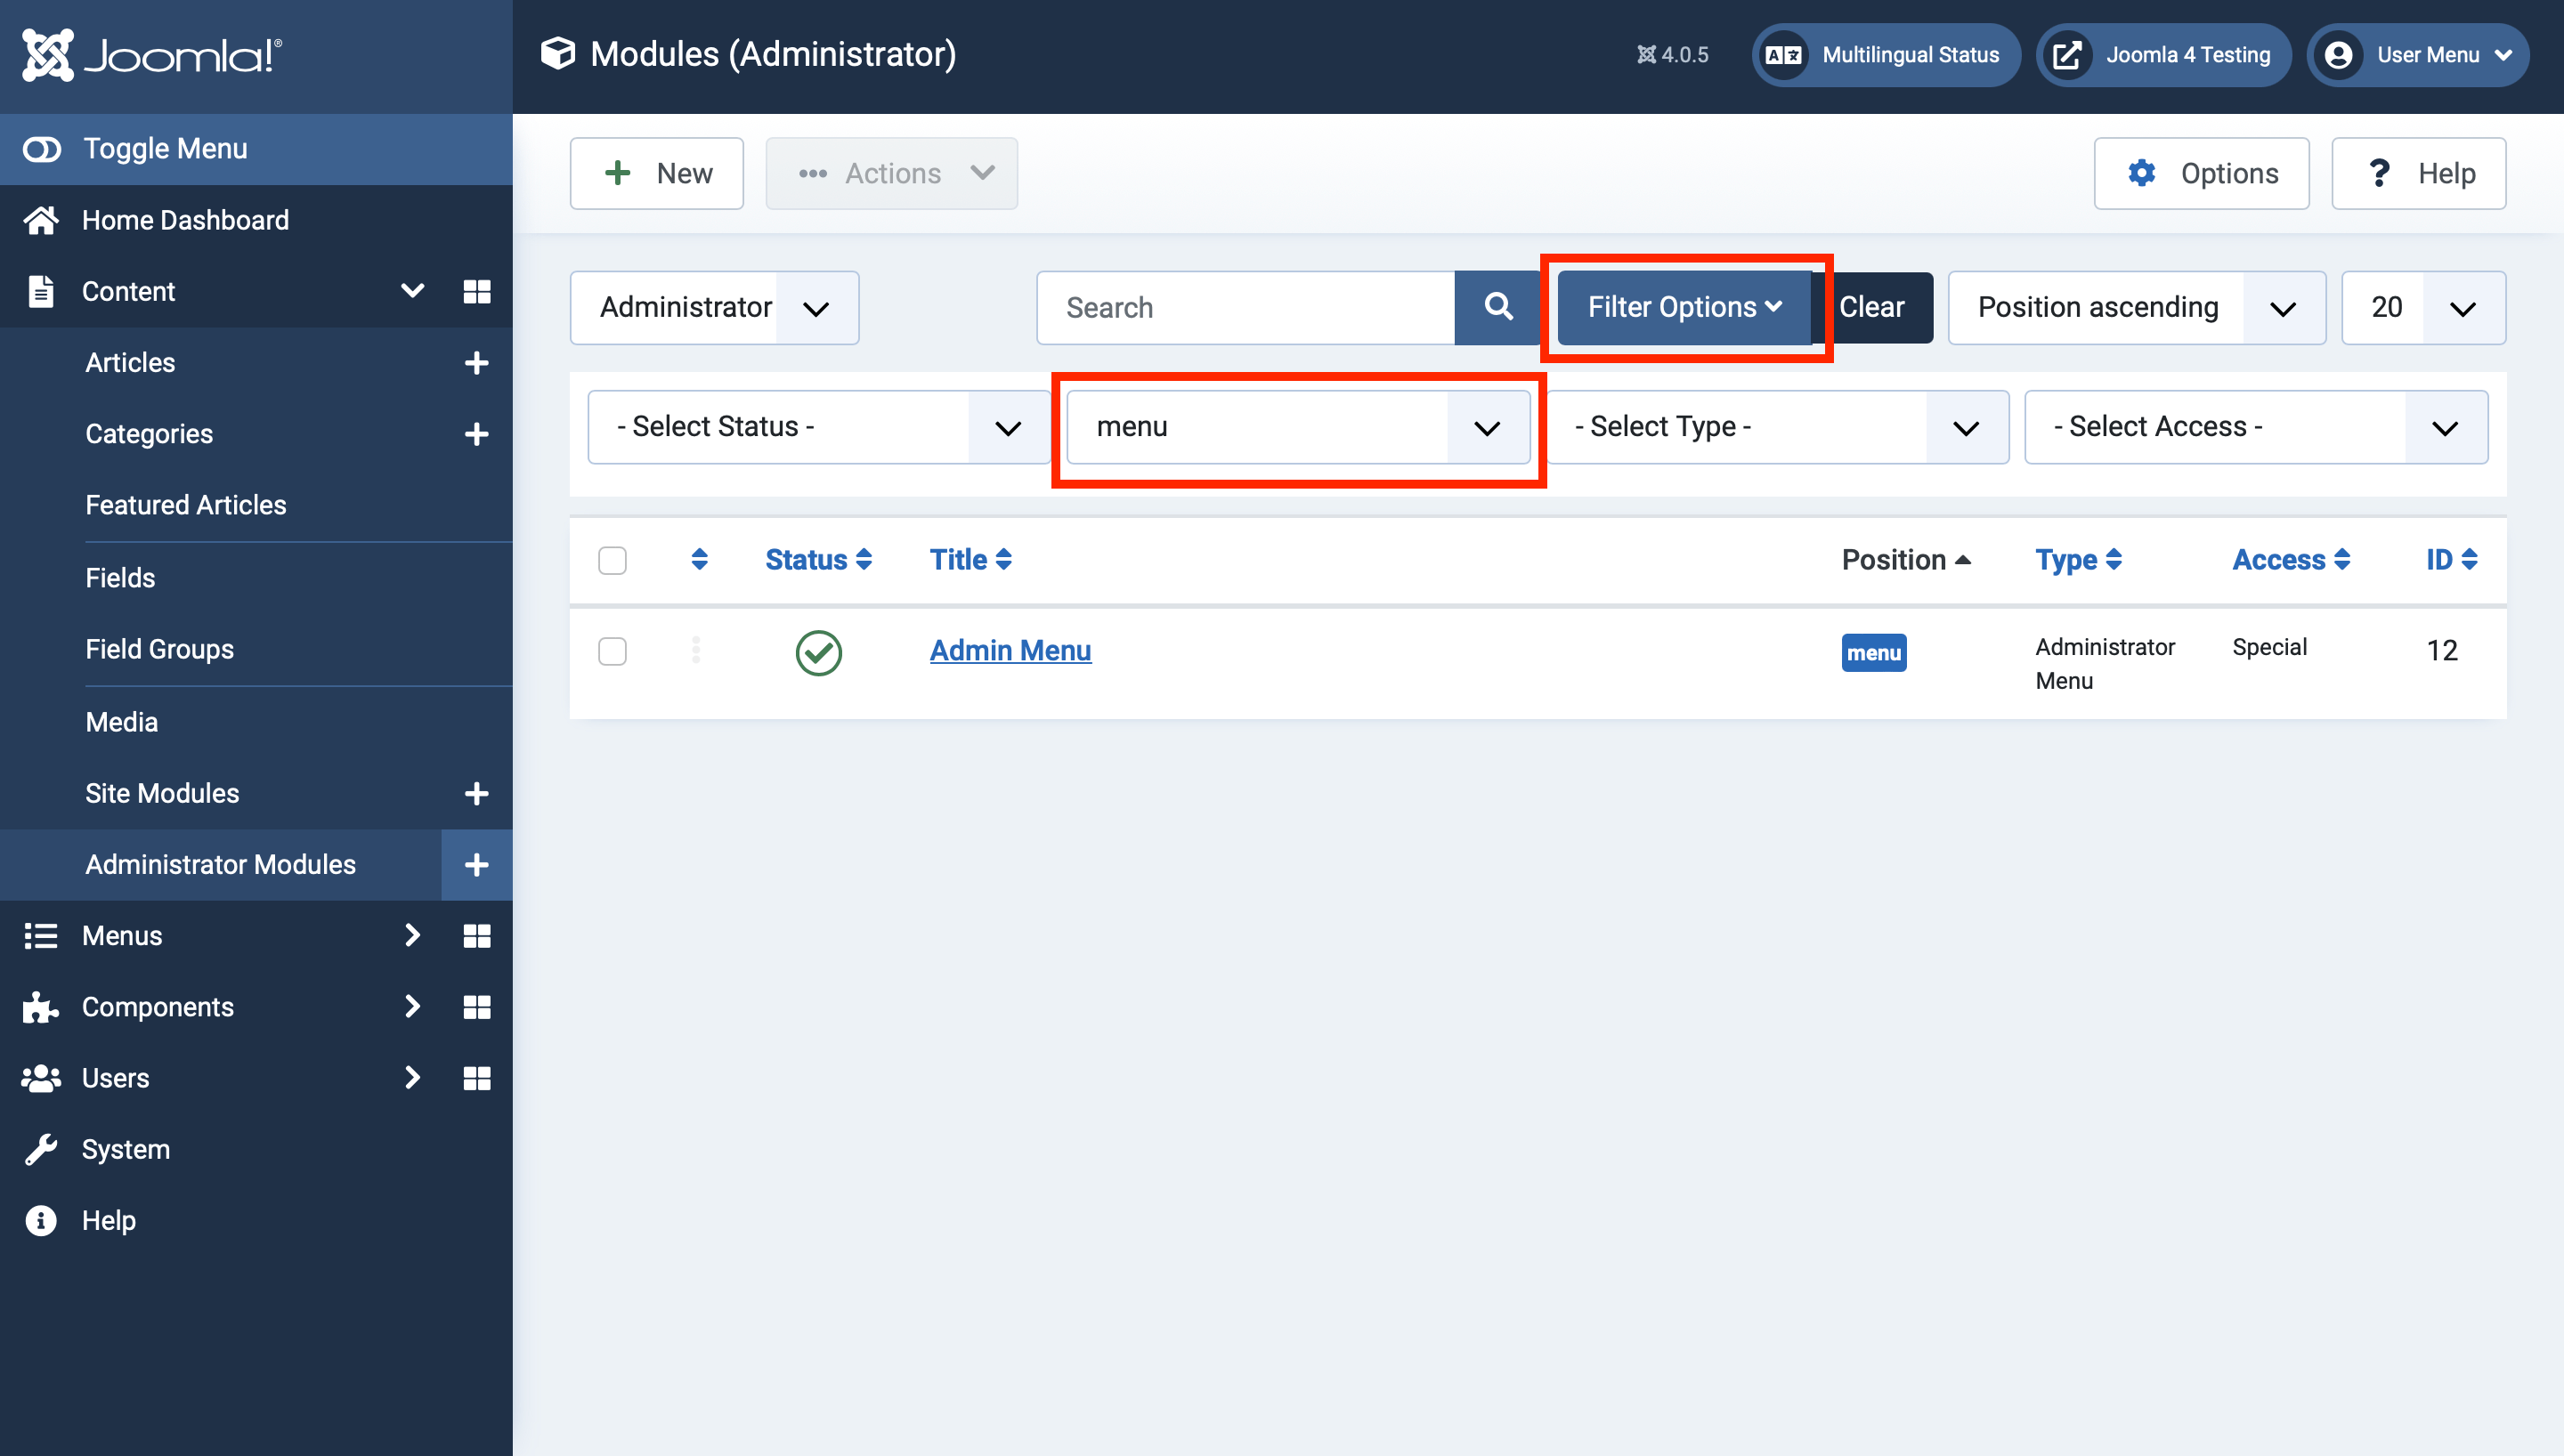
You'll notice that the access is currently "Special". We know from our part 1 article that that means both super users AND clients will see it, but we're making a special client menu, so we'll need to change that.
Click on "Admin Menu" to edit it.
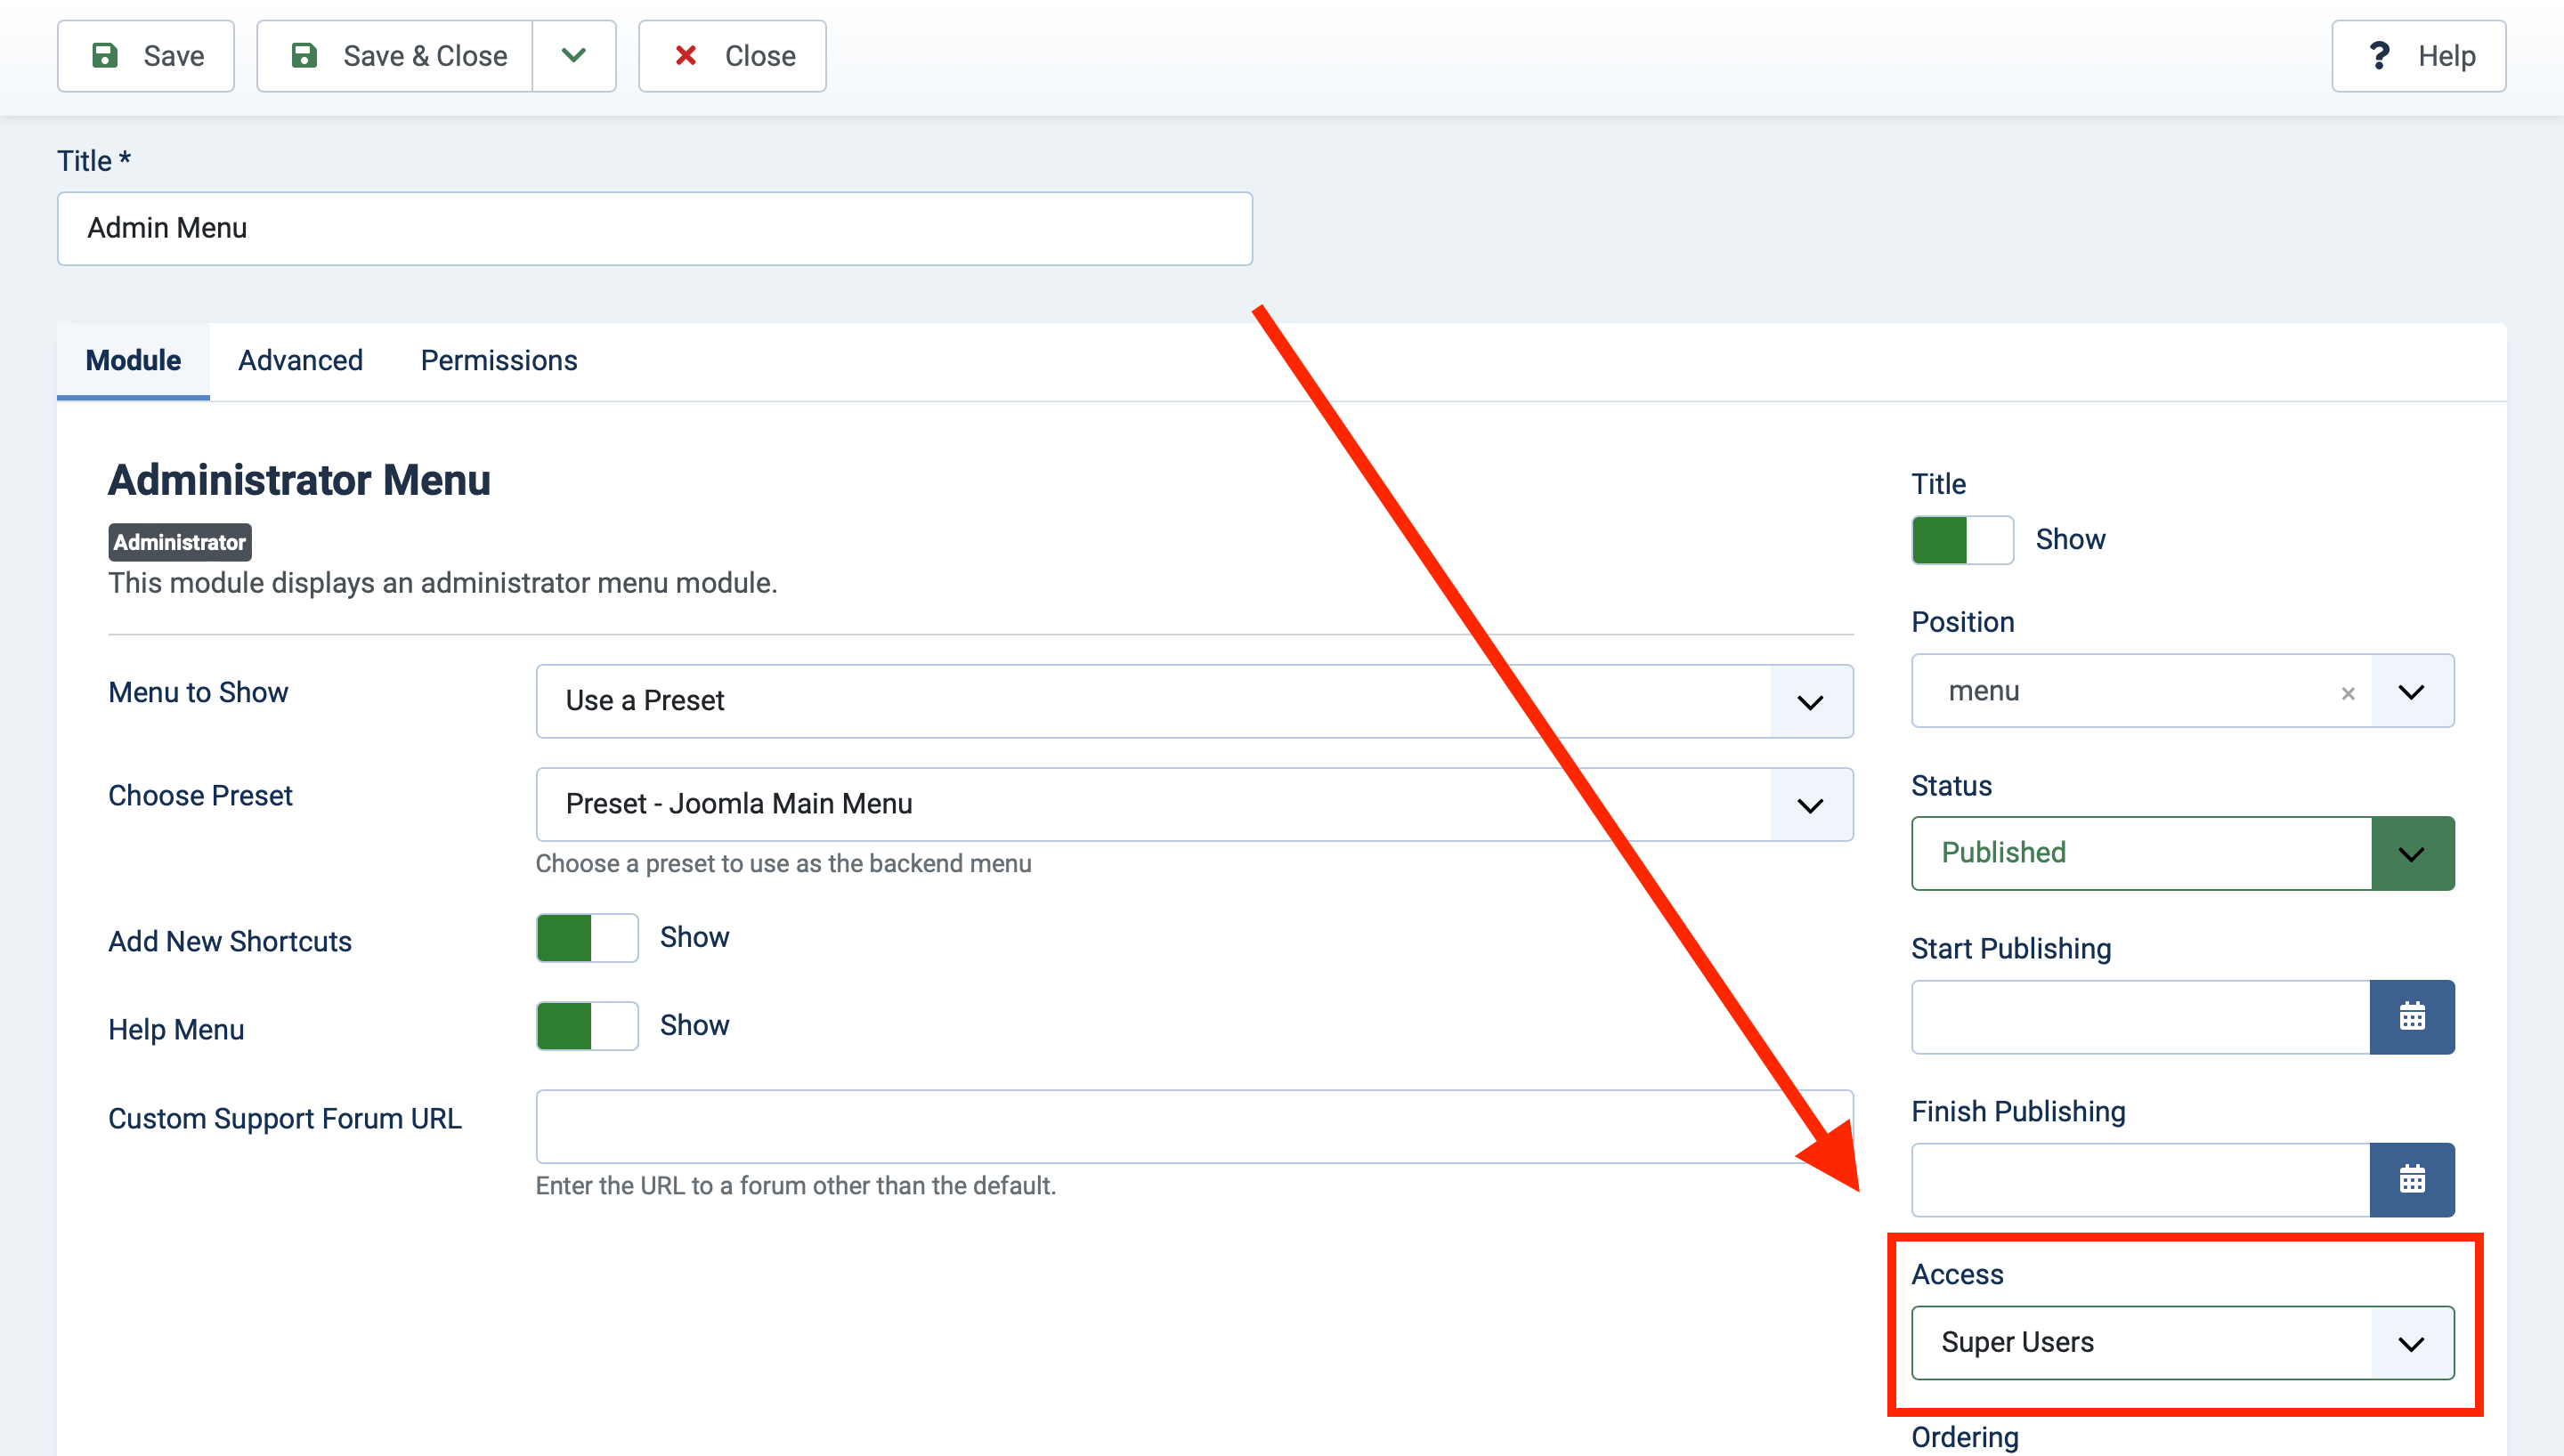
Find the "Access" dropdown (you may need to scroll down), and then select "Super Users". Then, Save & Close.
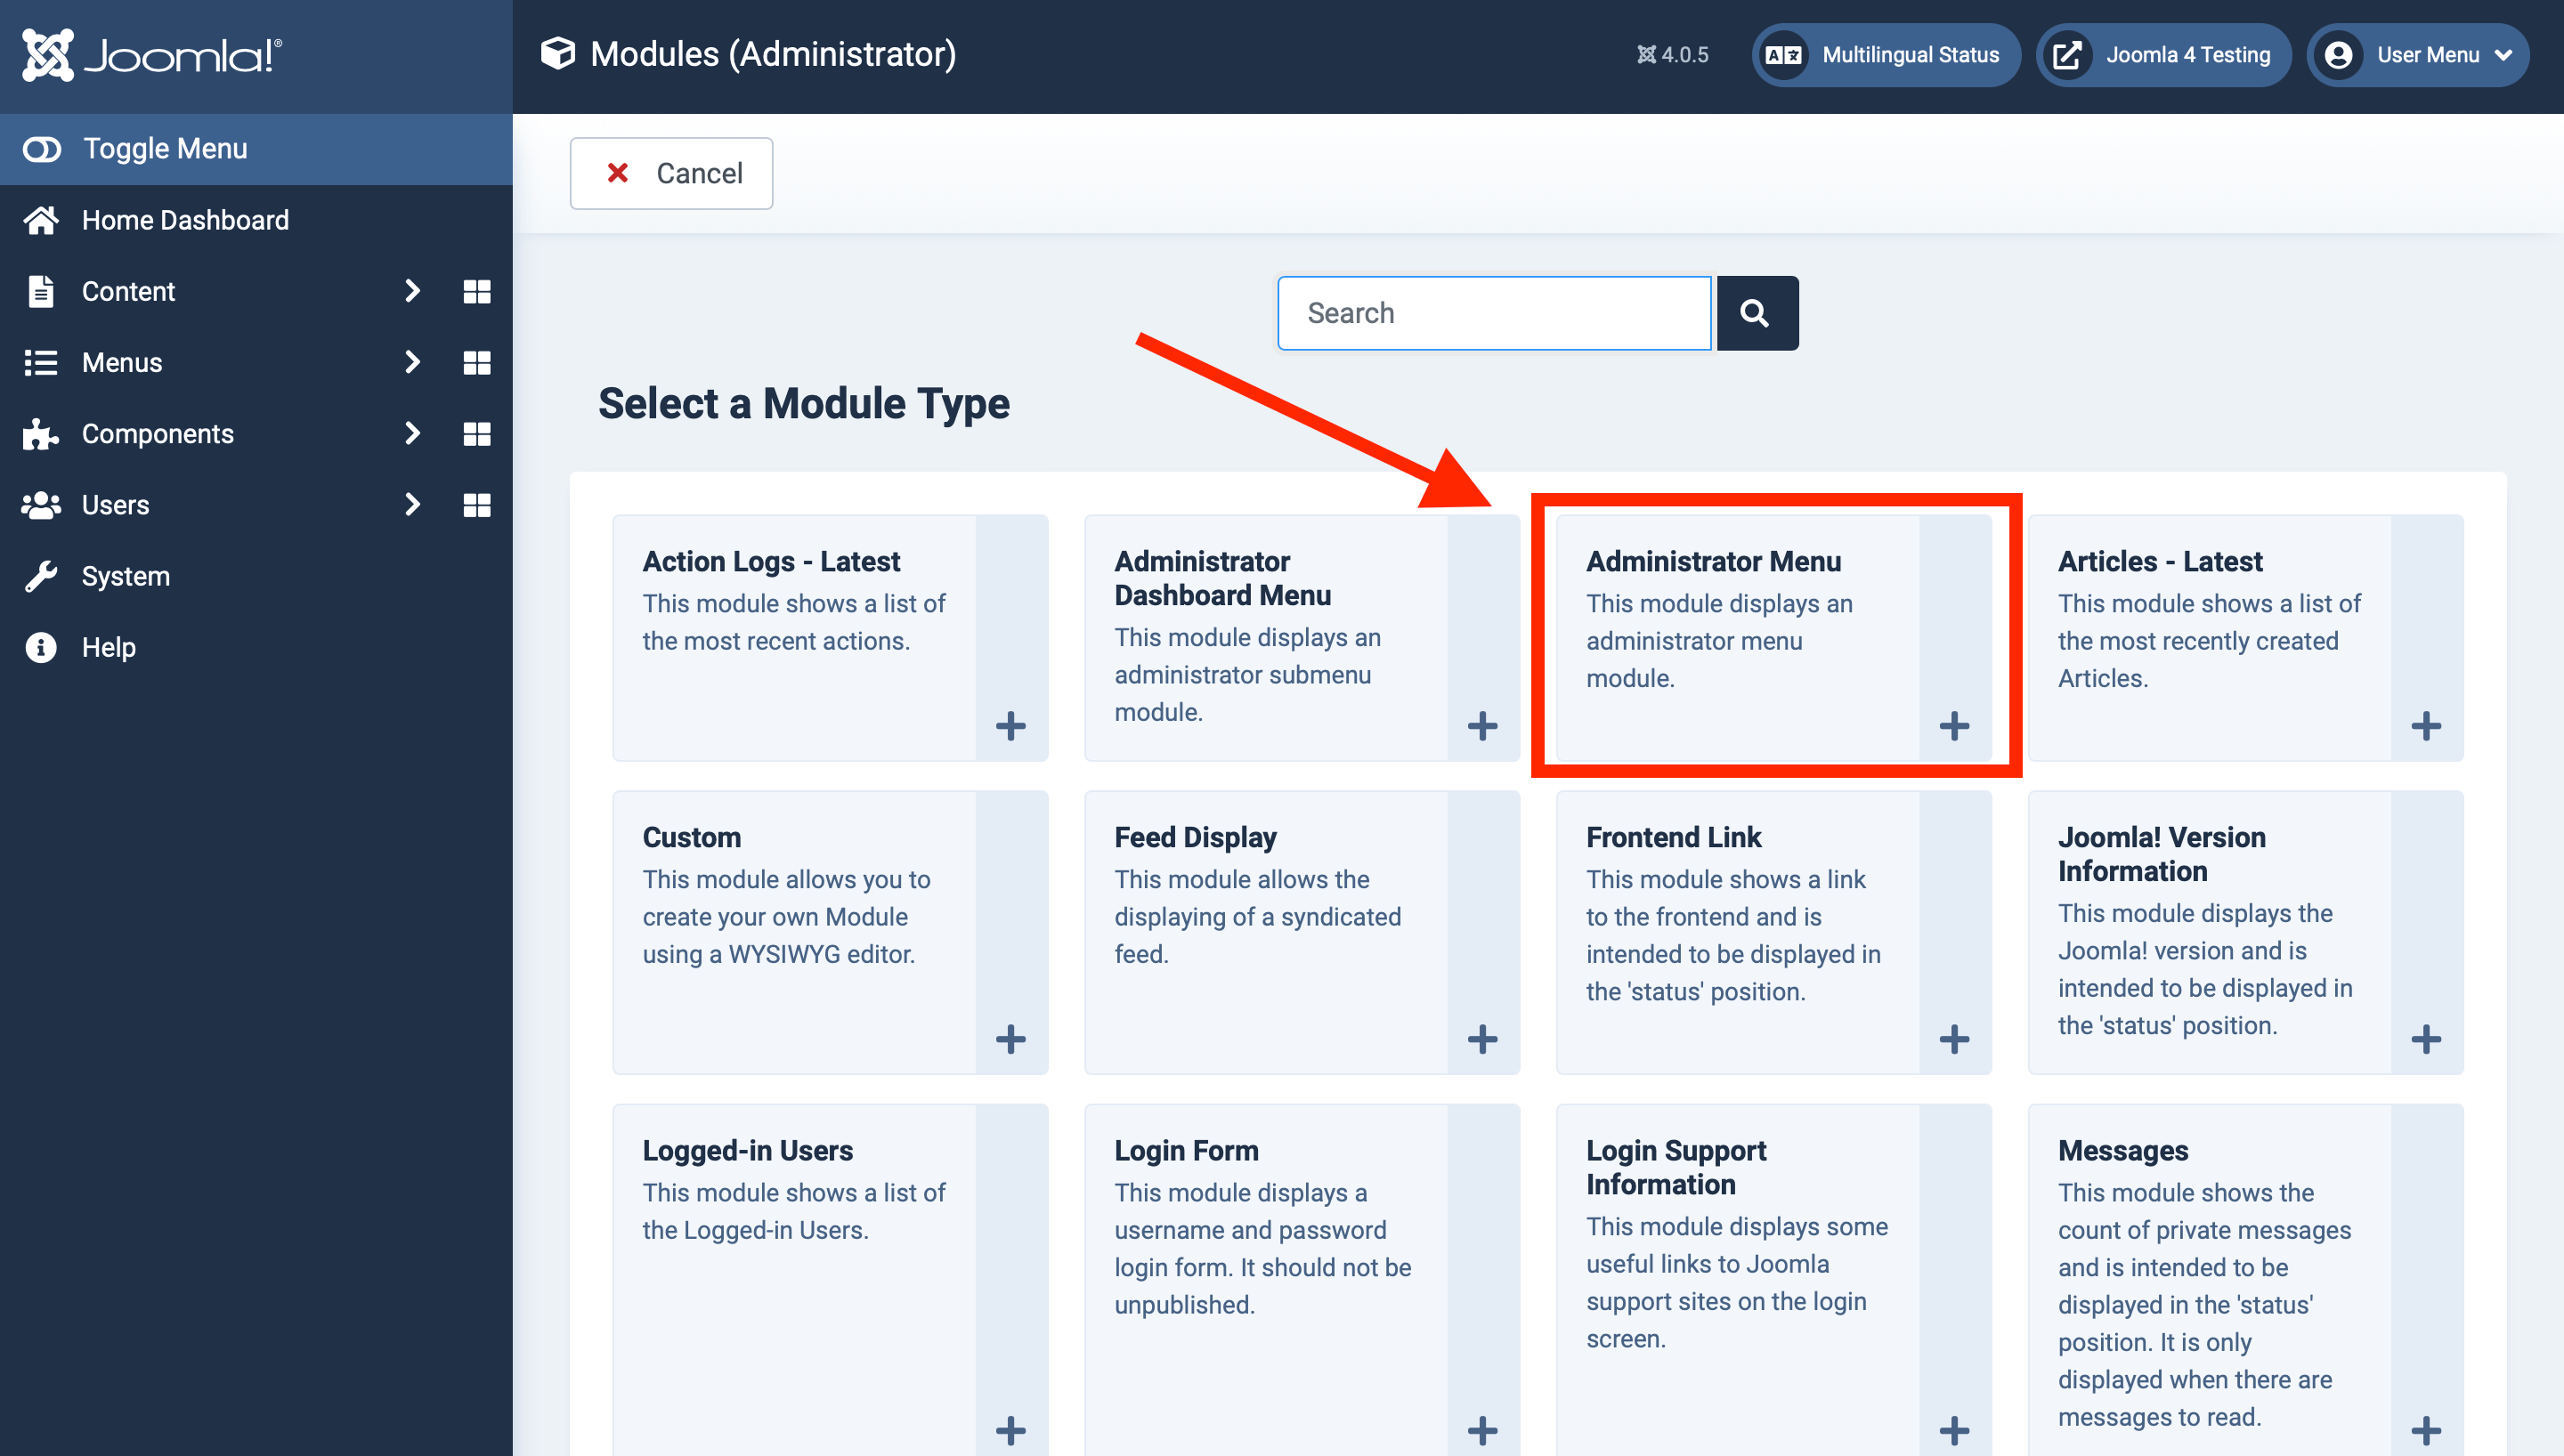
Now we're ready to create a new menu module. Click "New" in the toolbar.
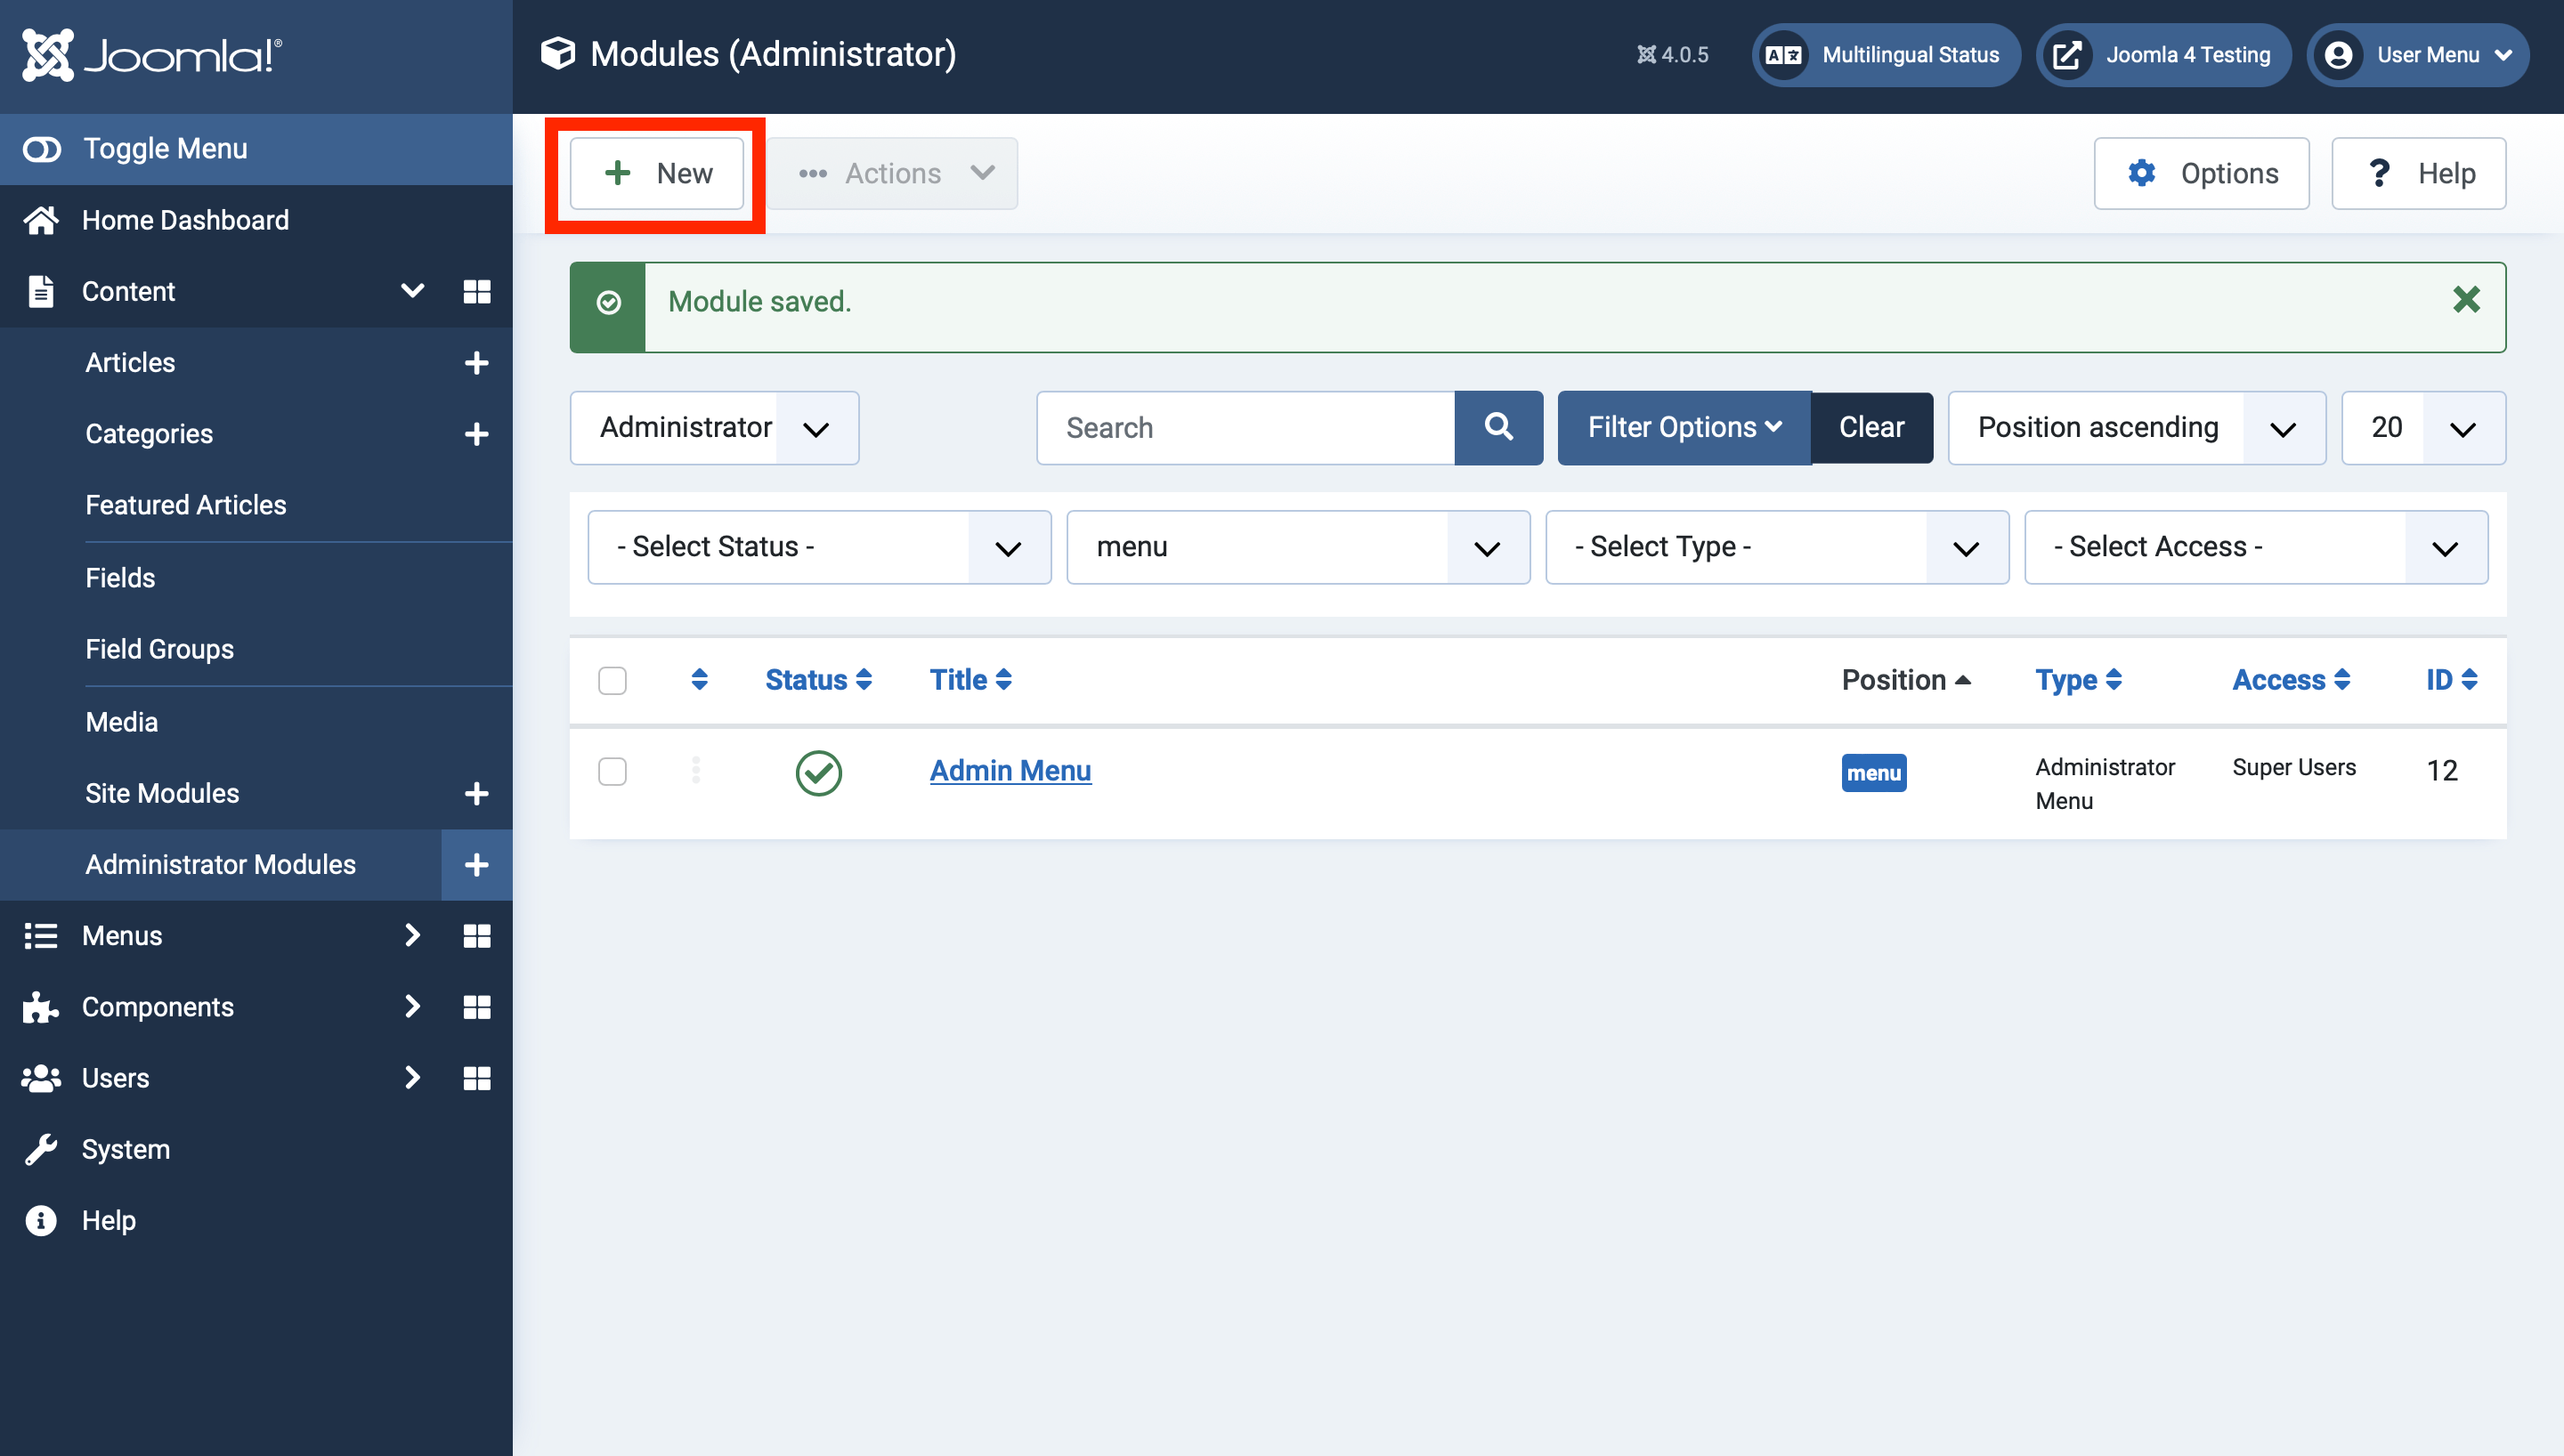
In the "Select a Module Type" screen, pick "Administrator Menu".
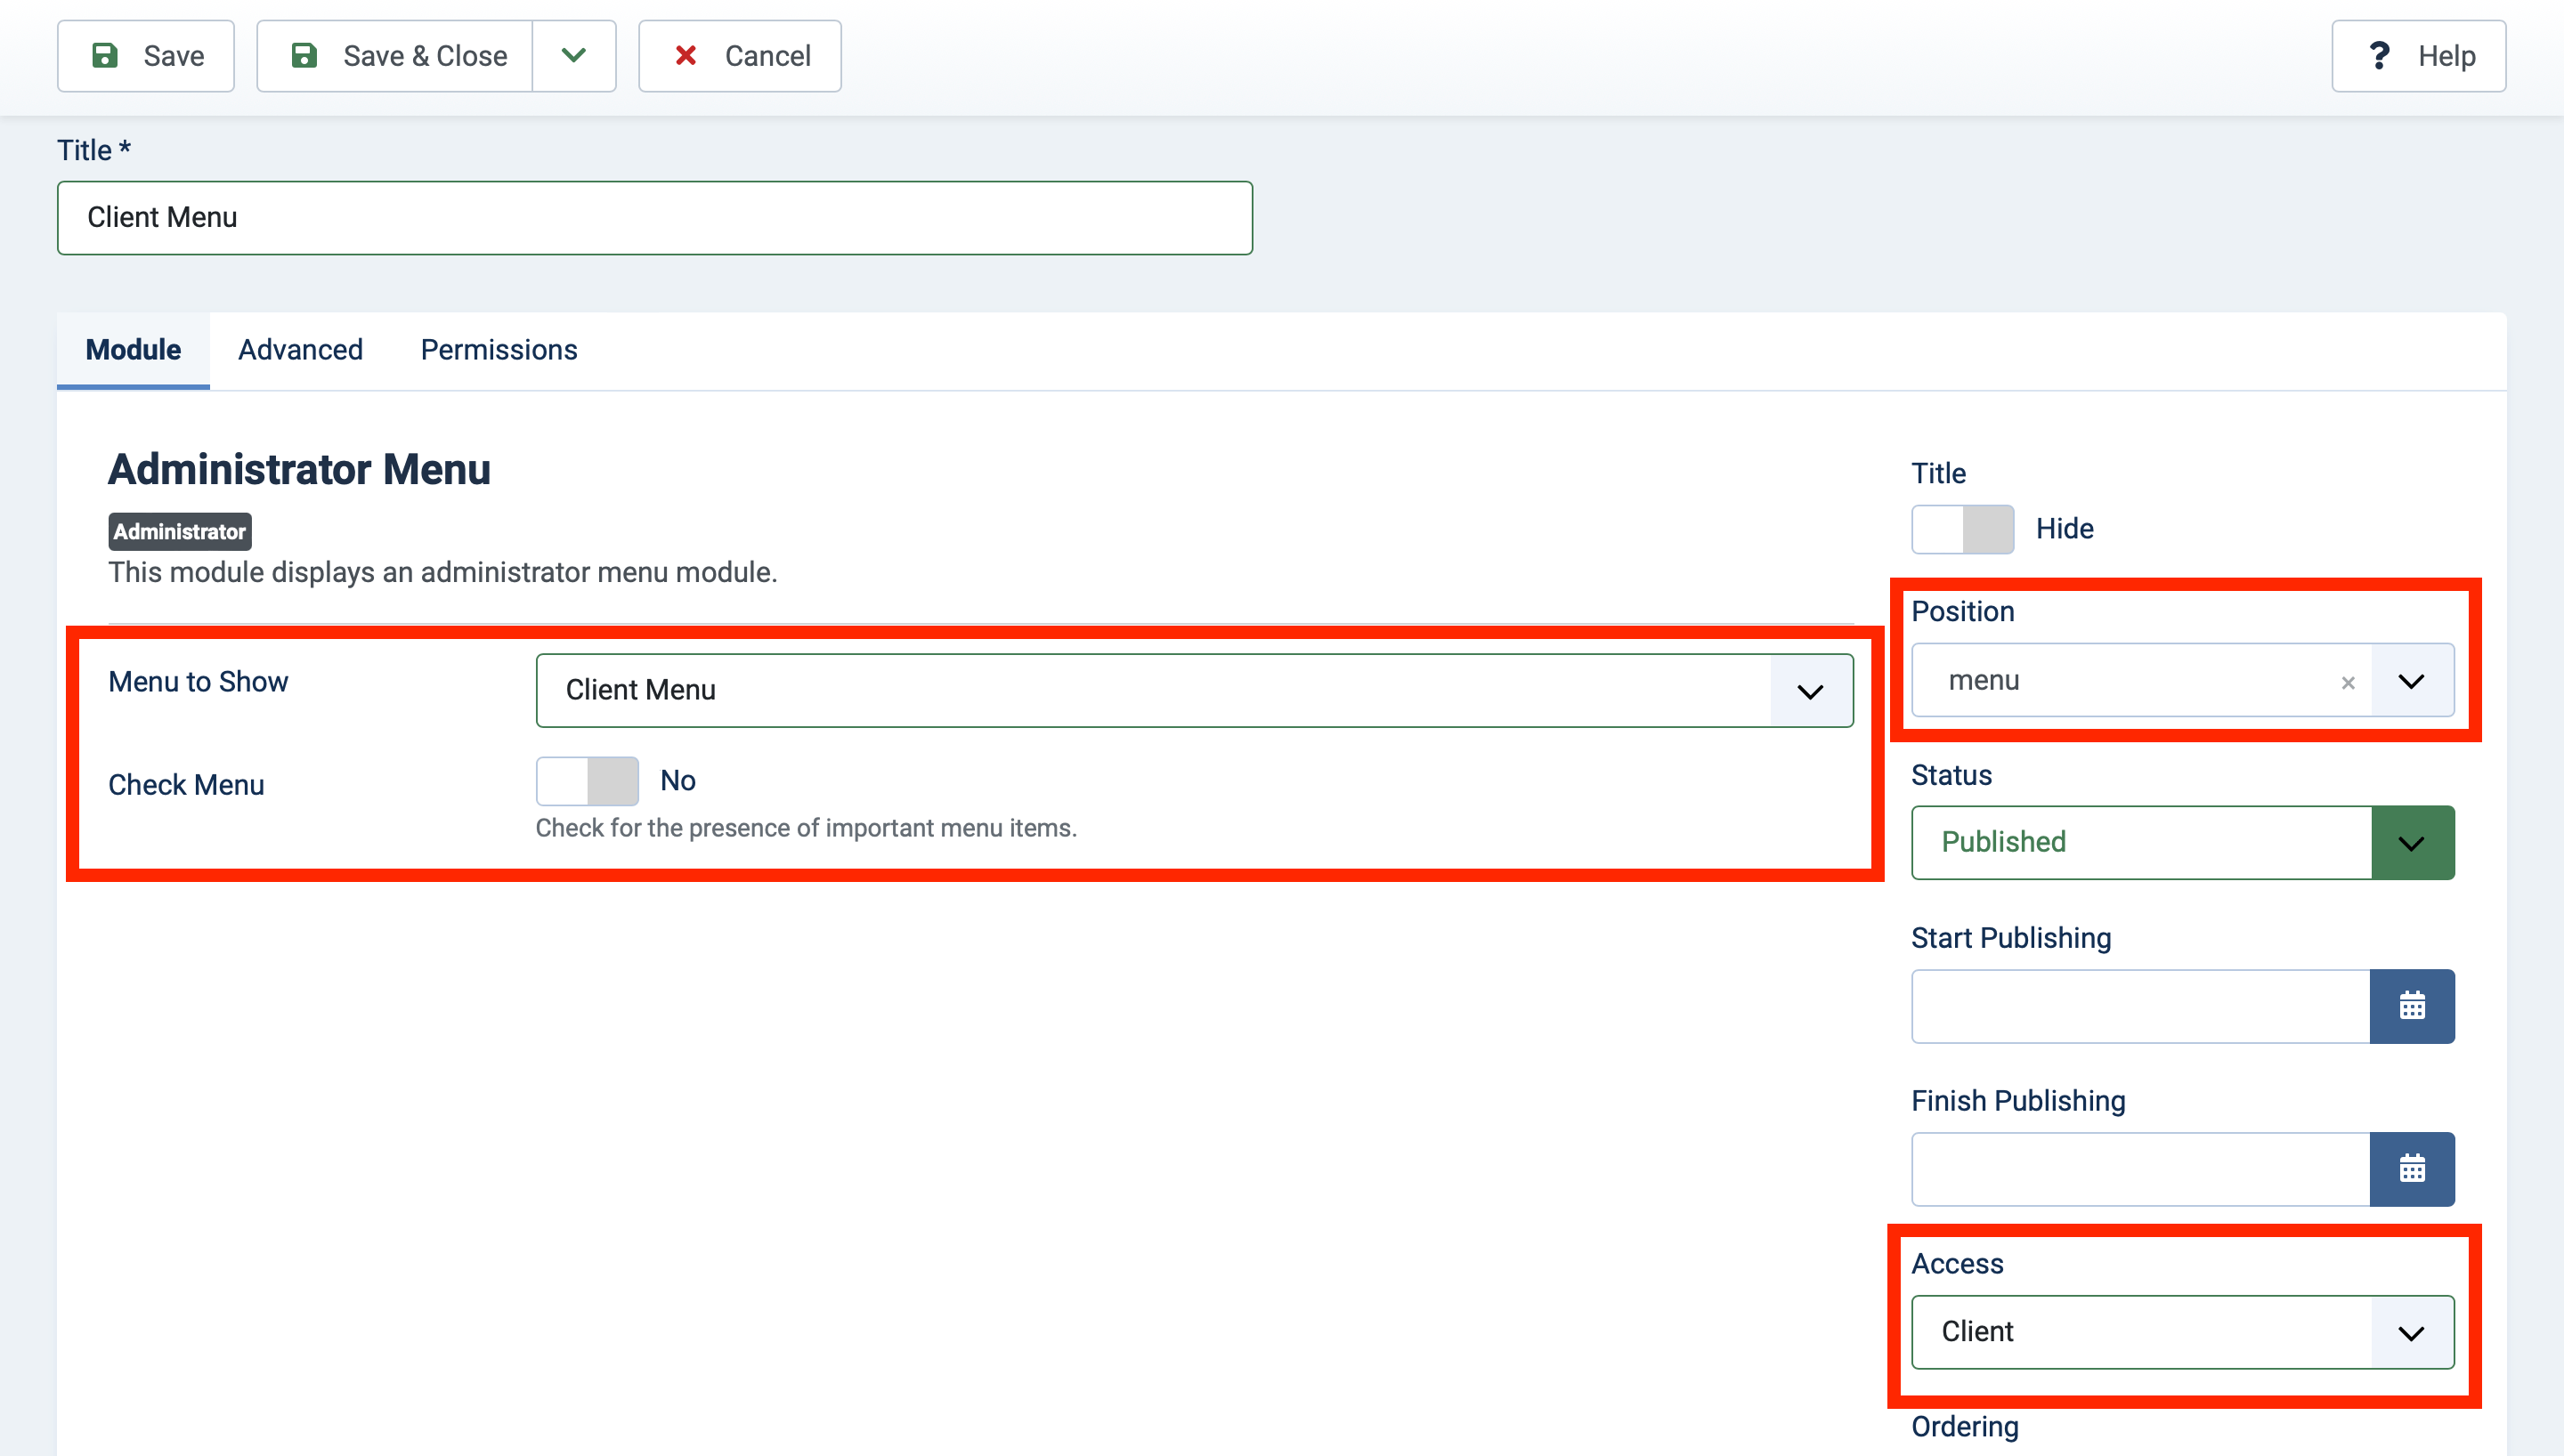
Name the menu module.
In the "Menu to show" dropdown, select the menu we just created. Make sure you change "Check Menu" to No, otherwise your clients will get a notice to revert to the default menu.
Scroll down a bit to see the access dropdown, and select the "Client" view access level we created in part one.
Since we had already filtered the administrator modules to the menu position, it's already pre-filled, but double check that anyway.
Your screen should look something like this:
When you're ready, click Save & Close.
That's it! Now's a great time to login in a private window with your test client user.
My test client sees this now:
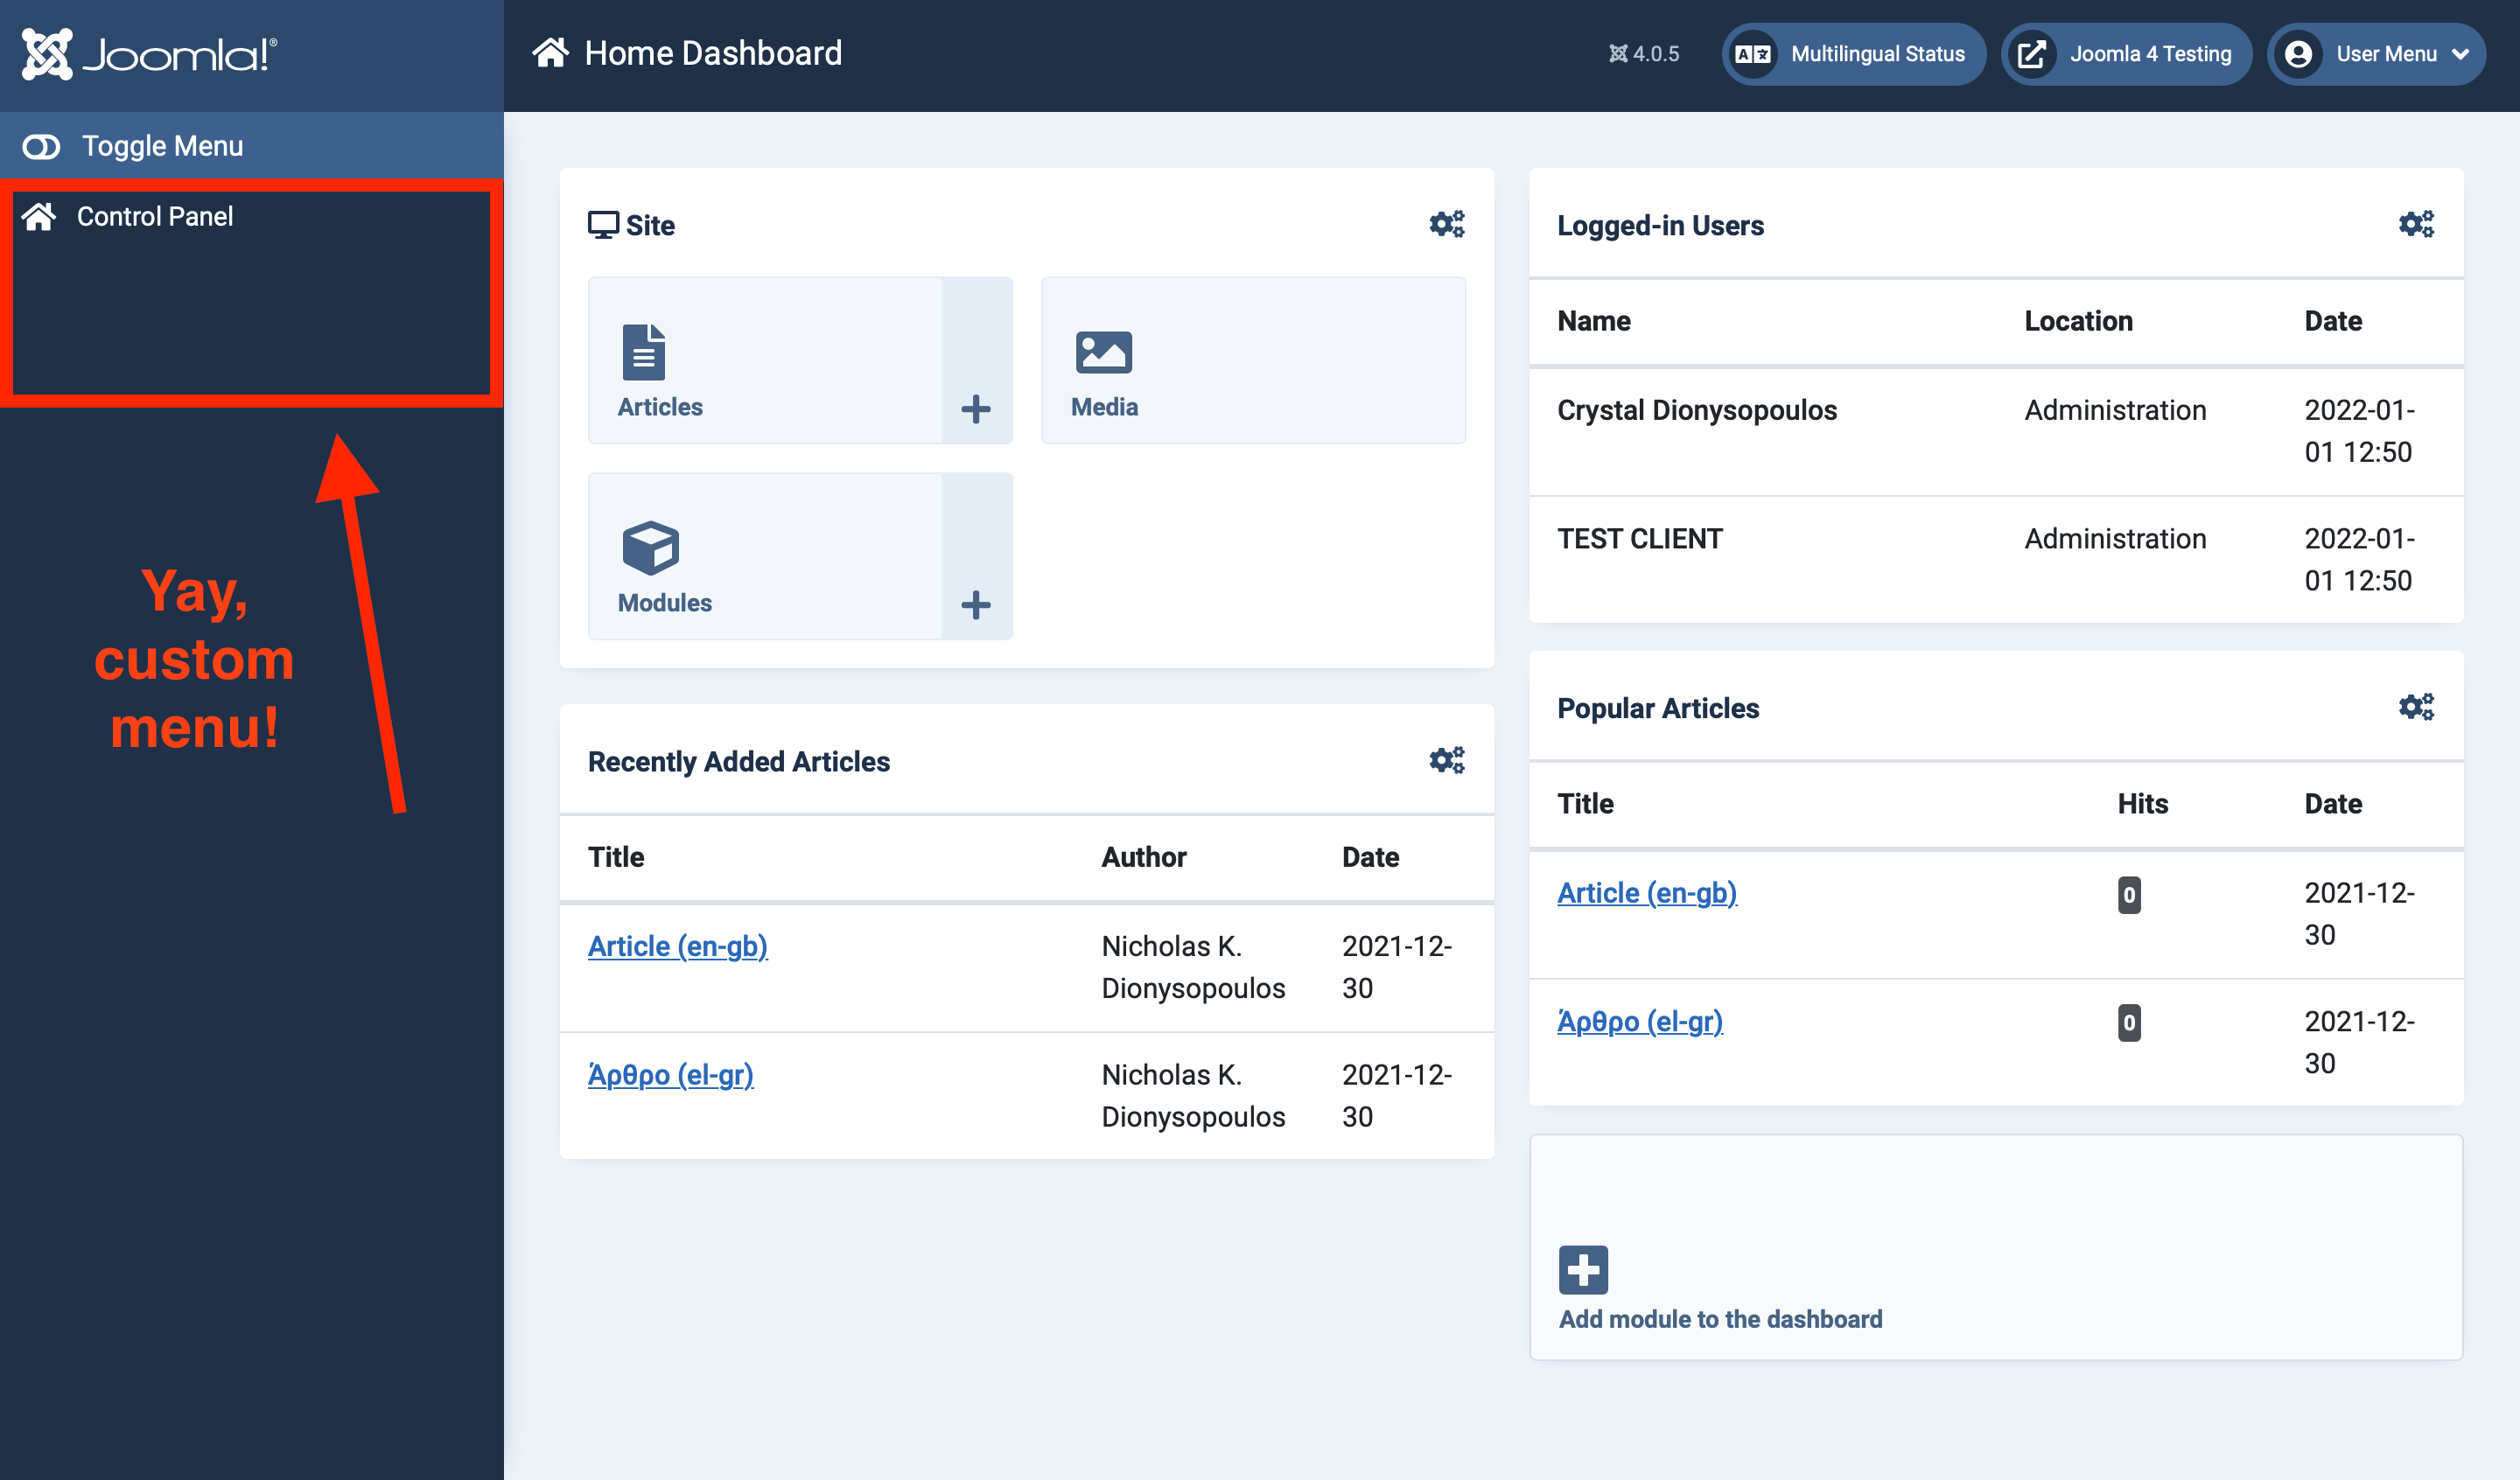
Woohoo! You can add links, headings (with nested menu items), and more to make this a perfect, streamlined menu for your clients.
Creating (and using!) new dashboard pages
Dashboard pages are totally new in Joomla 4, and they make use of a new component called com_cpanel. They're what you see when you click on the little "window" icons in the default admin menu:
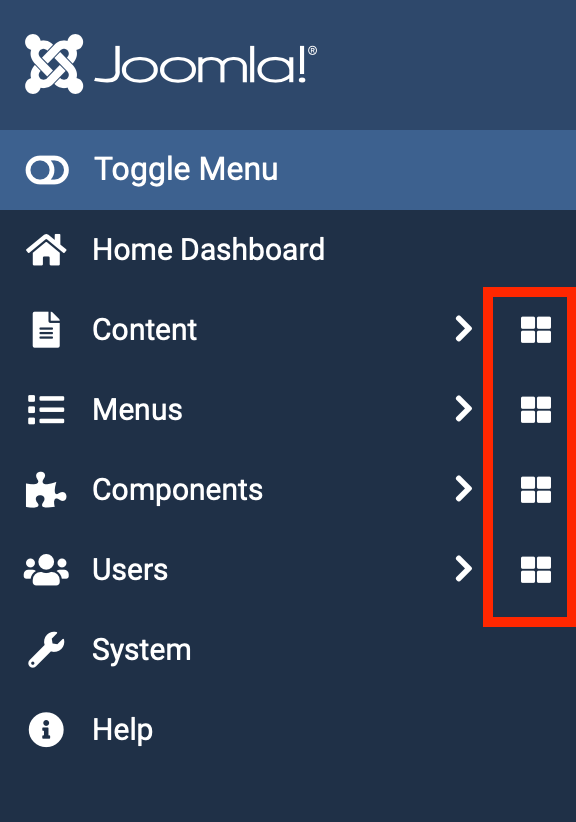
There are 7 core dashboard pages (that I'm aware of):
- Home Dashboard
- Content
- Menus
- Components
- Users
- System
- Help
Third-party extensions can also choose to integrate with com_cpanel and display their own dashboards.
What isn't necessarily obvious is that if you create your own admin menu, you can also add your own dashboard pages, outside of the default 7 that Joomla has...and it doesn't require any coding at all.
This is super useful, because Joomla's dashboards are organized by the function or component; this makes sense to us as site builders, because we understand Joomla. However, our clients have a different mental model of their site, and it's probably dependent on how content is categorized on the site (rather than the type of content).
For many of my clients, even though news articles and site pages are both "articles", they think about them differently, so it's unintuitive to access those articles in the same way.
To fix this hypothetical scenario, let's build a dashboard for the News section of our test site.
Click Menus, and open the Client Menu we just created.
Select "New" to create a new menu item.
Fill out the menu title. (I used "News".)
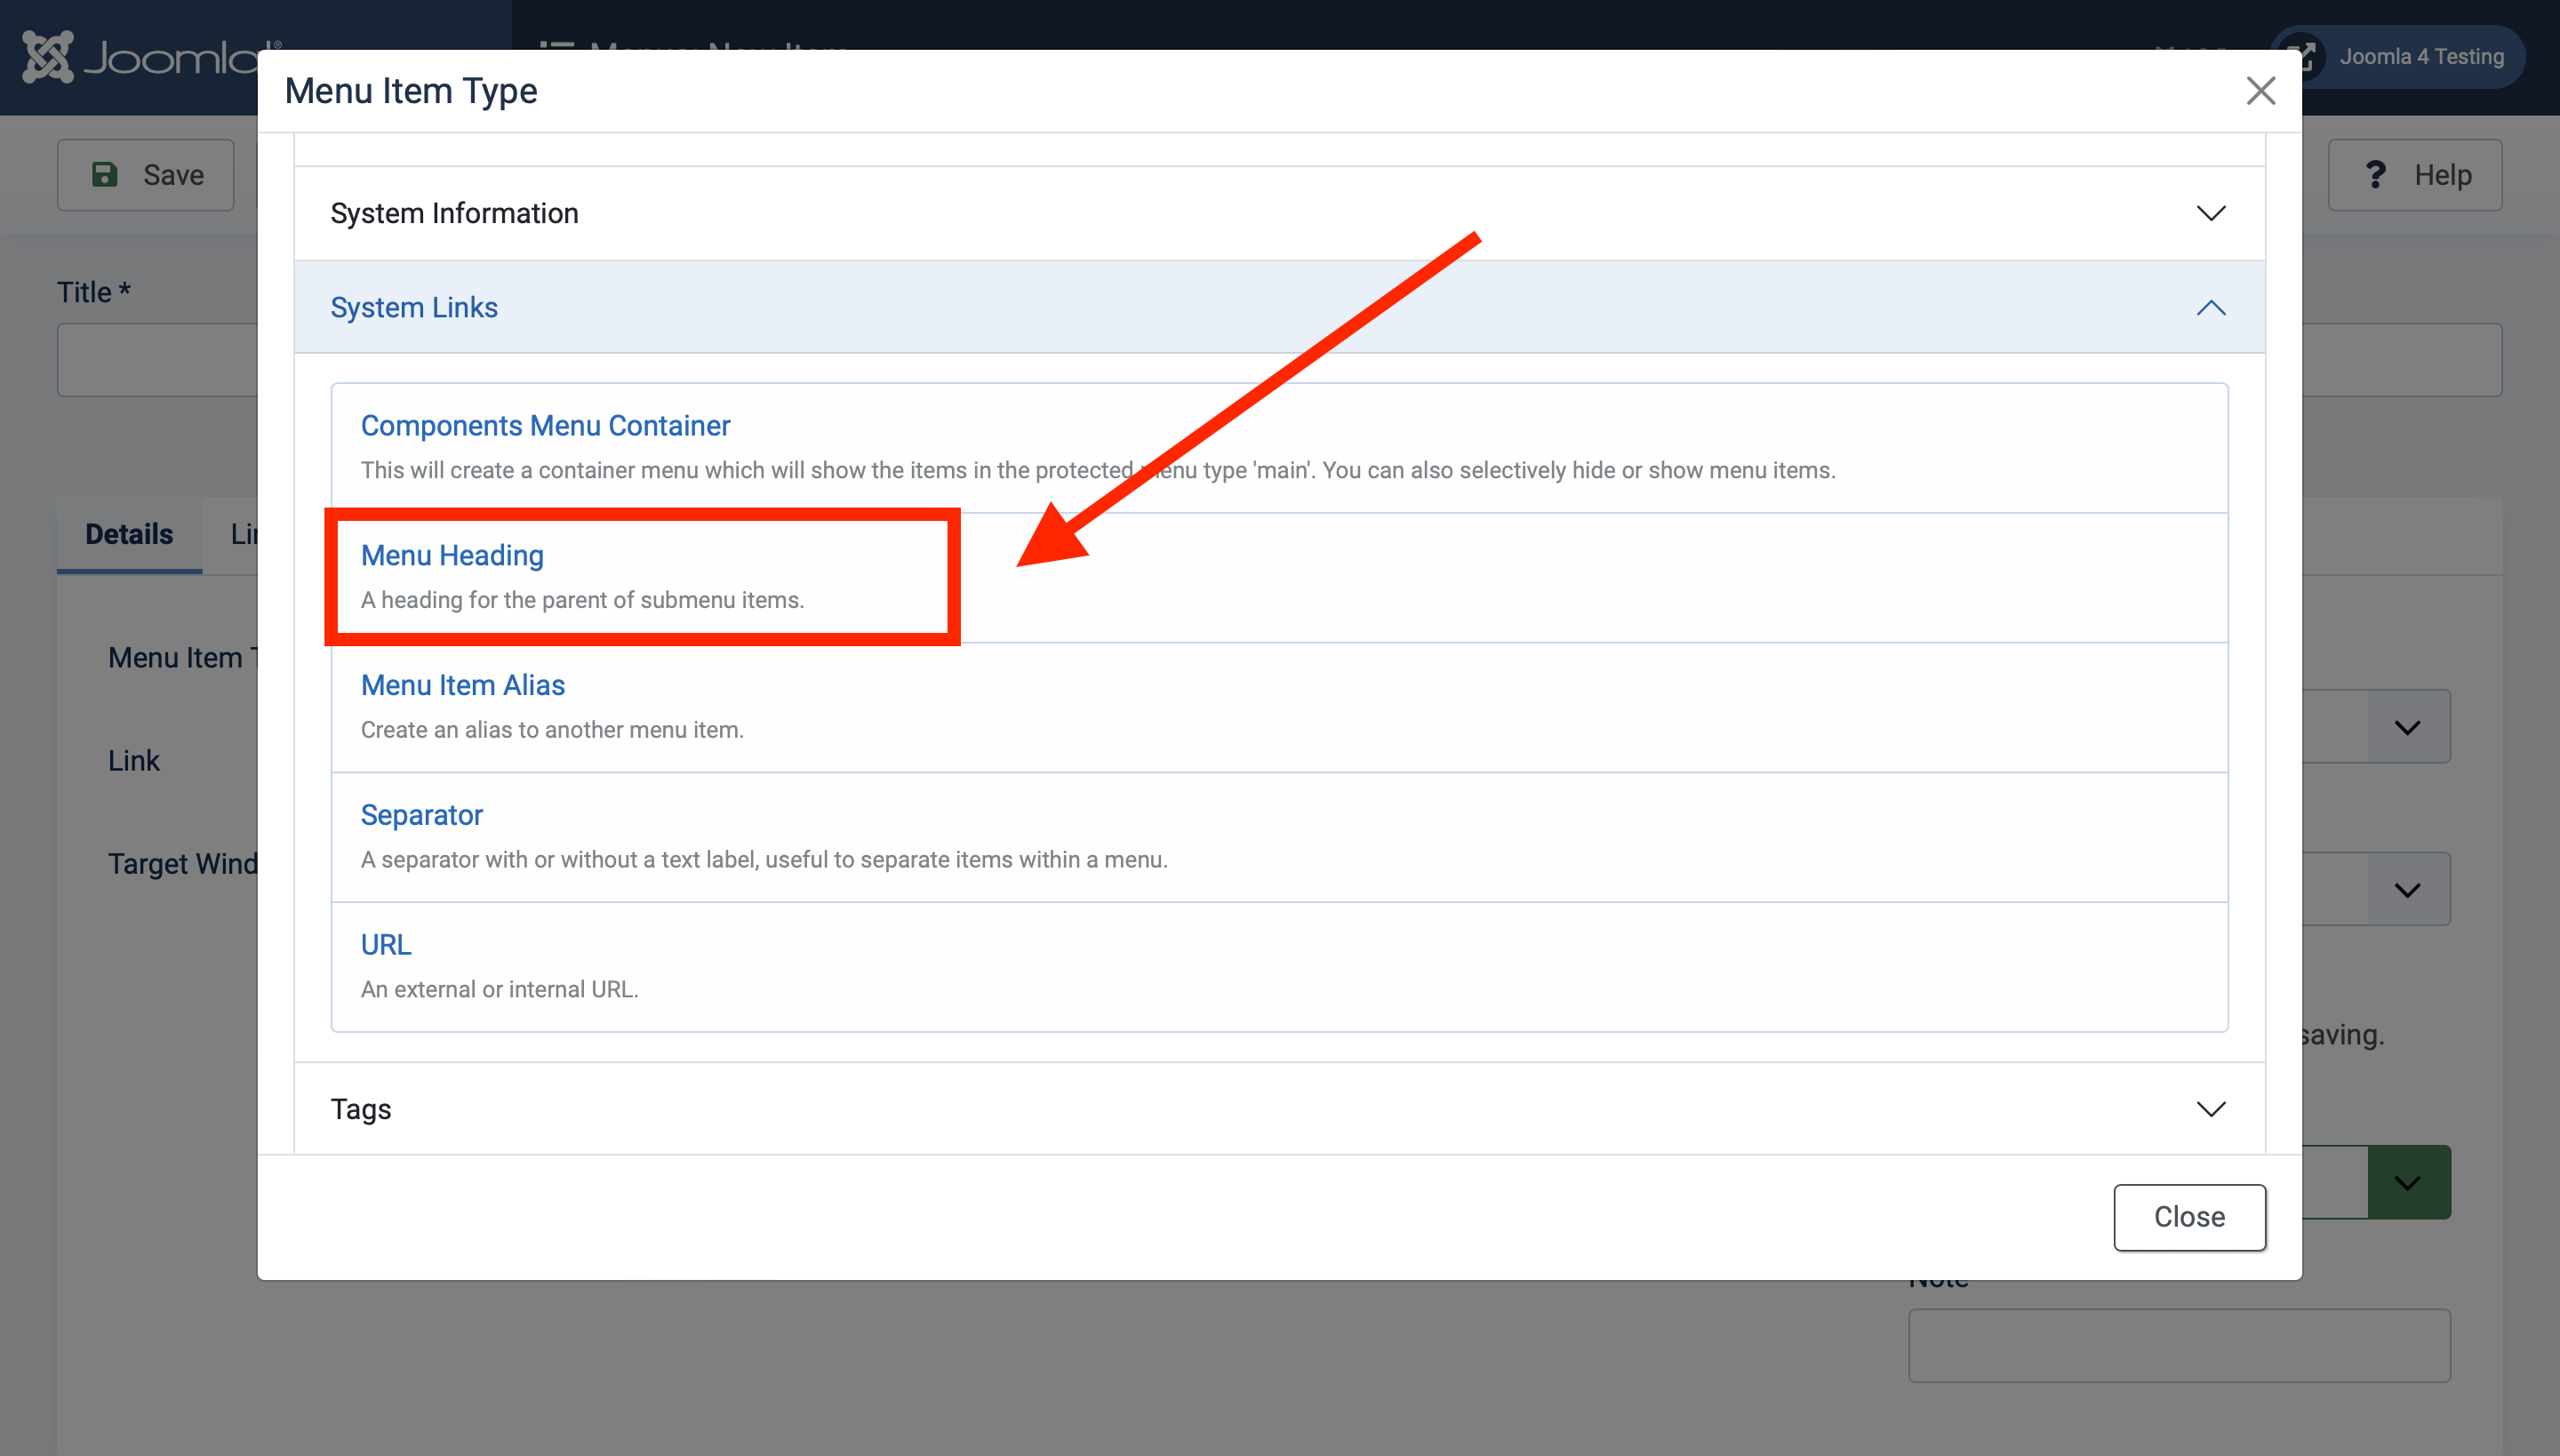
Select the menu item type: Scroll down to System Links, and select Menu Heading.
This will create a dropdown for the section, and is the menu item that the "window" icon will show next to.
Go to the second tab. If you want, fill out an icon class.
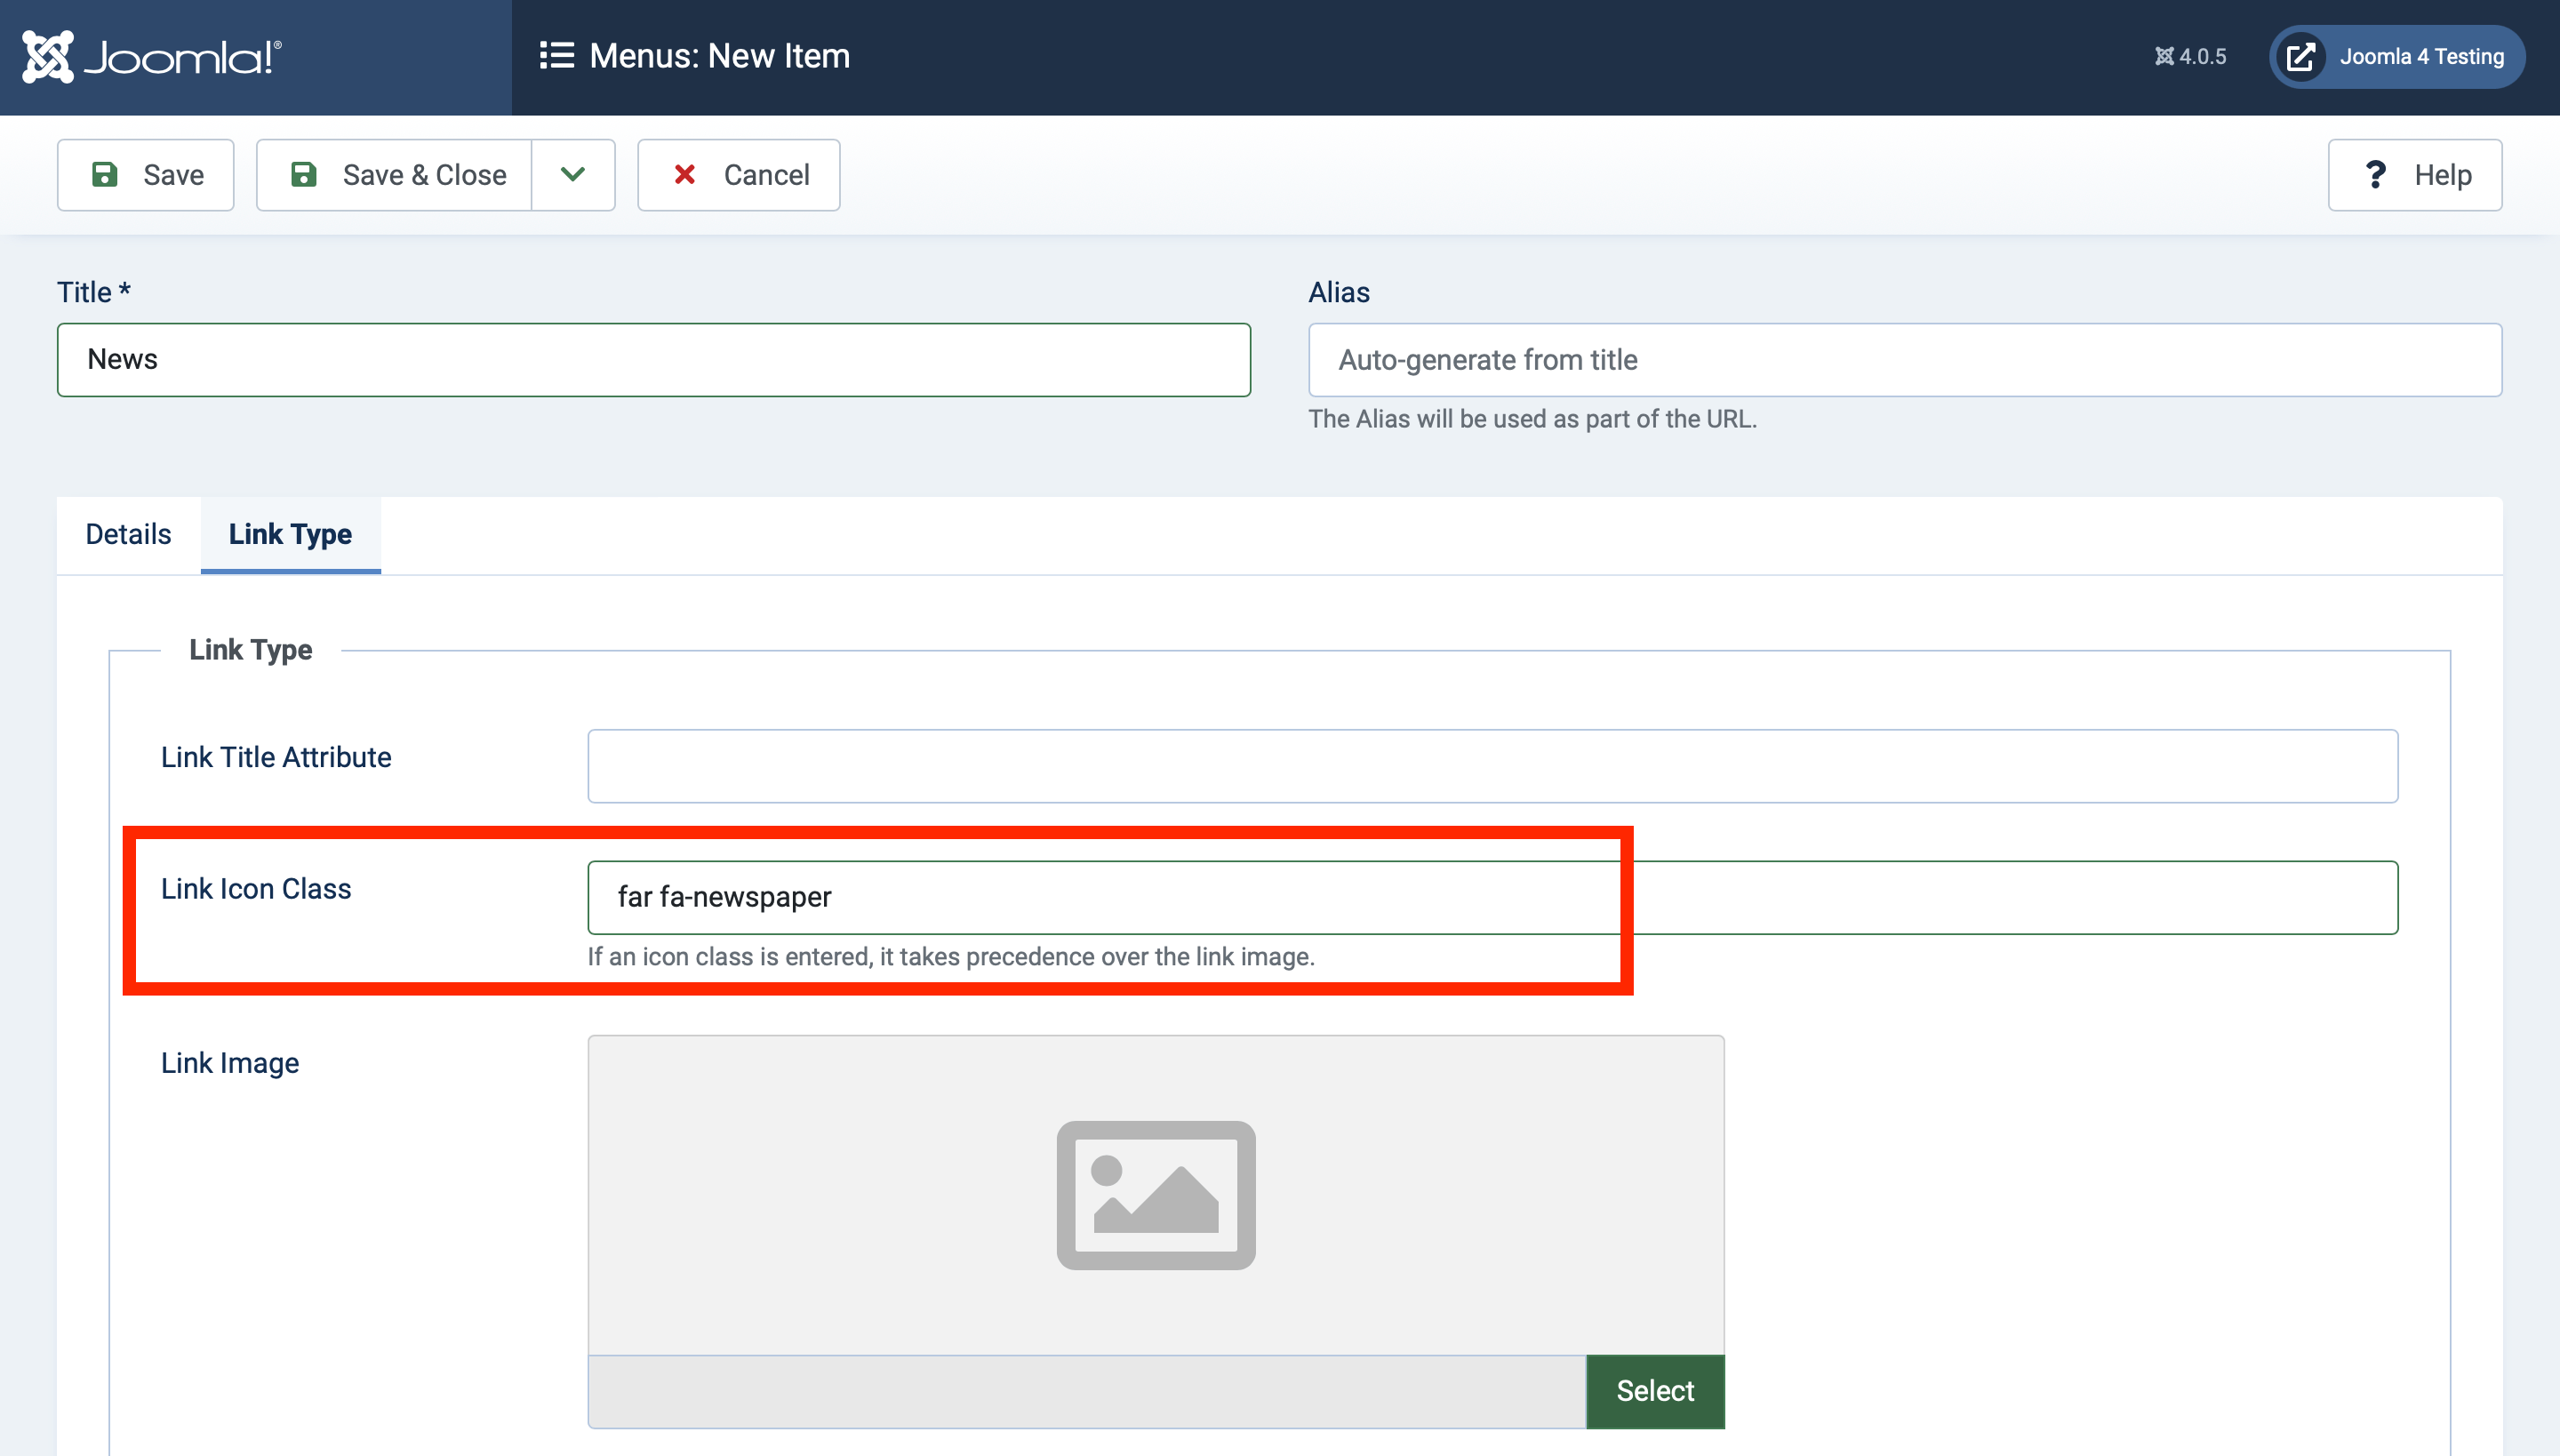
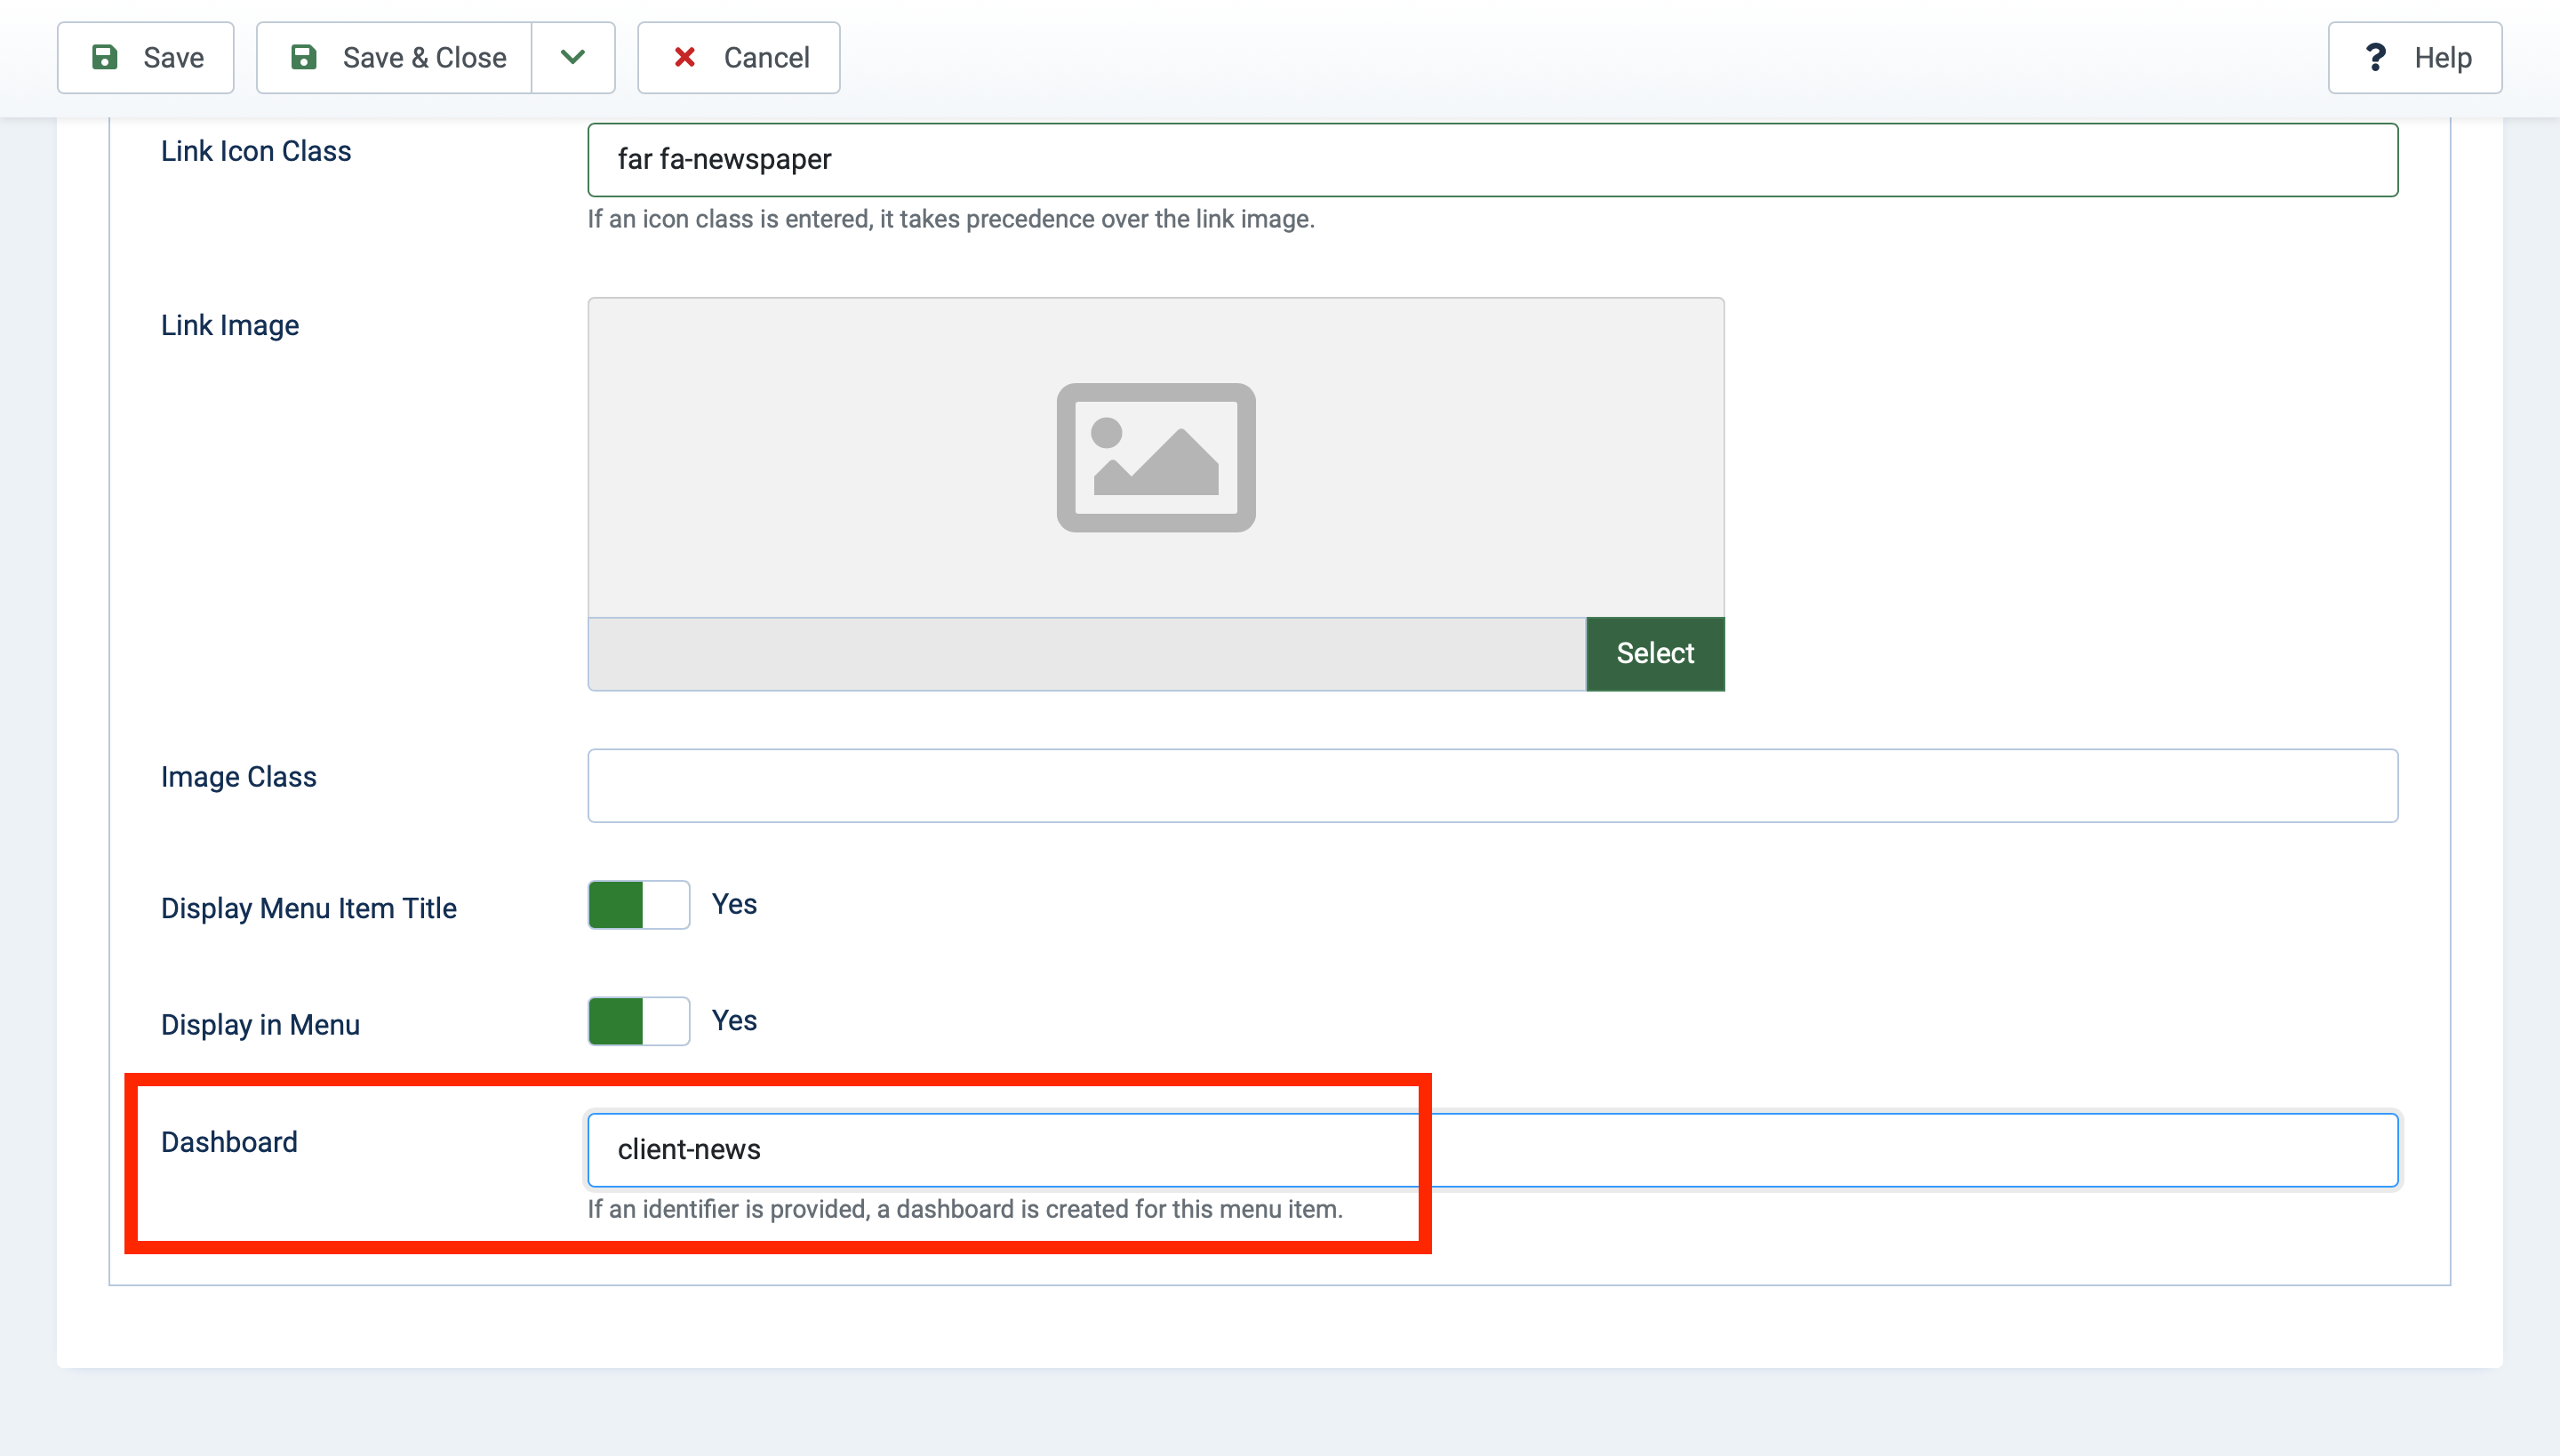
Scroll all the way down in the second tab, and find the field for Dashboard.
Aha! This is where the magic starts to happen. The help text here reads: If an identifier is provided, a dashboard is created for this menu item.
Select an identifier carefully—you don't want it to be the same as a component. It also must not have any spaces or special characters besides underscores or dashes. To be on the safe side, I prepend the identifier with "client-". So, in this case, let's use "client-news".
Save and close the menu item.
Add at least one nested menu item.
This is necessary, otherwise the menu heading won't show up. For my example, I'm going to "list all articles" in the "News" category. Make sure you select the menu heading we just created as the "Parent Item", like so:
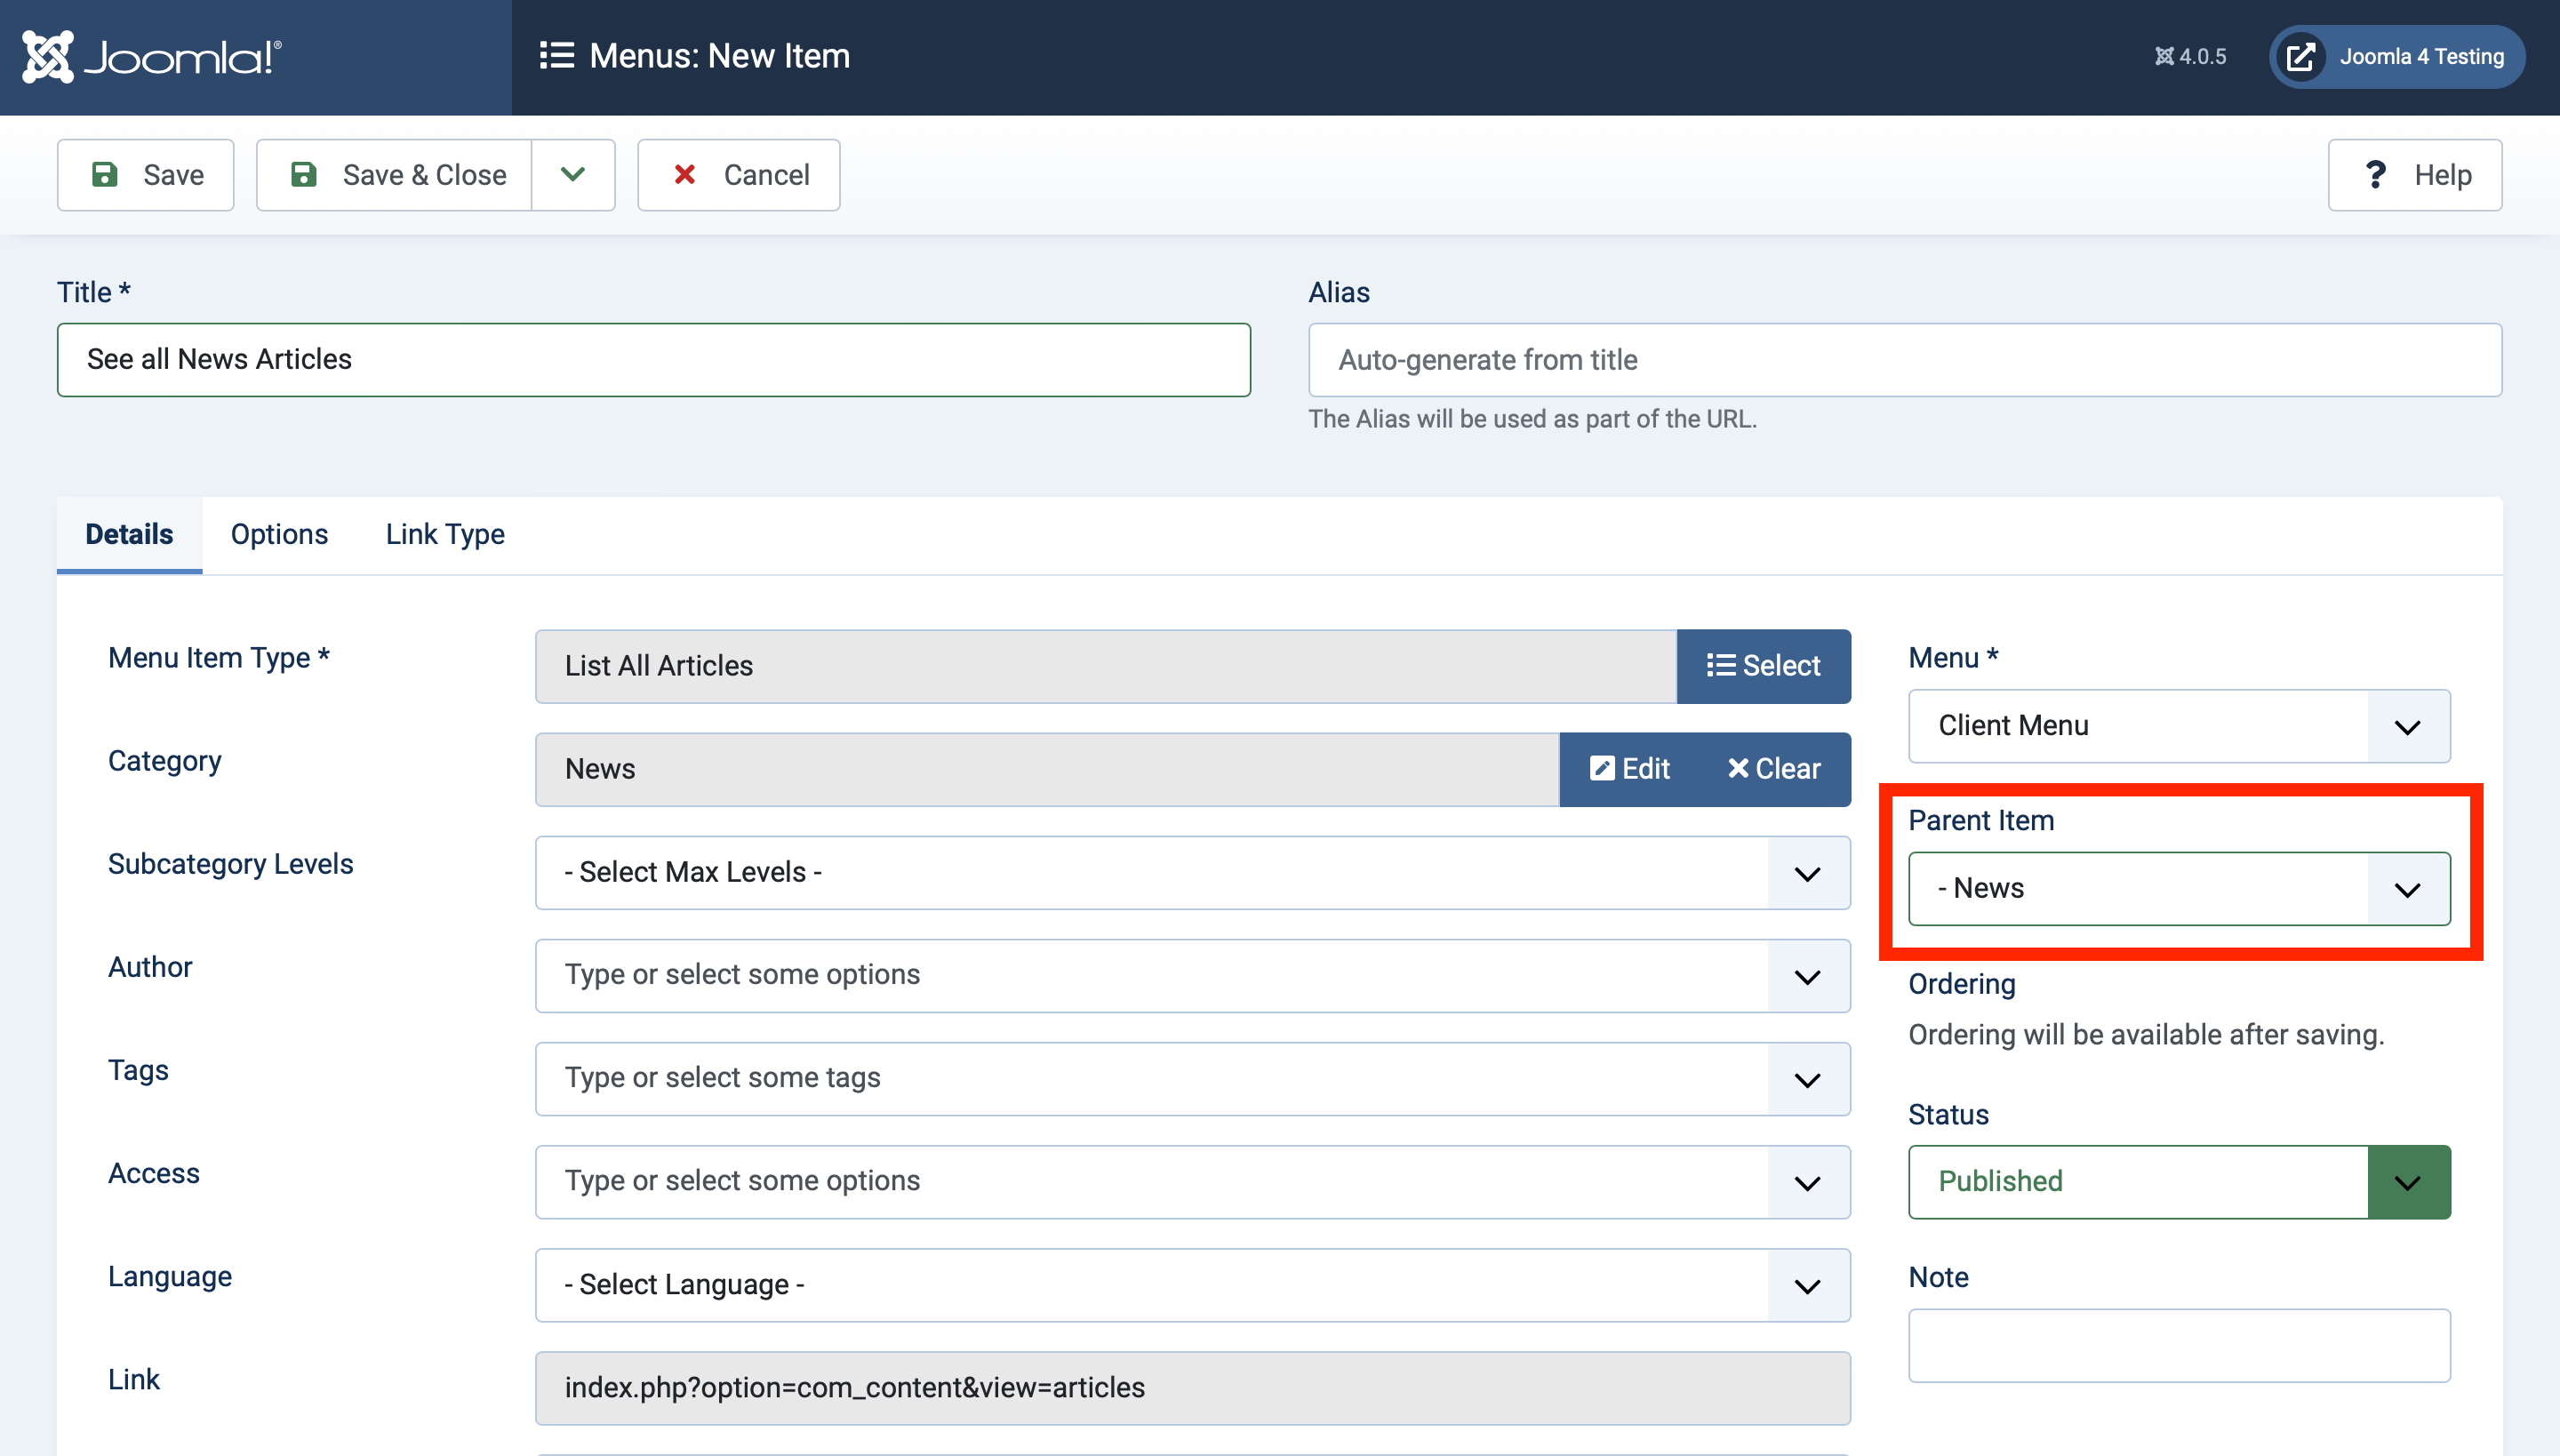
Save & close the menu item.
Now, if we log in with our test client, we'll see the following:
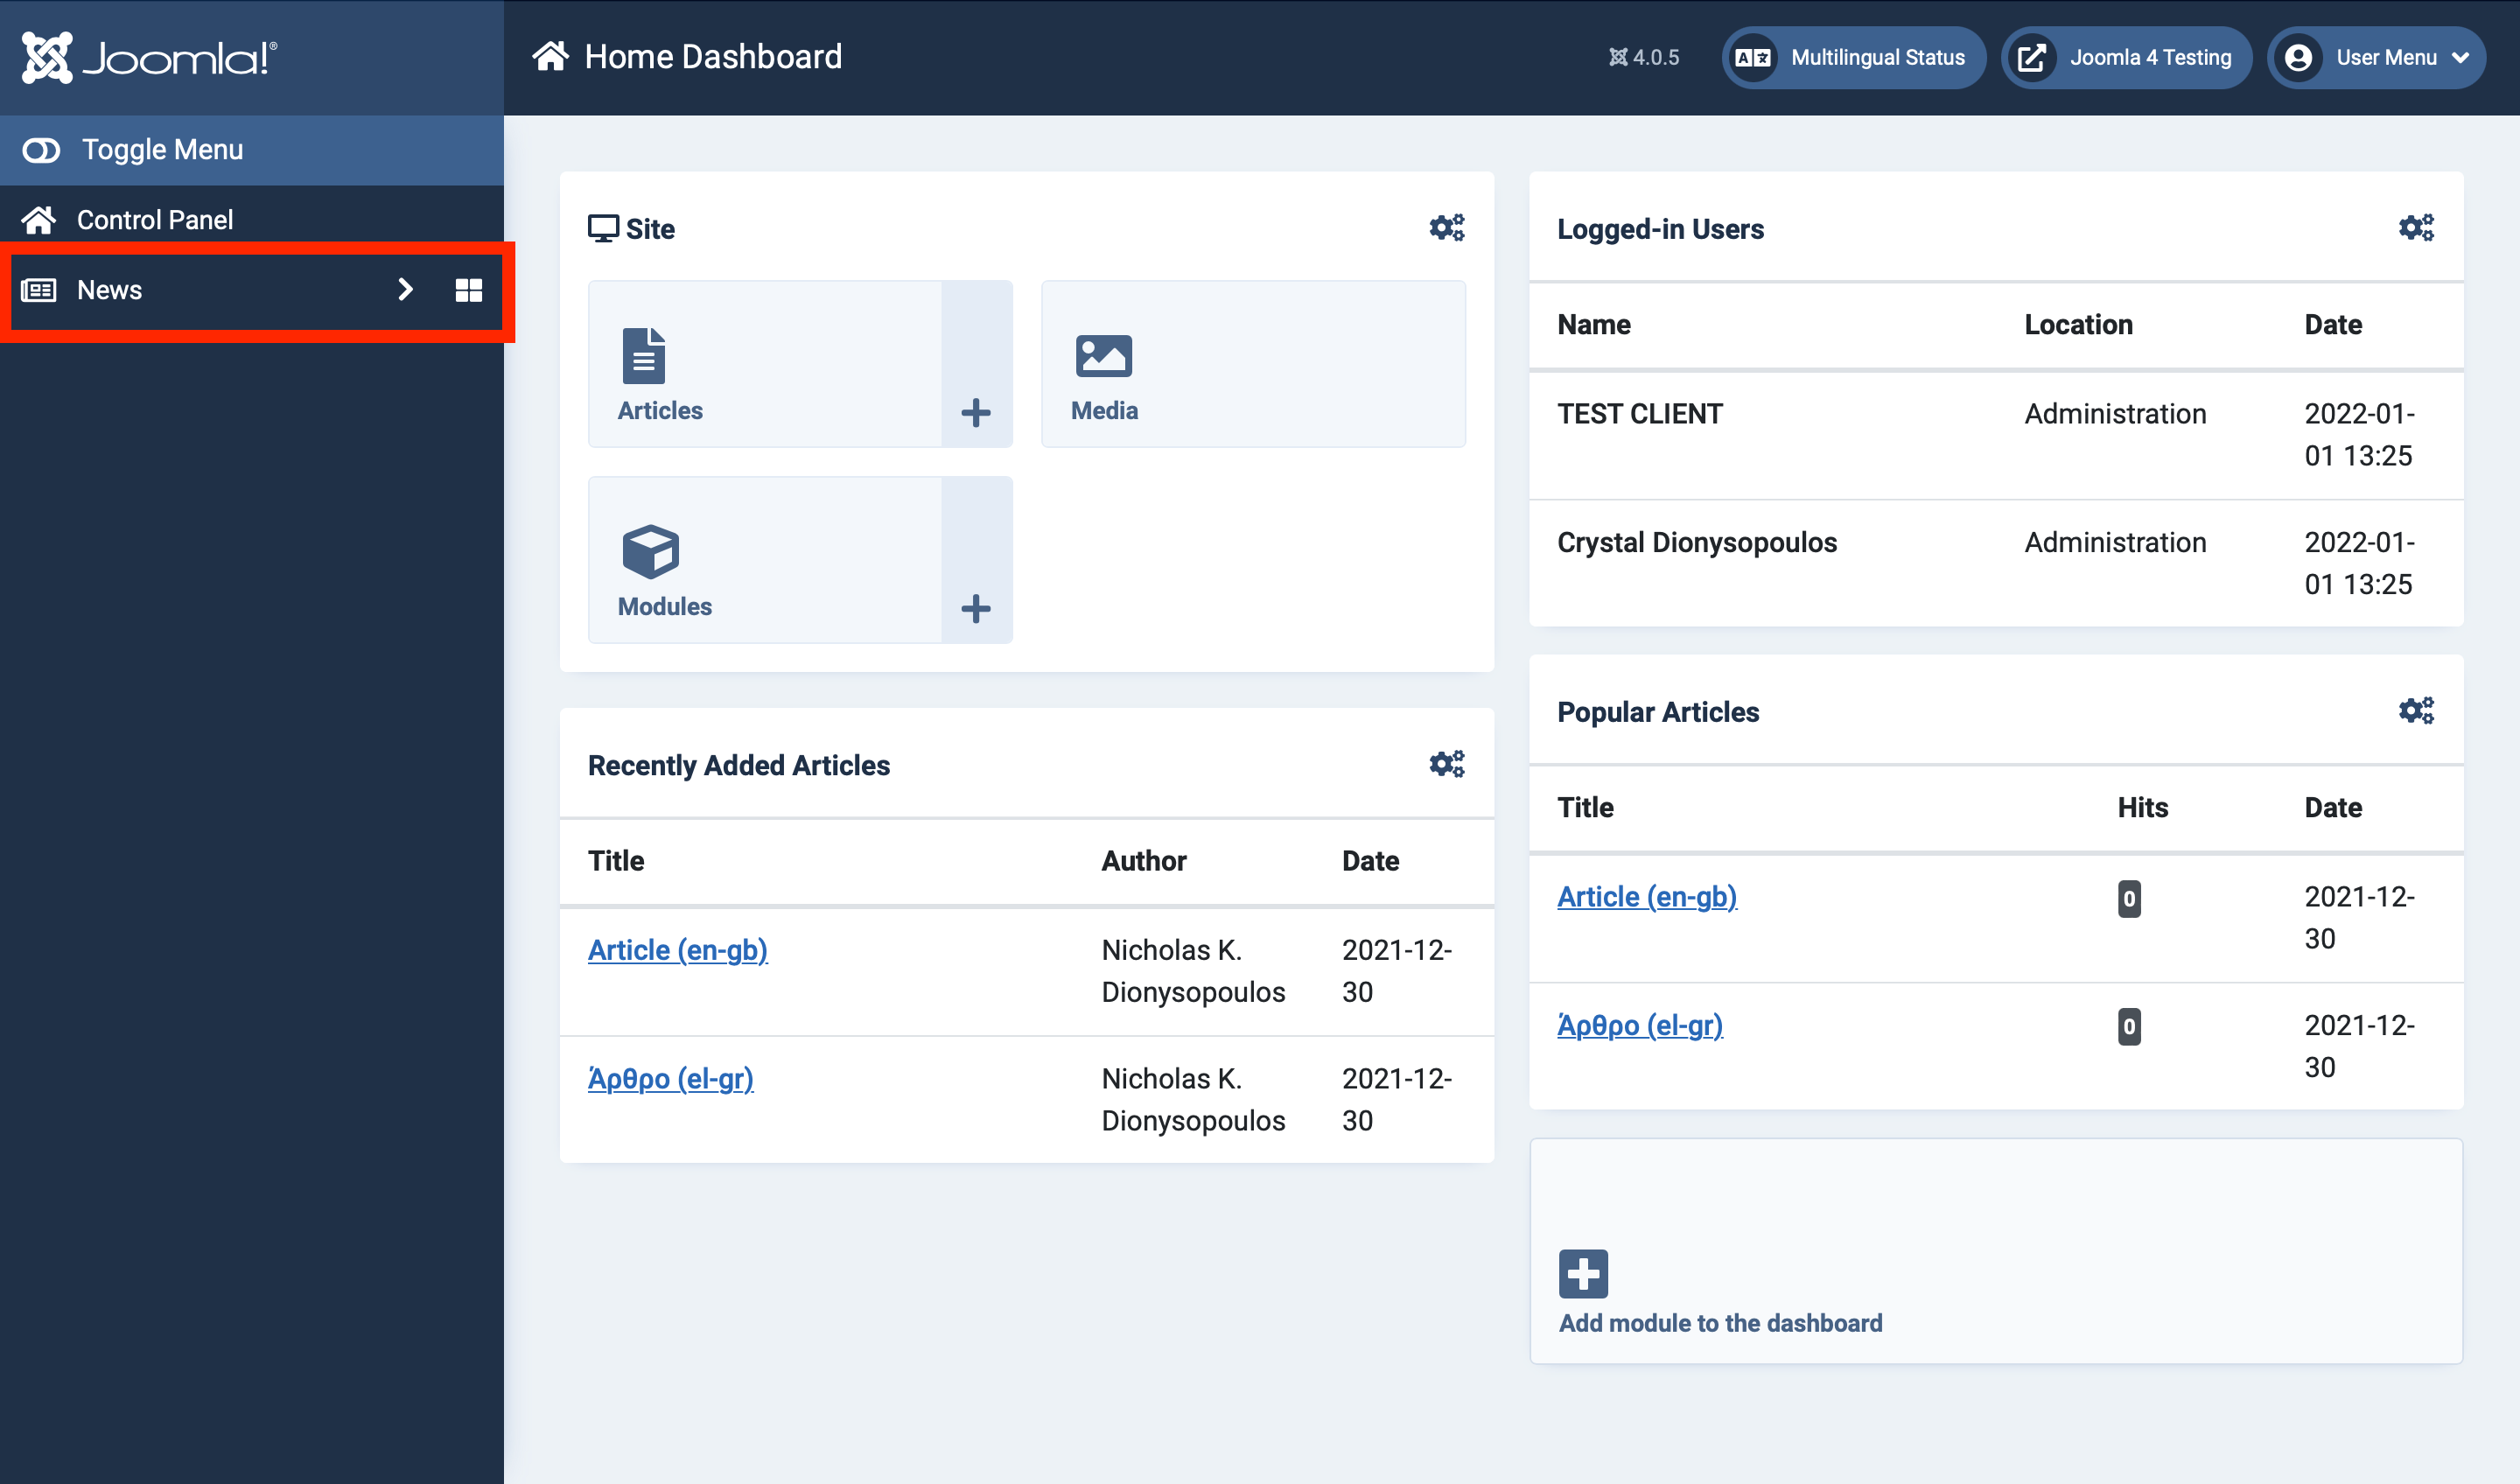
Yay!!! We did it!
If you click the dashboard icon, you'll see the following:

So, now we're free to add modules and make our custom dashboards, right?
Well...not quite. If you look closely at the top header, it's still showing the home icon and "Home Dashboard".
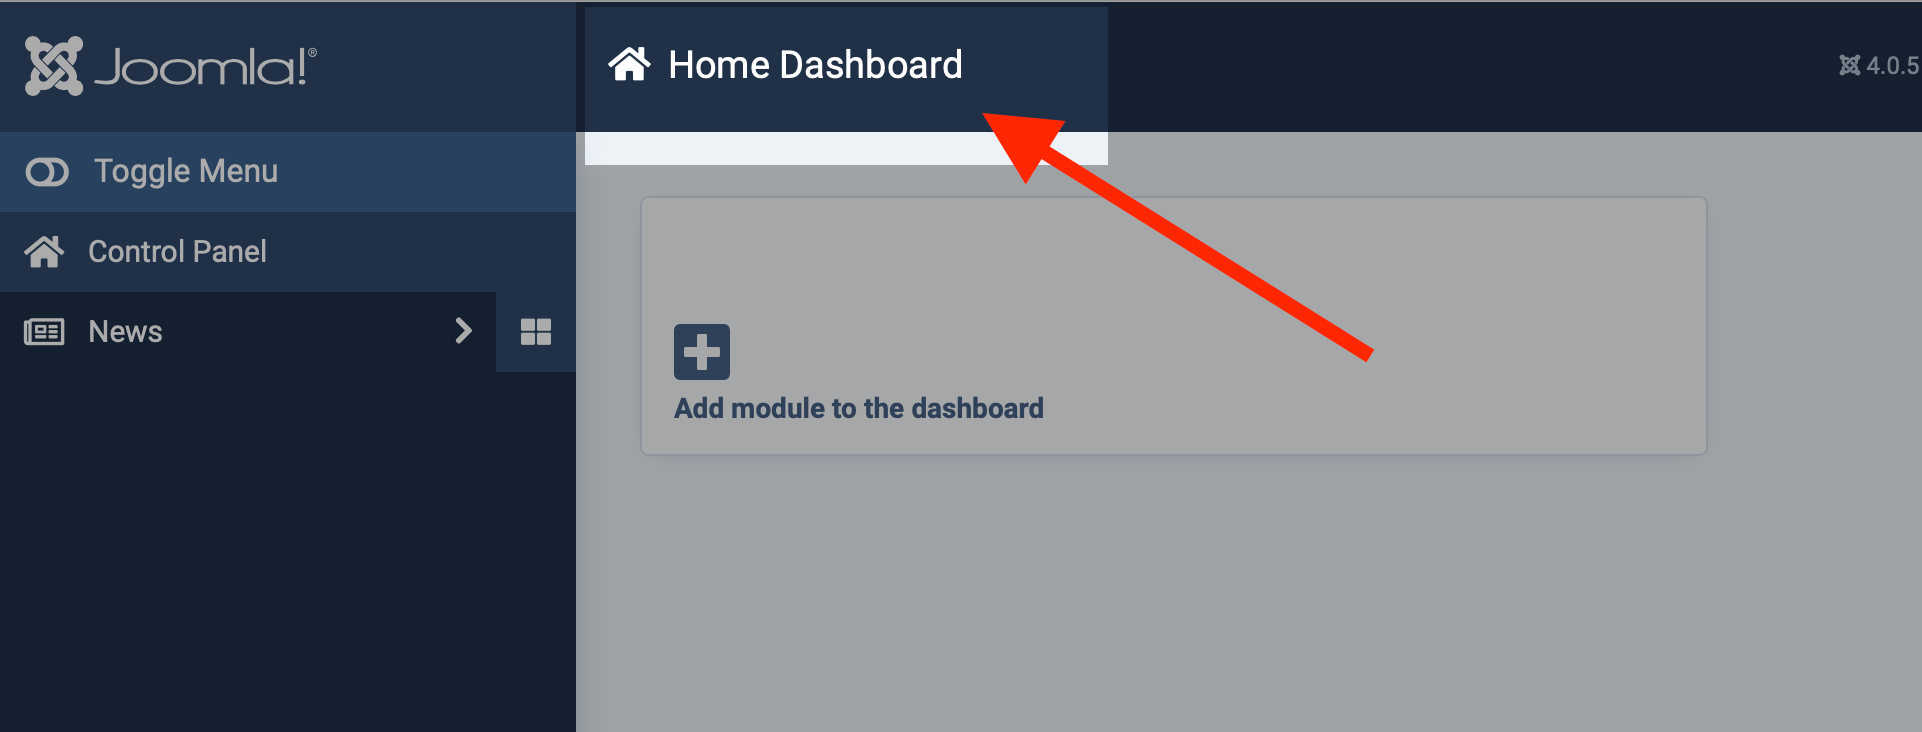
Not really a big deal, but if we're doing this, let's do it right.
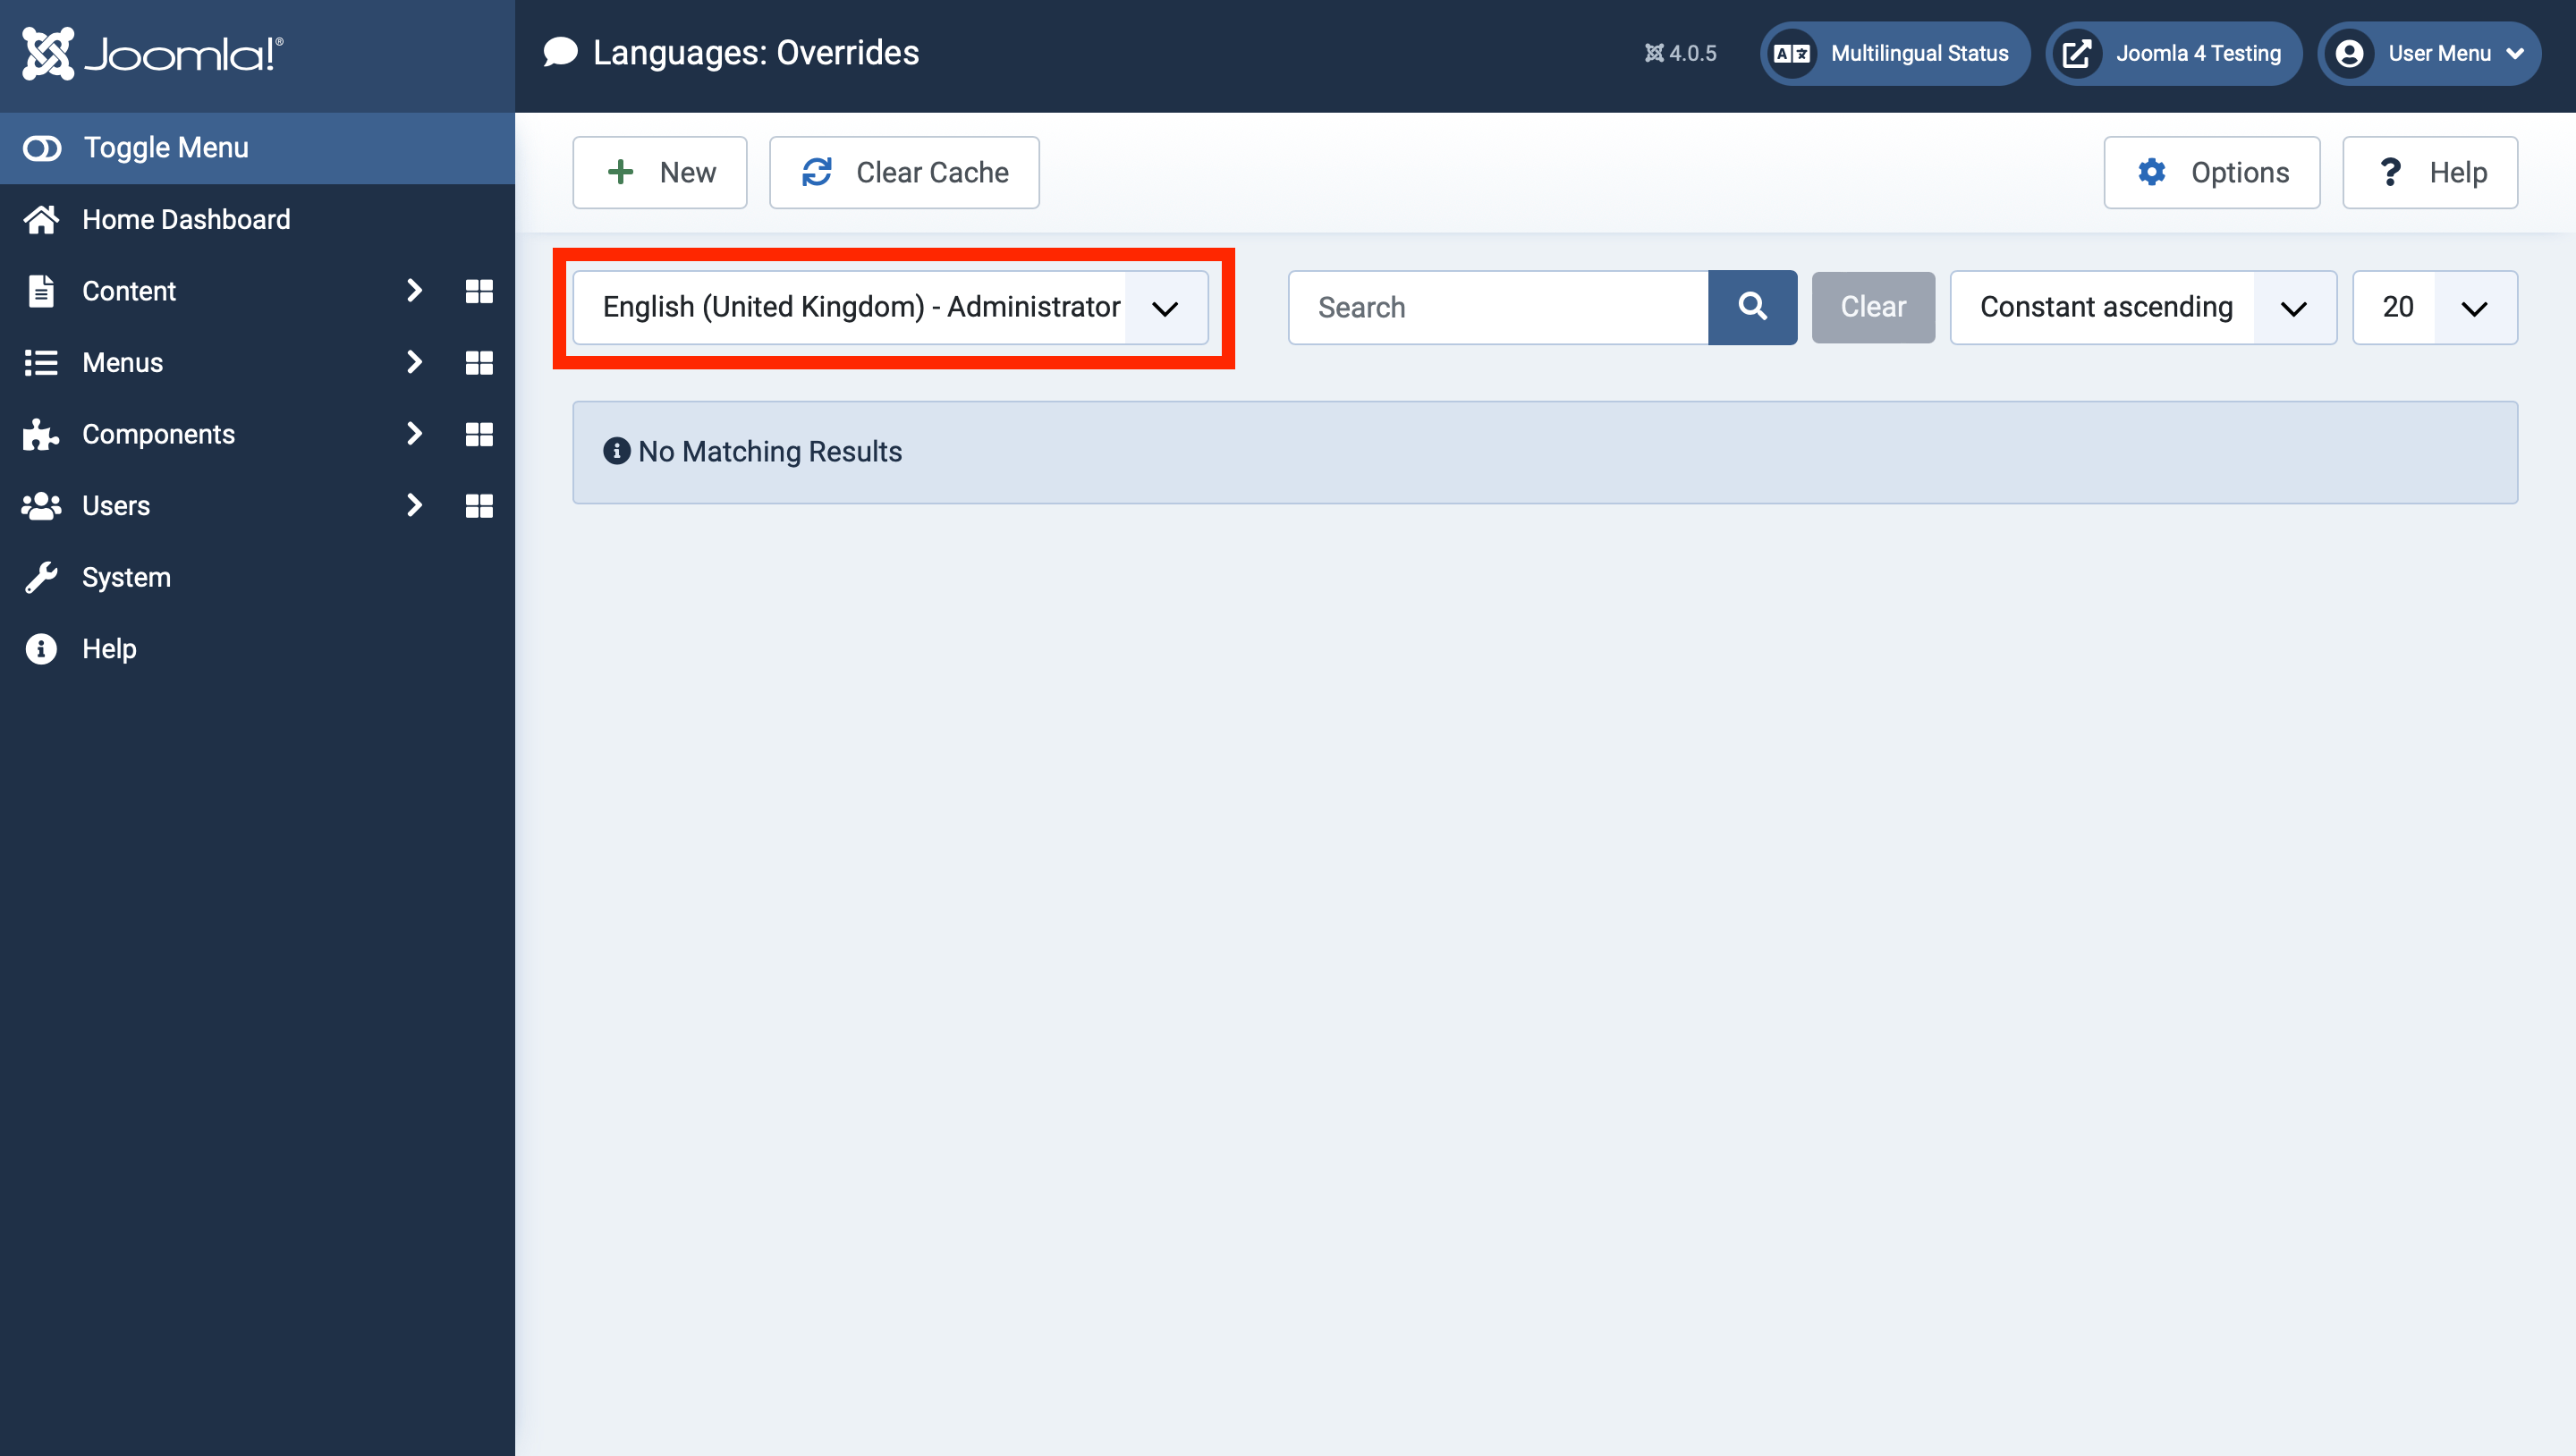
Back in your super user account, click on System, and then "Language Overrides".
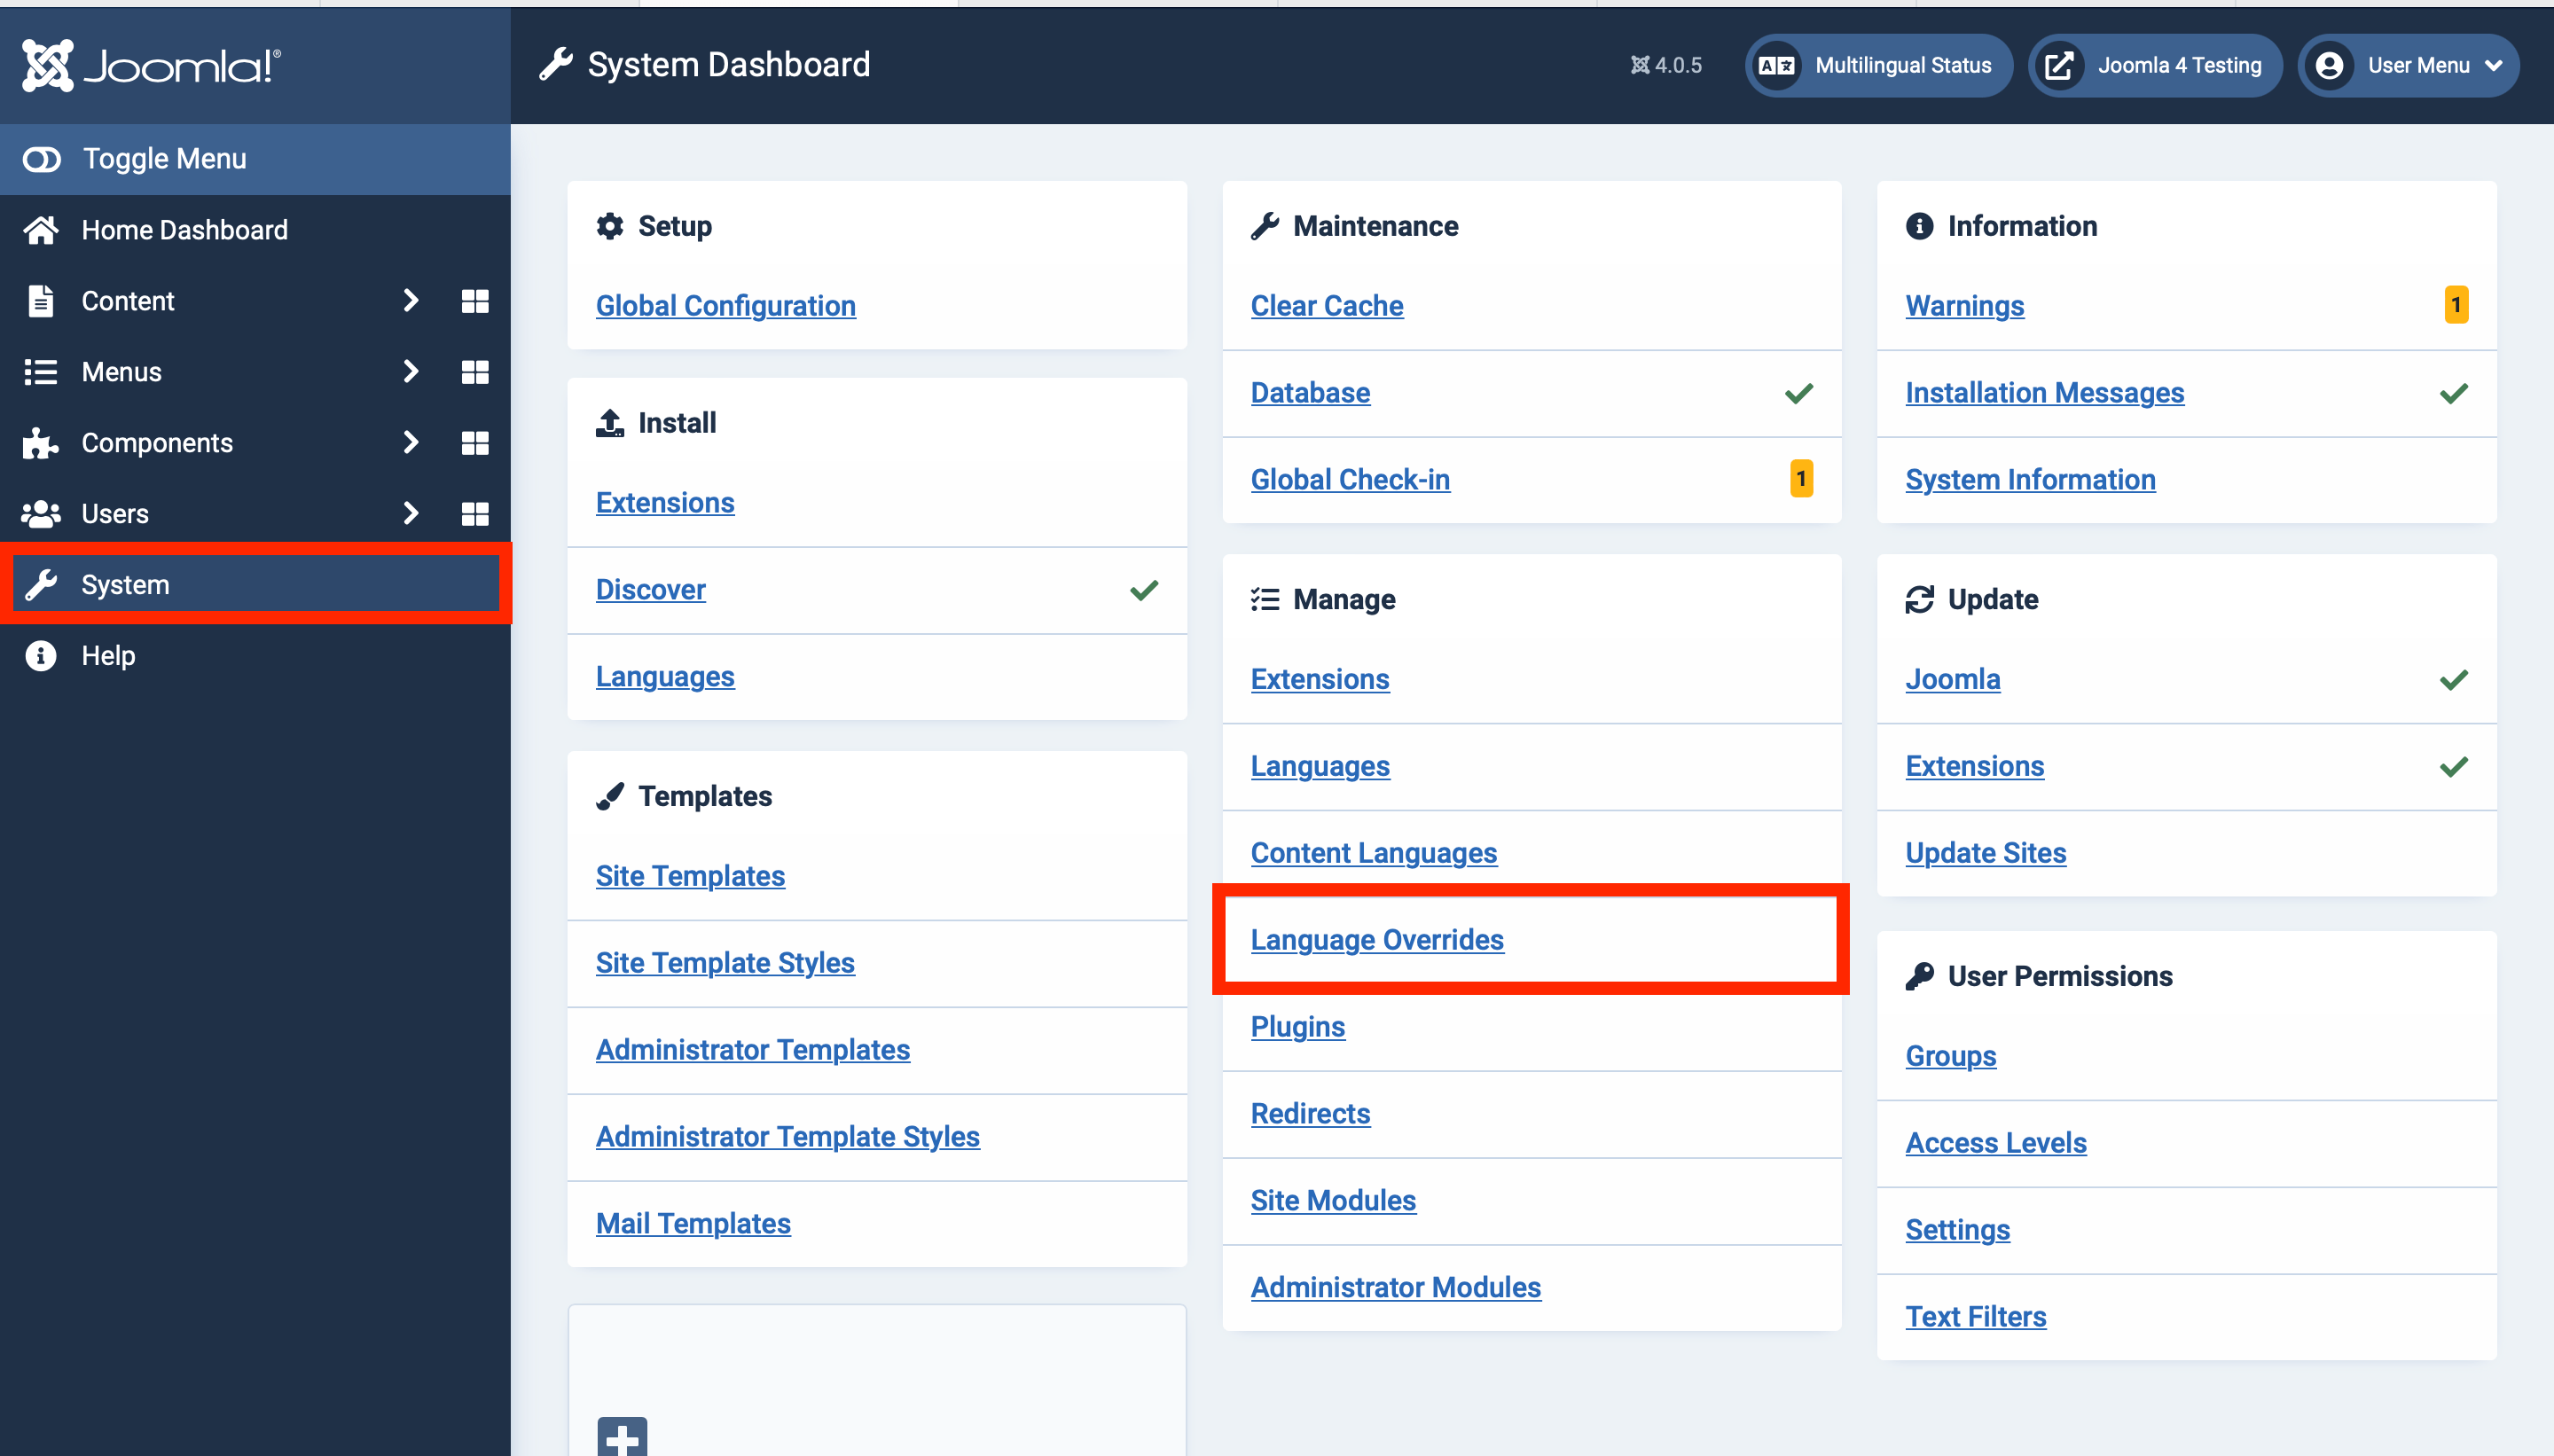
In the "Select Language & Client" dropdown, select "[DESIRED LANGUAGE] - Administrator".
In my case, I'm creating a dashboard in English, so I'll select "English (United Kingdom) - Administrator". Remember you'll need to do this for every language in which you want to provide custom dashboards.
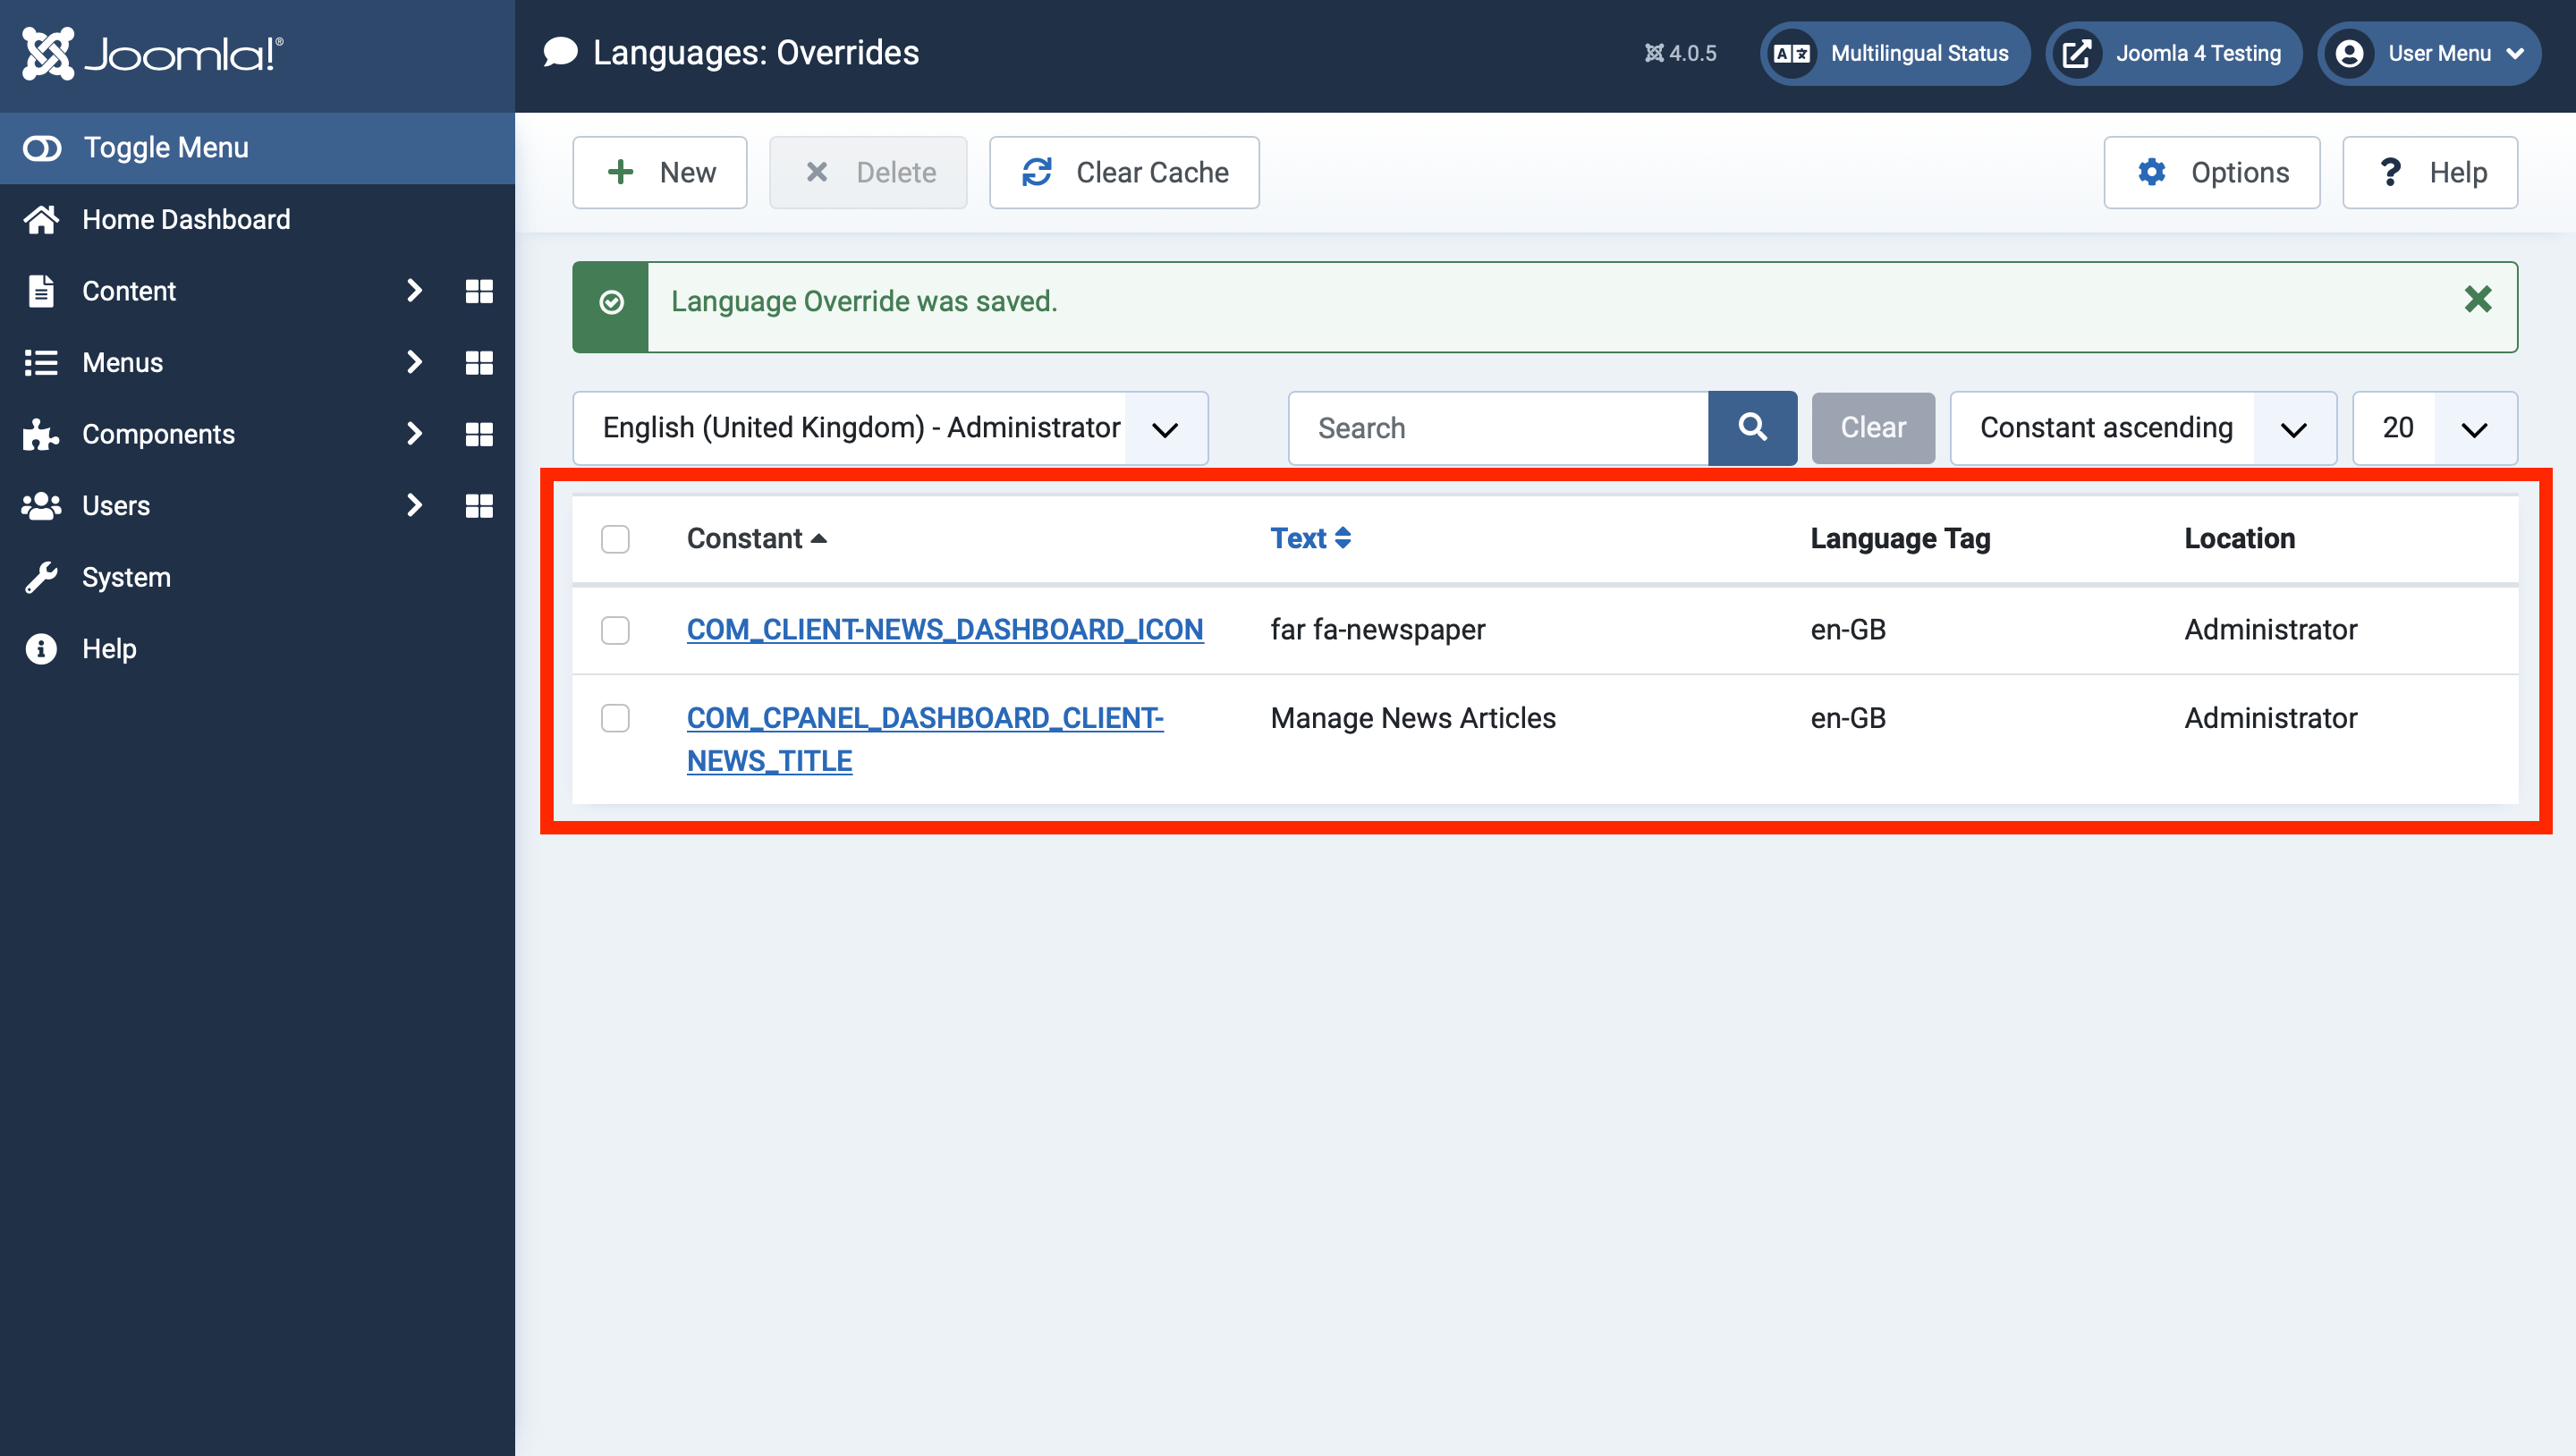
Click on "New" to create a new language override.
The icon and title are provided separately.
To define an icon, your language constant is:
COM_[IDENTIFIER]_DASHBOARD_ICON
Replace [IDENTIFIER] with the identifier we created above. In this case, I'm using the language constant COM_CLIENT-NEWS_DASHBOARD_ICON.
In "Text", put the Font Awesome classes of the icon you want to use. I want to use the same newspaper icon, so I'm using far fa-newspaper. Save and close.
To define the title, your language constant is:
COM_CPANEL_DASHBOARD_[IDENTIFIER]_TITLE
Like above, replace [IDENTIFIER] with the identifier we created. So, my language constant is COM_CPANEL_DASHBOARD_CLIENT-NEWS_TITLE.
In "Text", put the title you want to use. I'm using "Manage News Articles" for mine. Save and close.
Once you've added both of those, you should see something like this:
Let's head over to our test client account to see what shows up now...

Yay! We did it!
Now let's add some modules to our new dashboard.
You do not want to do this from the test client account, because want to create modules that our clients can't edit accidentally. So let's switch back to our Super User account.
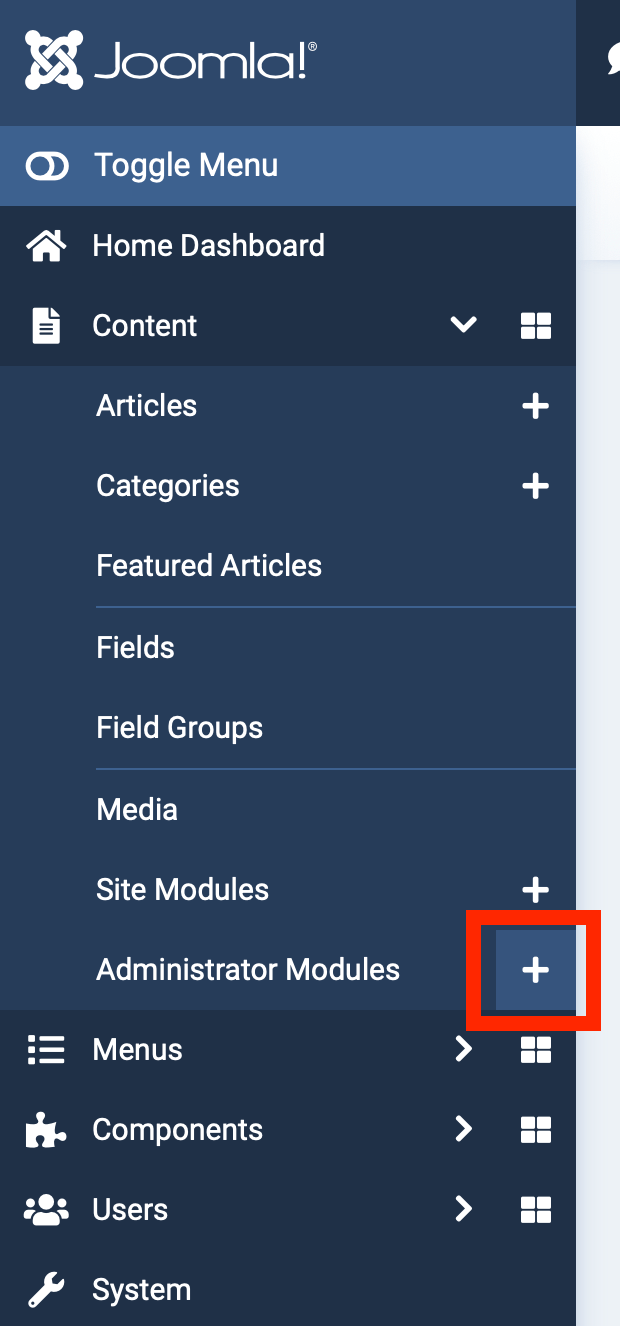
Click "Content" in the menu, and then select the plus icon next to "Administrator Modules" to add a new module.
Select a module type. For this example, I'm creating a custom HTML module.
Configure the module the way you want. Make sure it's position cpanel-[identifier].
You'll have to type the position manually, and then hit 'enter' to add it. For this example, the position is cpanel-client-news.
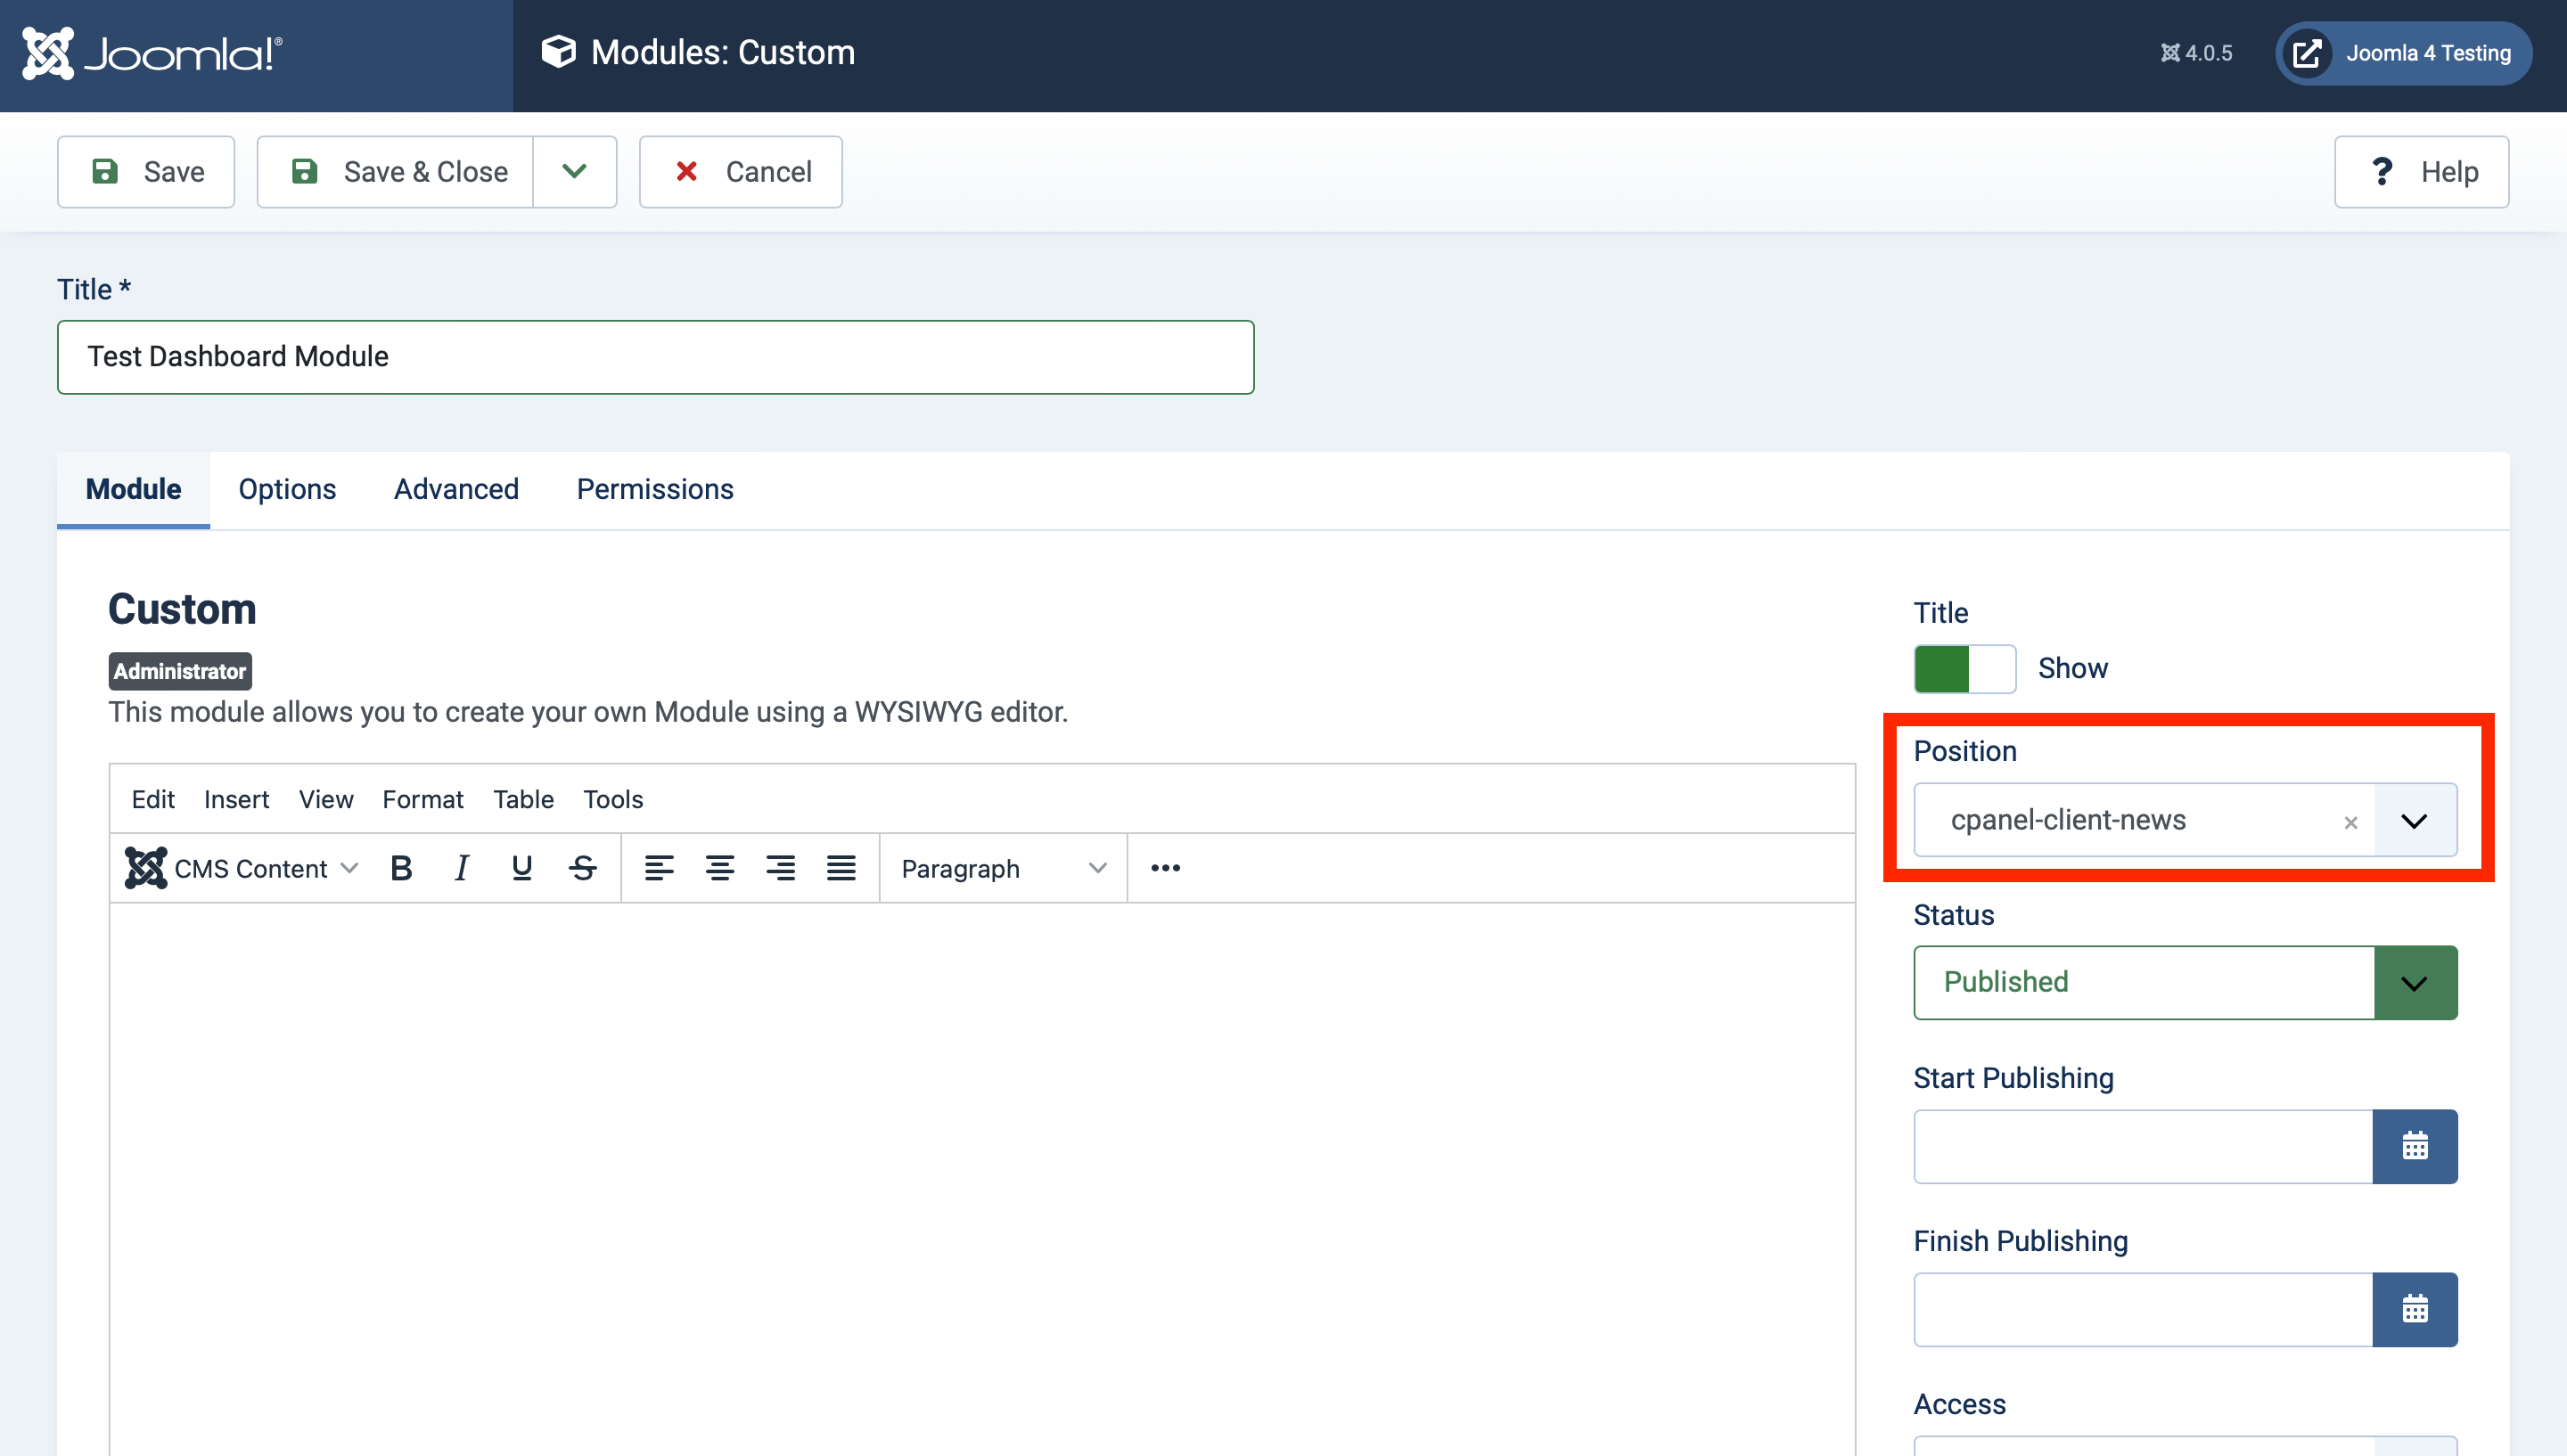
Save the module. Do not save and close.
After saving, go to the "Permissions" tab, and click on "Client".
You'll want to double check that they can't edit or unpublish the module. (If they have permission to edit front end modules, they will also have permission to edit back end modules.)
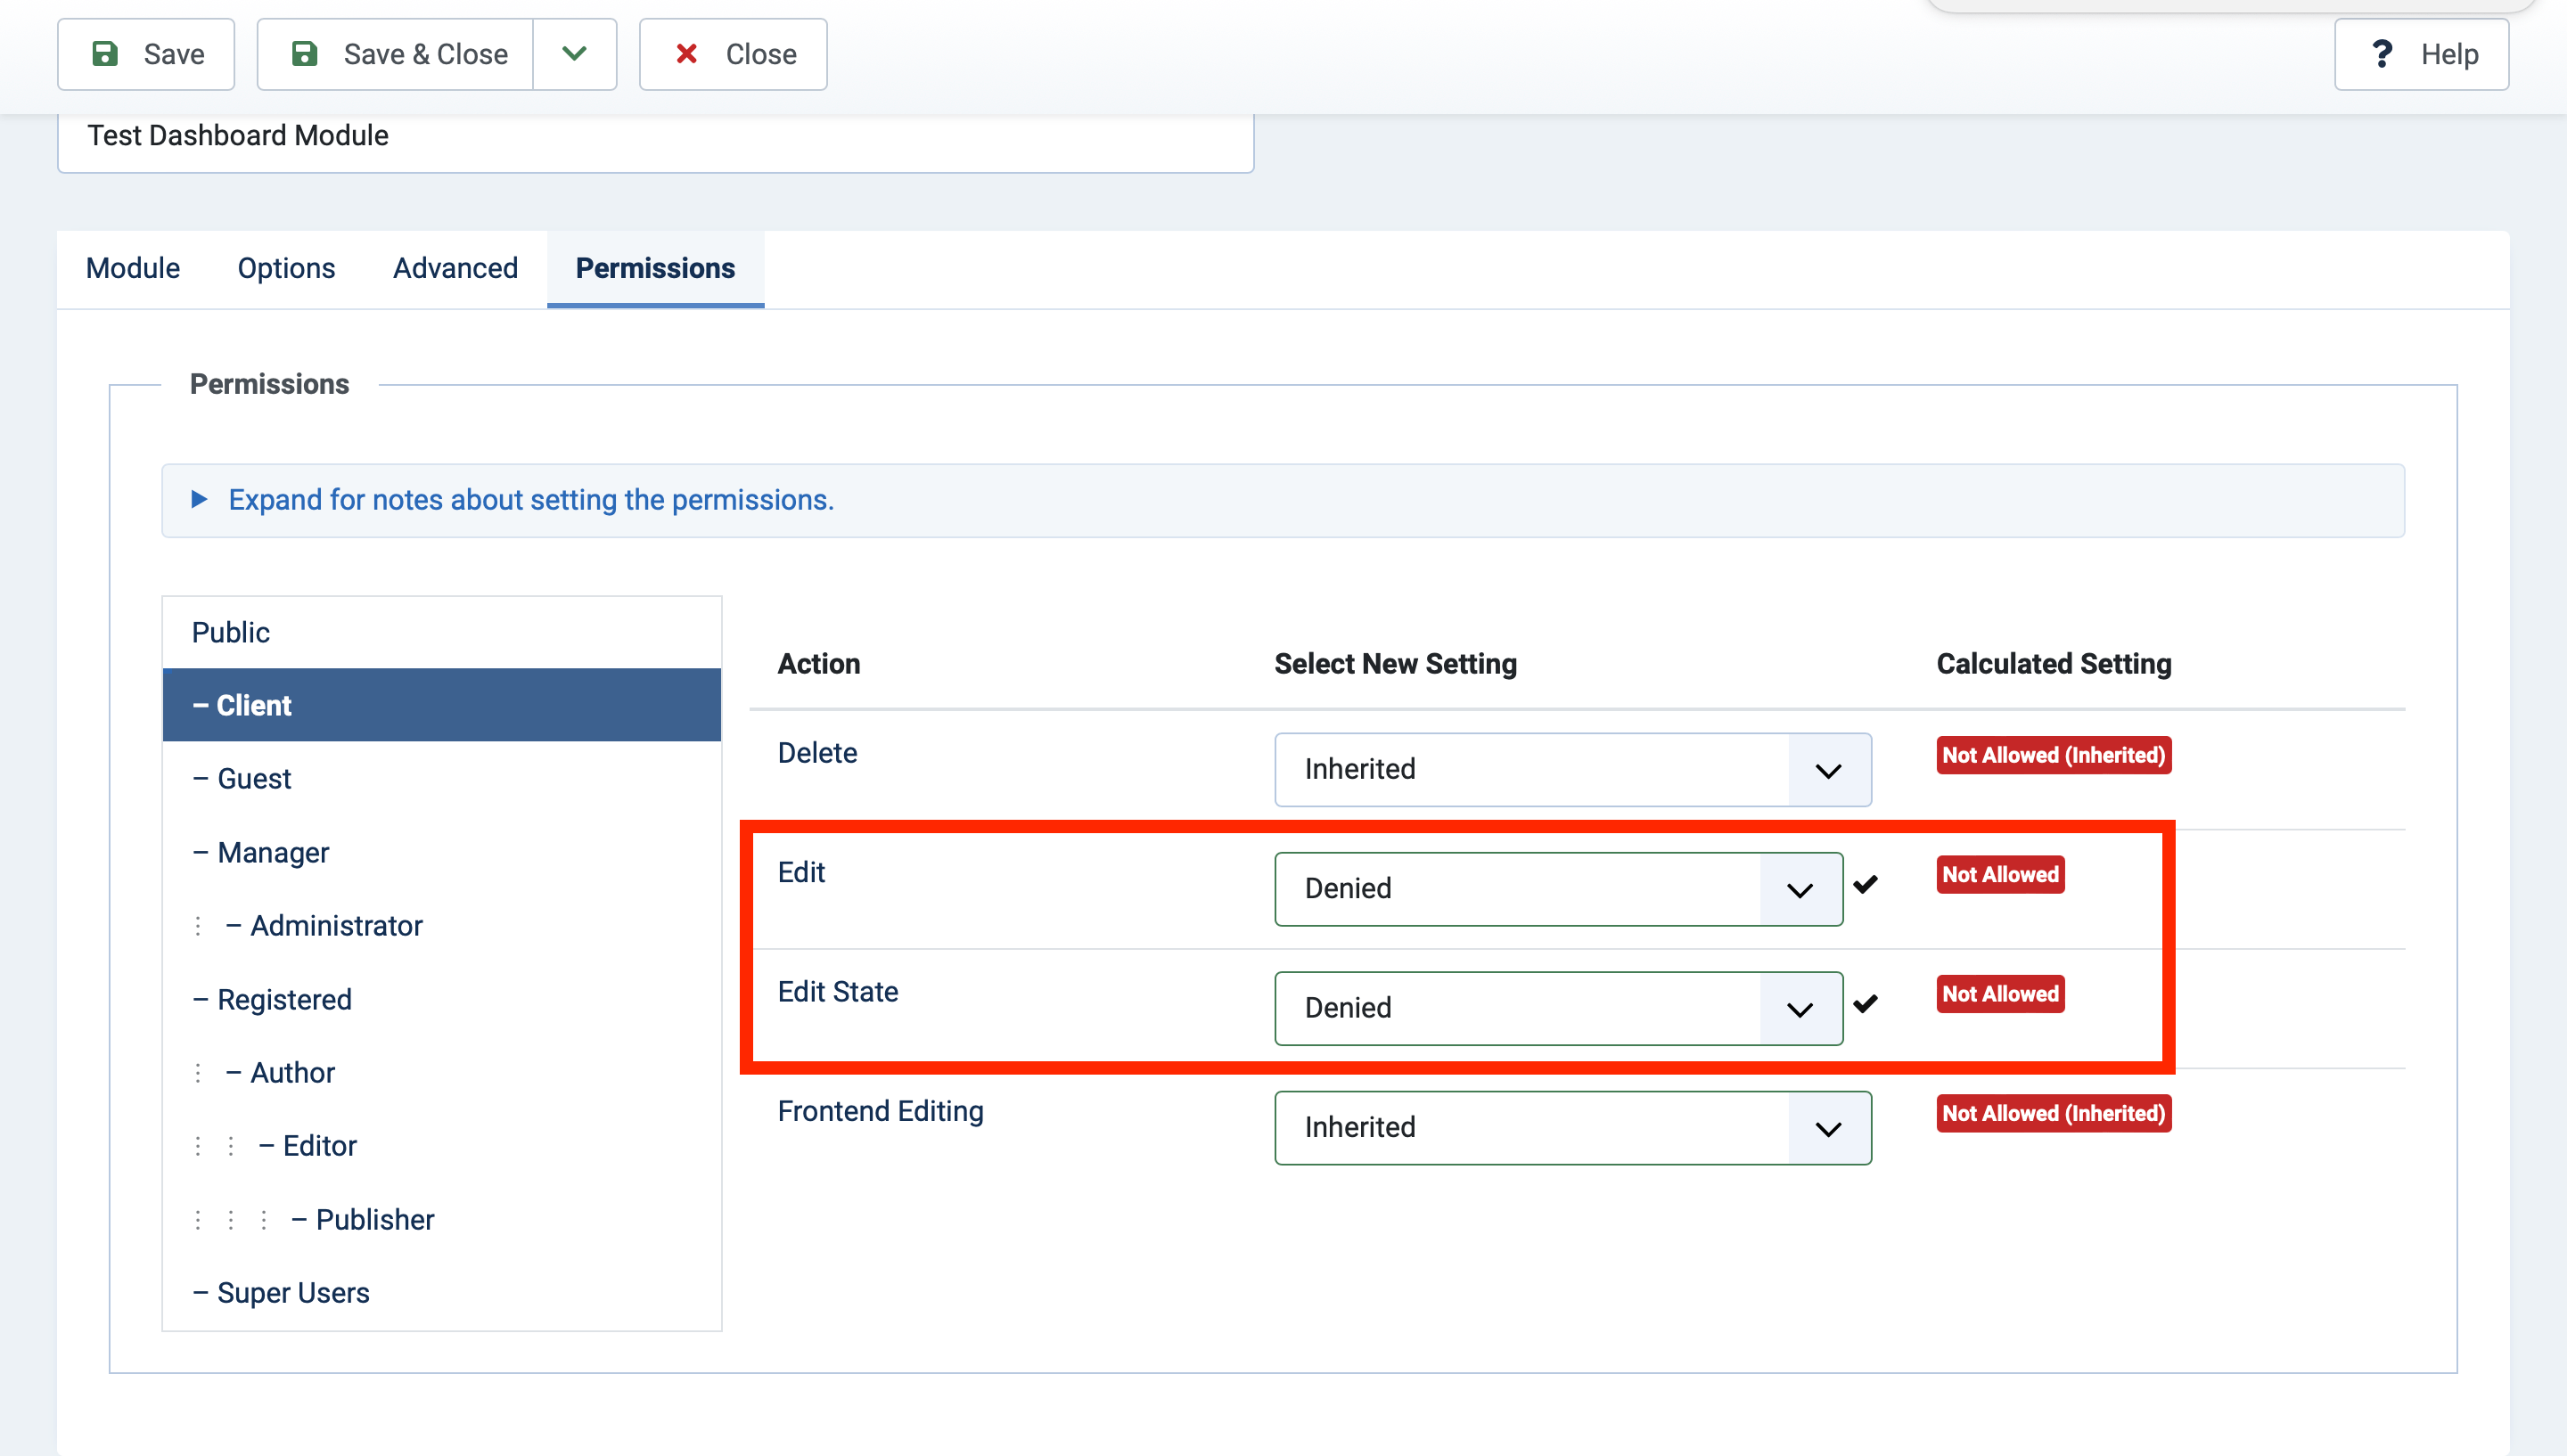
Save and close.
Let's head back to our test client login, and see what shows up now...
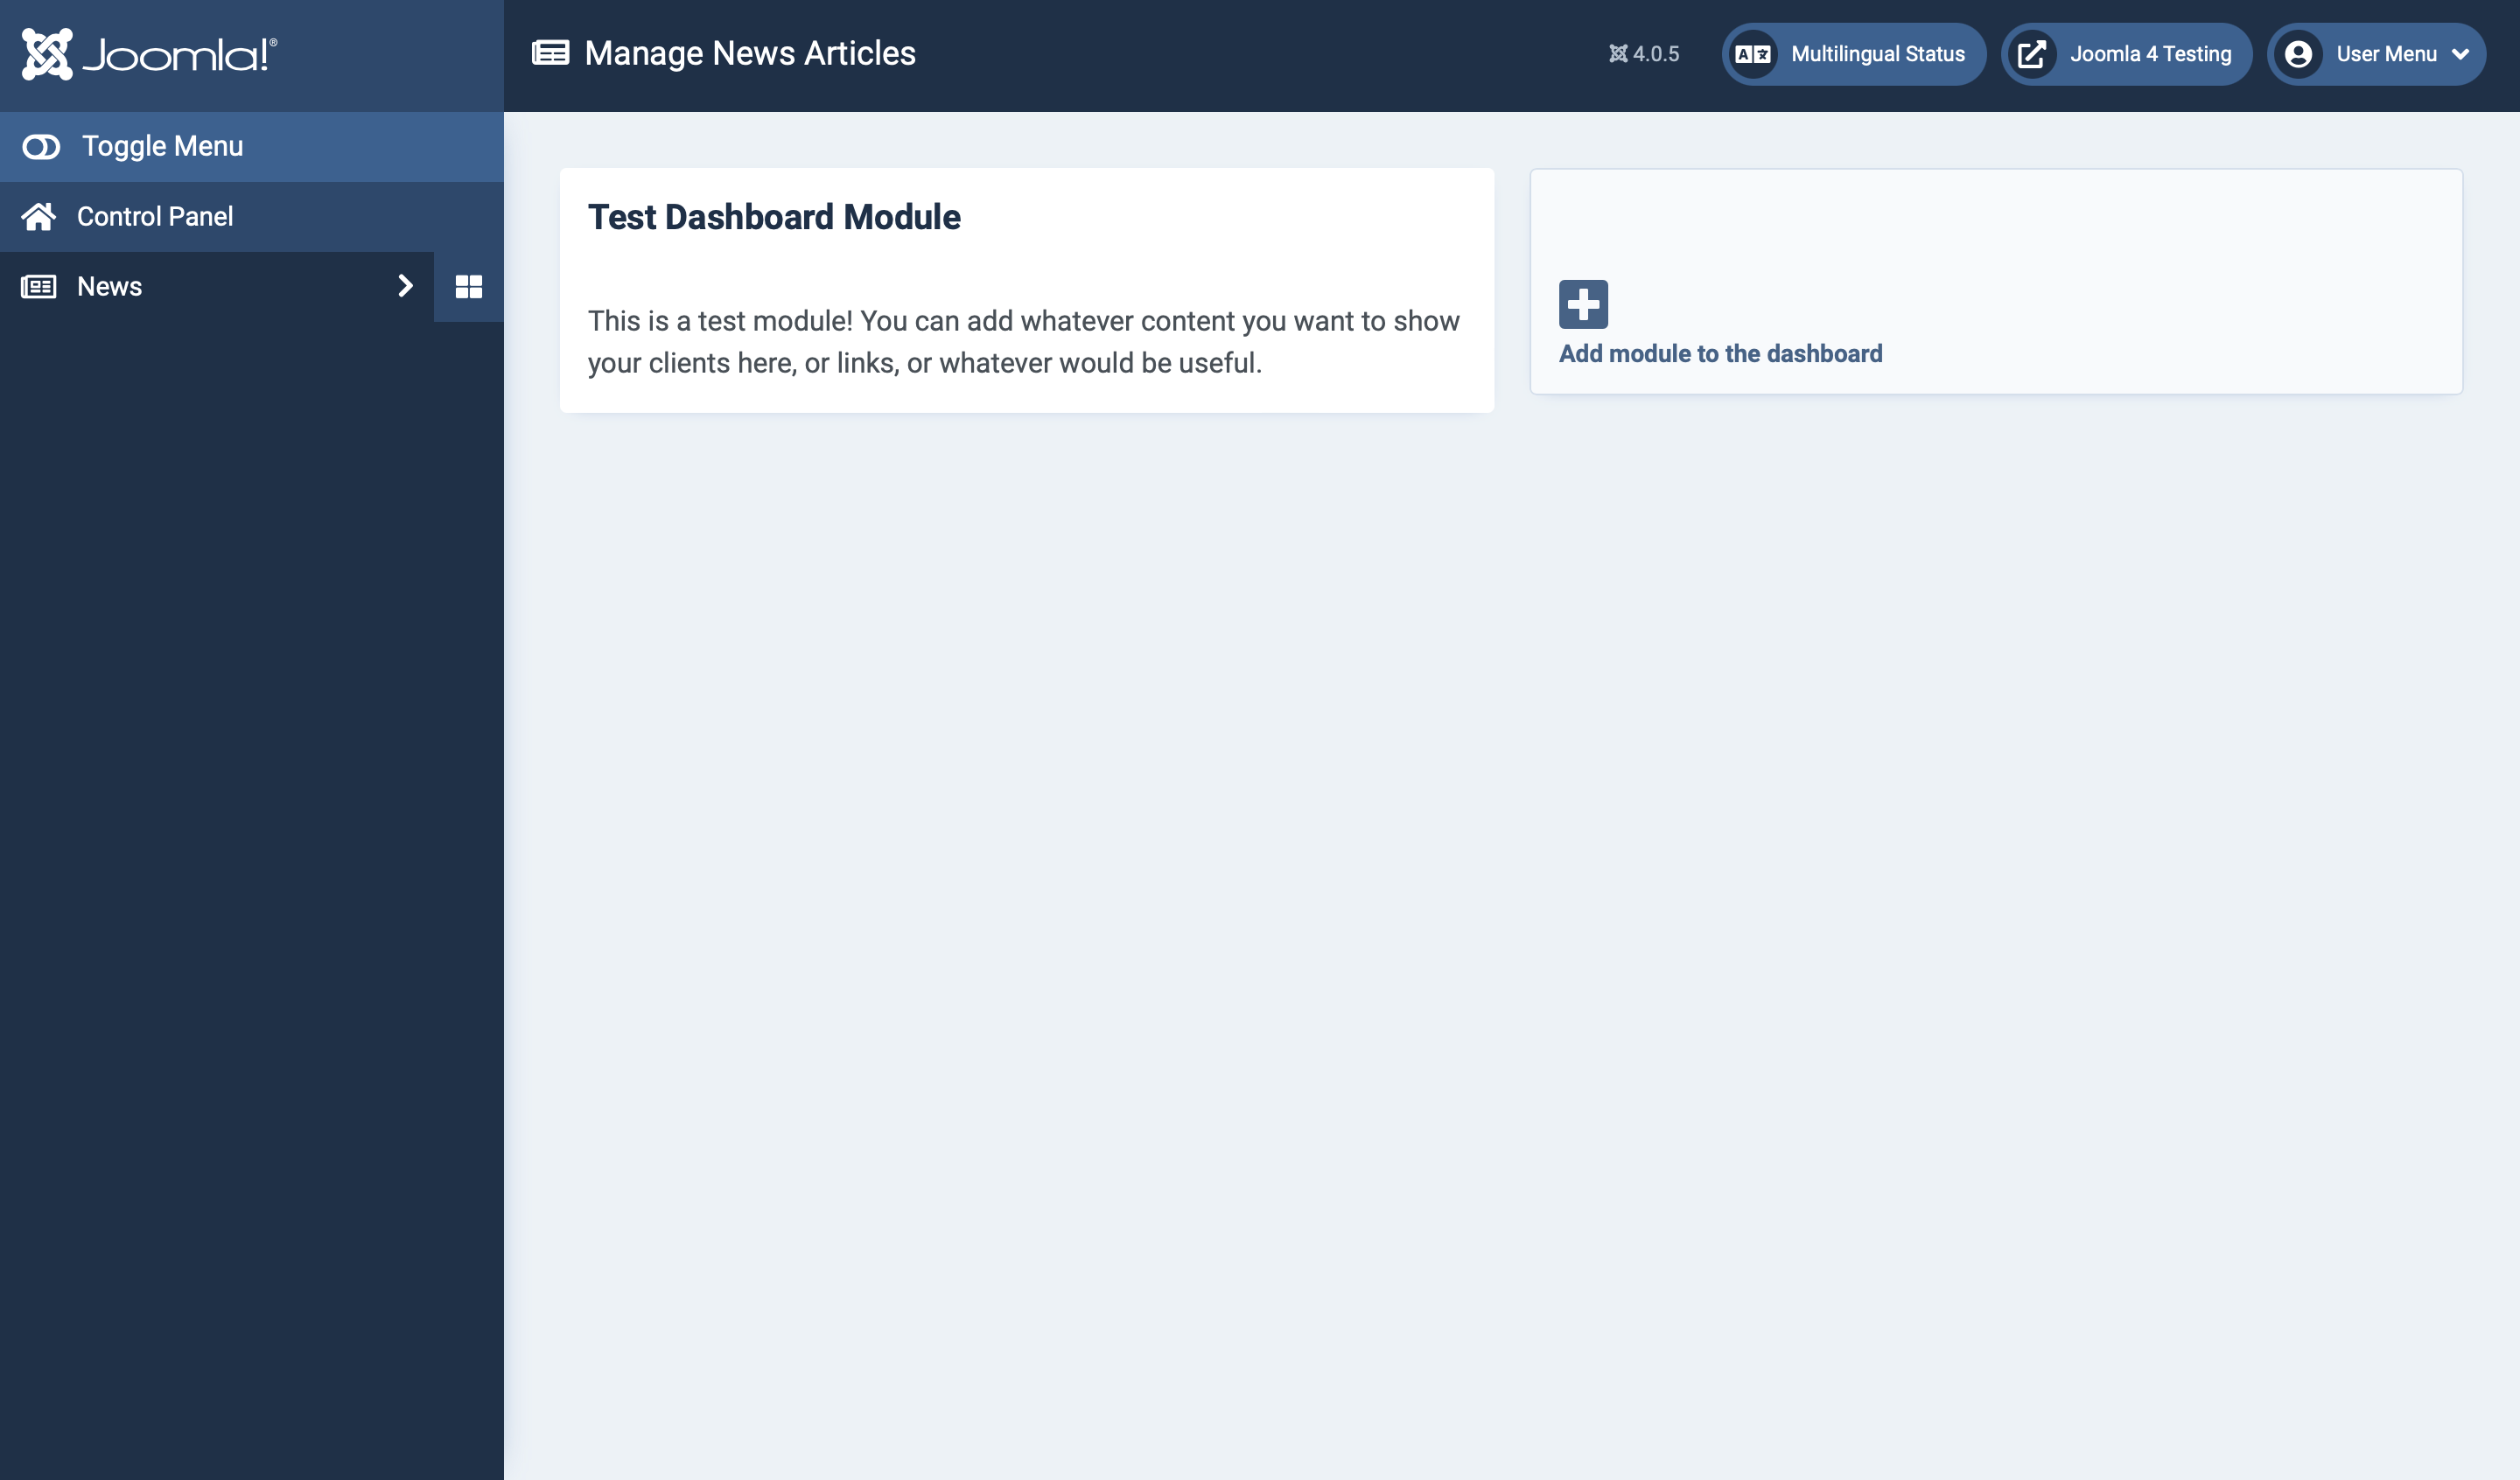
Beautiful!!
You can repeat the steps above as necessary to add any other modules to this dashboard, add more dashboards, and customize the admin experience the way your clients need.
